FPT AI Factory Hands-on: A Guide to Deploying GPU Notebooks and Experimenting with AI Models
FPT AI Factory Hands-on: A Guide to Deploying GPU Notebooks and Experimenting with AI Models
Table of Contents
Jupyter Notebook is a browser-based interface that allows users to interact directly with code and data through a user-friendly web UI. It is commonly used in AI tasks such as data exploration, feature extraction, model building, and experimentation.
This guide provides a quick walkthrough for deploying GPU Notebooks on FPT AI Factory—from infrastructure setup to accessing and running AI notebooks for tasks like data analysis, feature engineering, model training, and inference.
I. Service Requirements
To deploy a GPU Notebook on FPT AI Factory, users need to:
- Register an account at https://id.fptcloud.com
- Contact the sales team to subscribe to the FPT AI Factory – AI Infrastructure service.
Once registered, the technical team will provision the necessary resources for service access.
II. Setting Up and Accessing the GPU Notebook
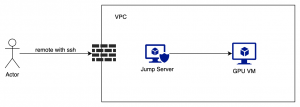
The environment setup involves two virtual machines within the same VPC:
- Jump Server: acts as an SSH gateway for external access.
- GPU VM: the main virtual machine for running the notebook and handling AI workloads.

Step 1: Create GPU VM
Create a GPU VM with H100 configuration using the recommended template (16 CPUs, 192 GB RAM, 80 GB GPU RAM).
Reference: https://fptcloud.com/en/documents/gpu-virtual-machine-en/?doc=quick-start
Network configuration: assign a public IP, open notebook ports, and configure access permissions via Security Group.
Step 2: Environment Setup
Update the system and install the GPU driver:
sudo apt update && sudo apt upgrade -y

sudo apt install -y nvidia-driver-565

nvidia-smi  # kiểm tra trạng thái GPU
Install Docker following the official guide:
https://docs.docker.com/engine/install/ubuntu/
Install NVIDIA Container Toolkit:
https://docs.nvidia.com/datacenter/cloud-native/container-toolkit/latest/install-guide.html
Step 3: Launch Jupyter Notebook Container
image="quay.io/jupyter/tensorflow-notebook:cuda-python-3.11"

docker run -p 8888:8888 \

  -v ~/work:/home/jovyan/work \

  --detach \

  --name notebook \

  --gpus all \

$image
Step 4: Retrieve Access Token
docker ps            # lấy container ID

docker logs -f <ID>  # tìm token trong log
Step 5: Access Notebook via SSH Tunnel
Open a browser and go to http://localhost:13888 using the token retrieved in Step 4.
ssh -L 13888:127.0.0.1:8888 -J <user_jump>@<jump_ip> <user_vm>@<vm_ip>
III. Running Basic Notebooks
After successfully accessing Jupyter Notebook, users can run notebooks to validate the setup:
1. Check GPU with TensorFlow
import tensorflow as tf

tf.config.list_physical_devices()
2. Directly test GPU driver
- Run mnist-example notebook
3. Try Stable Diffusion (Optional)
https://github.com/nebuly-ai/learning-hub/blob/main/notebooks/notebooks/stable-diffusion.ipynb
Conclusion
This guide outlines a step-by-step process for deploying a GPU Notebook environment on FPT Smart Cloud’s AI Factory infrastructure. It enables users to easily spin up virtual machines, configure the environment, and run basic AI models such as TensorFlow or GPU-based inference.
The deployment model using a Jump Server ensures secure external access while offering flexibility for scaling and experimenting with more advanced AI workloads. This platform is ideal for research teams, product development, or enterprises aiming to rapidly prototype and test AI models without upfront hardware investment.


