- About Us
-
 Secure, unlimited storage to ensures efficiency as well as high and continuous data access demand.
 Virtual server integration for 3D Rendering, AI or ML
 Enhance application capacity and availability.
 Access to an all-inclusive stack for AI development, driven by NVIDIA’s powerful technology!
 FPT Web Application Firewall provides powerful protection for web applications
 Advanced virtual server with rapid scalability
 Backup and restore data instantly, securely and maintain data integrity.
Advanced virtual server with rapid scalability
Access to an all-inclusive stack for AI development, driven by NVIDIA’s powerful technology!
Enhance application capacity and availability.
Backup and restore data instantly, securely and maintain data integrity.
Recovery, ensuring quick operation for the business after all incidents and disasters.
Backup and restore data instantly, securely and maintain data integrity.
Advanced virtual server with rapid scalability
Access to an all-inclusive stack for AI development, driven by NVIDIA’s powerful technology!
Enhance application capacity and availability.
Backup and restore data instantly, securely and maintain data integrity.
Recovery, ensuring quick operation for the business after all incidents and disasters.
 Diverse throughput and capacity to meet various business workloads.
Secure, unlimited storage to ensures efficiency as well as high and continuous data access demand.
FPT Web Application Firewall provides powerful protection for web applications
Intelligent and Comprehensive Virtual Web Application Firewall - Security Collaboration between FPT Cloud and Penta Security.
The Next generation firewall security service
Easily store, manage, deploy, and secure Container images
Safe, secure, stable, high-performance Kubernetes platform
Provided as a service to deploy, monitor, backup, restore, and scale MongoDB databases on cloud.
Provided as a service to deploy, monitor, backup, restore, and scale Redis databases on cloud.
Provided as a service to deploy, monitor, backup, restore, and scale PostgreSQL databases on cloud. System Monitoring Solution anywhere, anytime, anyplatform
 Helps reduce operational costs by up to 40% compared to traditional BI solutions, while improving efficiency through optimized resource usage and infrastructure scaling.
 - Pricing
- Partner
- Event
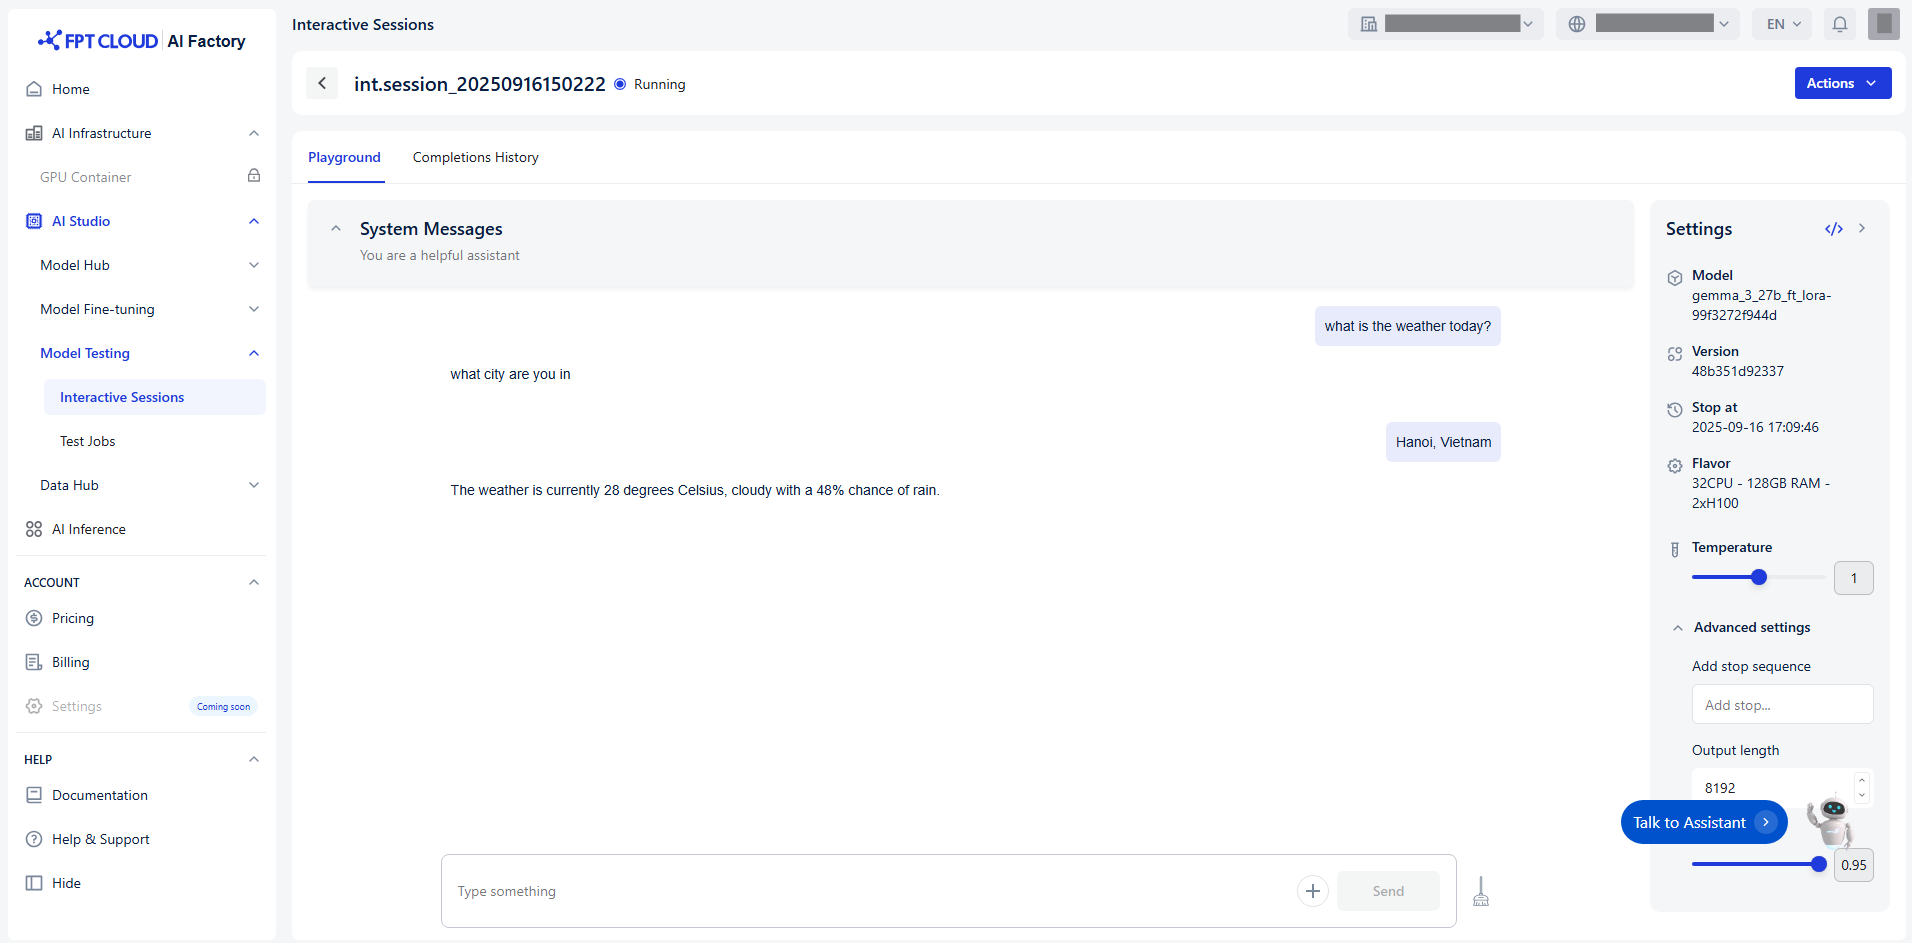
Playground is space where users can interact with AI models in a chat-like format. It’s designed for testing messages, evaluating model responses, and adjusting model behavior.
You can follow guide to evaluate your model:
Step 1: Adjust parameters
Parameters include:
| Name | Description | Type | Supported value |
|---|---|---|---|
| Temperature | Controls randomness in assistant responses. Lower = more focused, higher = more creative. | Float | [0.00, 2.00] (commonly 1.00 is balanced) |
| Add stop sequence | Defines where the model should stop generating text. | String | Custom string(s) |
| Output length | Limits the number of tokens in the response. | Int | [0, 8192] |
| Top-P | Controls diversity via nucleus sampling. Lower = more focused | Float | (0.00, 1.00] |
We recommend you adjust parameters based on each purpose:
| Purpose | Temperature | Add stop sequence | Output length | Top-P |
|---|---|---|---|---|
| Creative writing | 1.0–1.5 | 500+ | 0.8–1.0 | |
| Technical explanation | 0.2–0.5 | 200–500 | 0.3–0.6 | |
| Summarization | 0.2–0.5 | 150–300 | 0.3–0.6 | |
| Code generation | 0.1–0.4 | “n” or “#” | 0.3–0.6 | |
| Conversational agent | 0.7–1.0 | 200–600 | 0.8–1.0 |
Step 2: Start chatting
The Playground interface is structured around Completions, which include:
| Prompts | Description |
|---|---|
| System messages | Define the assistant’s behavior and tone. It helps guide how the model responds throughout the conversation. Eg: You are a creative writing assistant. Always write with vivid imagery, emotional depth, and a storytelling tone. |
| User messages | Represent the input or query from you. You can type text to test LLM models or add to upload an image to test VLM models. |
| Assistant responses | The AI model’s reply is based on user messages and system messages. |
You can interact with the model in real time, observe how it responds, and iterate based on your goals.
Step 3: Refine your prompts
To improve or explore different behaviors:
-
Modify the system message to change the assistant’s personality or tone.
-
Adjust the user message to test different types of queries.
-
Tweak the parameters to observe how the model’s output changes.
Step 4: Clear completion
-
Click icon Clear to reset and start a new completion.
-
After clearing completion, completion is finished and stored in completion history.