- About Us
-
 Secure, unlimited storage to ensures efficiency as well as high and continuous data access demand.
 Virtual server integration for 3D Rendering, AI or ML
 Enhance application capacity and availability.
 Access to an all-inclusive stack for AI development, driven by NVIDIA’s powerful technology!
 FPT Web Application Firewall provides powerful protection for web applications
 Advanced virtual server with rapid scalability
 Backup and restore data instantly, securely and maintain data integrity.
Advanced virtual server with rapid scalability
Access to an all-inclusive stack for AI development, driven by NVIDIA’s powerful technology!
Enhance application capacity and availability.
Backup and restore data instantly, securely and maintain data integrity.
Recovery, ensuring quick operation for the business after all incidents and disasters.
Backup and restore data instantly, securely and maintain data integrity.
Advanced virtual server with rapid scalability
Access to an all-inclusive stack for AI development, driven by NVIDIA’s powerful technology!
Enhance application capacity and availability.
Backup and restore data instantly, securely and maintain data integrity.
Recovery, ensuring quick operation for the business after all incidents and disasters.
 Diverse throughput and capacity to meet various business workloads.
Secure, unlimited storage to ensures efficiency as well as high and continuous data access demand.
FPT Web Application Firewall provides powerful protection for web applications
Intelligent and Comprehensive Virtual Web Application Firewall - Security Collaboration between FPT Cloud and Penta Security.
The Next generation firewall security service
Easily store, manage, deploy, and secure Container images
Safe, secure, stable, high-performance Kubernetes platform
Provided as a service to deploy, monitor, backup, restore, and scale MongoDB databases on cloud.
Provided as a service to deploy, monitor, backup, restore, and scale Redis databases on cloud.
Provided as a service to deploy, monitor, backup, restore, and scale PostgreSQL databases on cloud. System Monitoring Solution anywhere, anytime, anyplatform
 Helps reduce operational costs by up to 40% compared to traditional BI solutions, while improving efficiency through optimized resource usage and infrastructure scaling.
 - Pricing
- Partner
- Event


Overview
GPU Virtual Machines (VMs) are Linux-based virtual machines that run on top of virtualized hardware with high-end GPUs. Each VM you create is a new virtual server that you can use either standalone or as part of a larger, cloud-based infrastructure.
Step 1: Open Instance Management
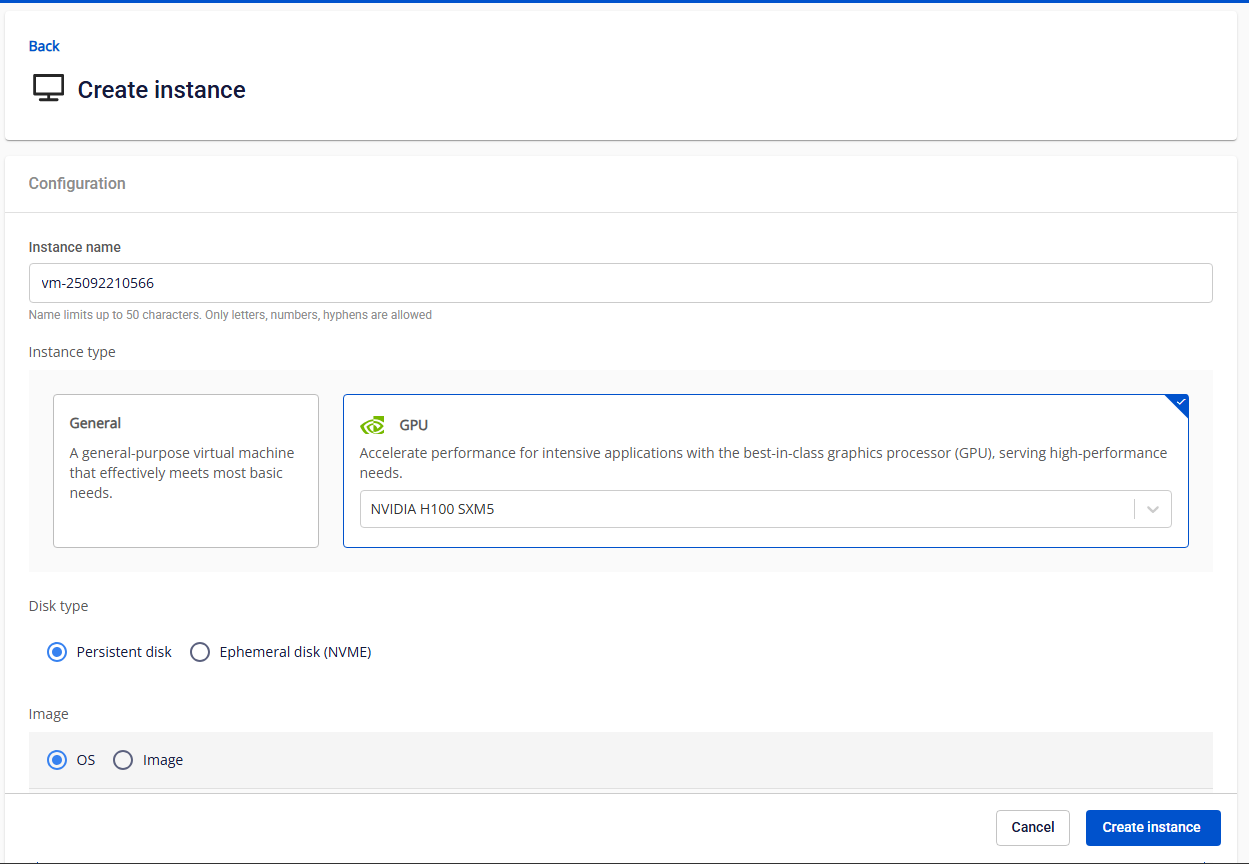
In the side menu, go to Compute Engine > Instance Management, then click Create Instance.
Step 2: Configure the Instance
-
Instance Name: Enter a unique name for your GPU virtual machine.
-
Instance Type: Select the type of instance. GPU: Optimized for high-performance computing, machine learning, and other intensive tasks.
Currently supported GPUs: NVIDIA H100 SXM5 and NVIDIA H200 SXM.
-
Disk Type: Only one disk type can be selected during GPU VM creation: Ephemeral Disk (NVMe) or Persistent Disk (Block Storage)
-
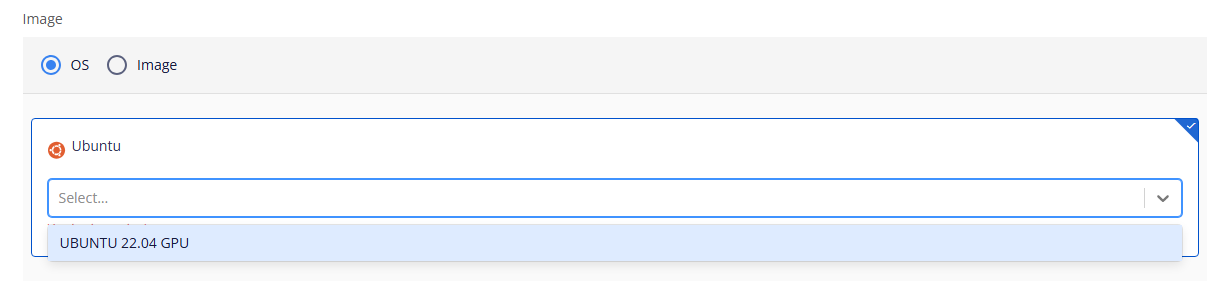
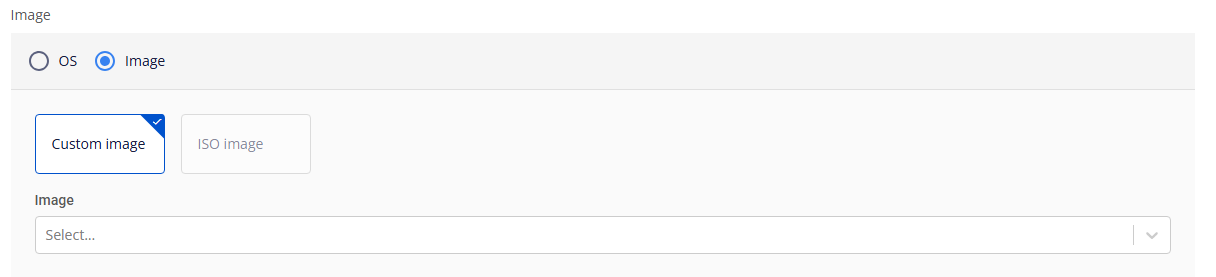
Image: You can use either the default Ubuntu base image or your own custom image.
- OS: Currently supports Ubuntu 22.04 GPU.
- Custom image: Upload your image under Custom Images (file type: QCOW). It will then appear in the image selection list.
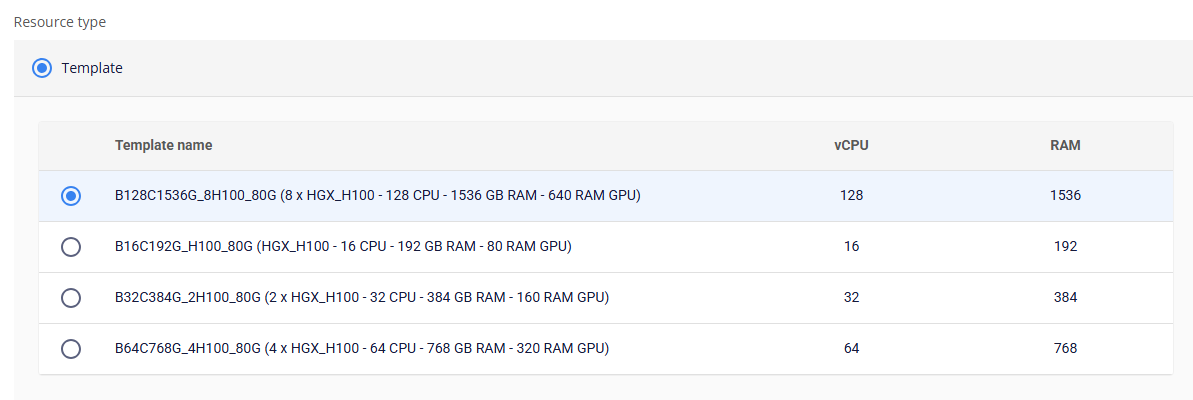
- Resource Type: Each GPU VM offers different configurations for vCPU, RAM, and the number of GPUs attached. You can choose the configuration that best fits your workload requirements.
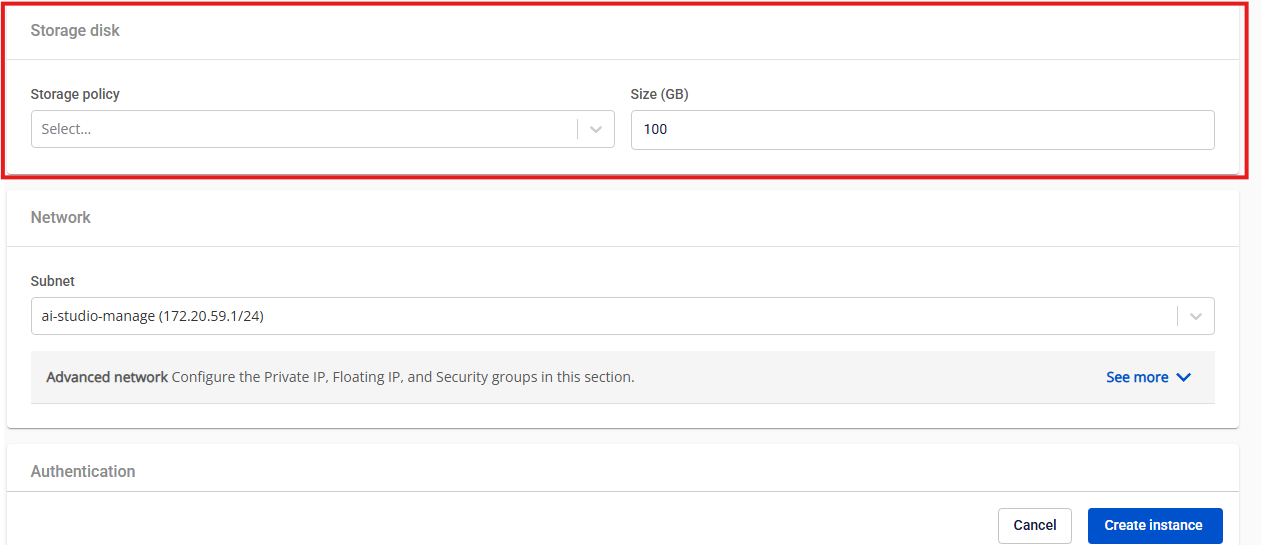
Step 3: Configure the Storage Disk
-
Storage Policy: Specifies the storage type used for the GPU VM.
-
GPU VMs with Ephemeral Disk (NVMe) support only NVMe-SSD.
-
GPU VMs with Persistent Disk support only Premium SSD, offering IOPS between 3,000 and 10,000 (depending on your service quota request).
-
-
Size:
-
Ephemeral Disk (NVMe): Fixed capacity per GPU instance (depends on the number of GPUs selected).
-
Persistent Disk: Scalable based on your storage requirements, starting from 100GB.
-
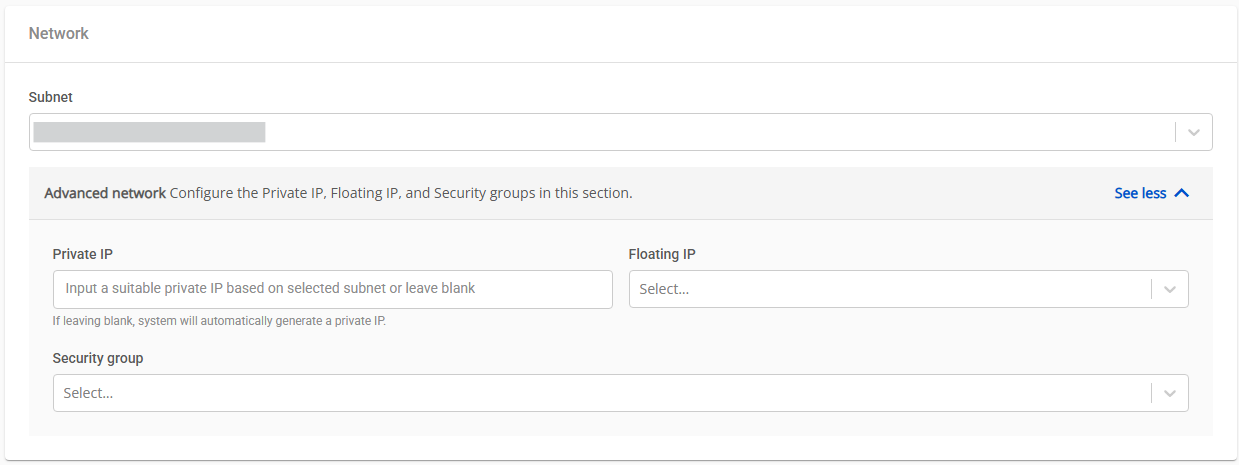
Step 4: Configure the Network Settings
-
Subnet: Select the appropriate subnet to enable your VM to connect to internal and external resources.
-
Advanced Network:
-
Private IP: Enter a private IP manually or let the system automatically assign one based on the selected subnet.
-
Floating IP: For Ephemeral Disk NVMe, the Floating IP is only configured after the VM is successfully created.
-
Security Group: Assign a security group to manage inbound and outbound traffic for the VM.
-
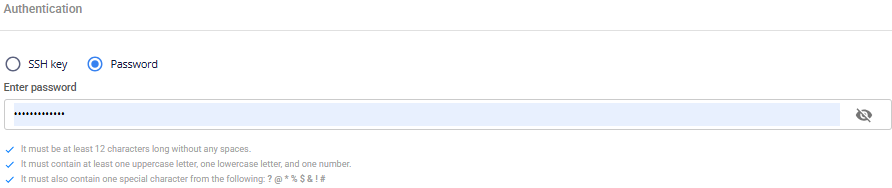
Step 5: Set Authentication Method
Choose one of the following authentication methods:
-
SSH Key: The system automatically uses your latest SSH key (you can change it if needed).
-
Password: Set a password and securely store it for console access.
Step 6: Advanced Settings
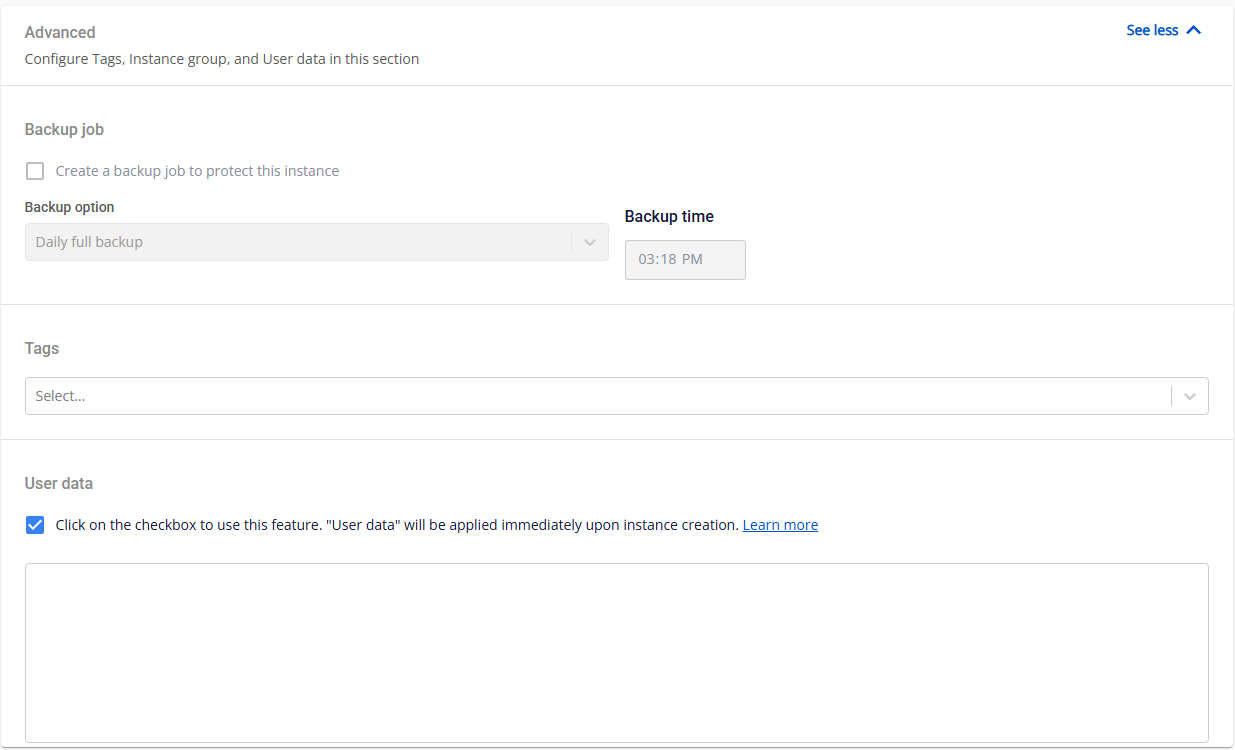
Backup Job
Only available for GPU VMs using Block Storage - Persistent Disk. You can schedule automatic backups and define their frequency and timing.
Backup Options:
-
Daily Full Backup: Performs a full backup every day.
-
Daily Incremental, Weekly Active Full: Performs daily incremental backups with a full backup once per week.
-
Daily Incremental, Monthly Active Full: Performs daily incremental backups with a full backup once per month.
Backup Time: Set the specific time for the backup to run.
Tags
Assign existing tags to help manage and categorize your resources.
User Data (Cloud-init Script)
The User Data field allows you to add cloud-init scripts.
When the VM starts, cloud-init reads metadata and automatically configures the system — including users, SSH keys, and network settings.
Sample Cloud-init Script: With the provided script, the system will automatically create the user "testcloudinit" with password "Abc123" . Another user, "testcloudinit2", with be created with the password "P@ssw0rd!"
# cloud-config
users:
- name: testcloudinit
  sudo: ALL=(ALL) NOPASSWD:ALL
  lock_passwd: false
  shell: /bin/bash
  passwd: $6$rounds=4096$V6anciWl30$xKbcljqks1gUkMiM80pyKzhvyhn7U1n.jXcGCUfkUlX.rnllUWKUrmDEzekhhhP8aERSylRuC7gfDhJ32Xv0A1

- name: testcloudinit2
  groups: sudo
  lock_passwd: false
  shell: /bin/bash
  plain_text_passwd: P@ssw0rd!

- hostname: testcloudinit
Step 7: Create the Instance
Click Create Instance to deploy and start your GPU VM.
Once the instance is successfully created, you can view its details in the Instance Management dashboard.