- About Us
-
 Secure, unlimited storage to ensures efficiency as well as high and continuous data access demand.
 Virtual server integration for 3D Rendering, AI or ML
 Enhance application capacity and availability.
 Access to an all-inclusive stack for AI development, driven by NVIDIA’s powerful technology!
 FPT Web Application Firewall provides powerful protection for web applications
 Advanced virtual server with rapid scalability
 Backup and restore data instantly, securely and maintain data integrity.
Advanced virtual server with rapid scalability
Access to an all-inclusive stack for AI development, driven by NVIDIA’s powerful technology!
Enhance application capacity and availability.
Backup and restore data instantly, securely and maintain data integrity.
Recovery, ensuring quick operation for the business after all incidents and disasters.
Backup and restore data instantly, securely and maintain data integrity.
Advanced virtual server with rapid scalability
Access to an all-inclusive stack for AI development, driven by NVIDIA’s powerful technology!
Enhance application capacity and availability.
Backup and restore data instantly, securely and maintain data integrity.
Recovery, ensuring quick operation for the business after all incidents and disasters.
 Diverse throughput and capacity to meet various business workloads.
Secure, unlimited storage to ensures efficiency as well as high and continuous data access demand.
FPT Web Application Firewall provides powerful protection for web applications
Intelligent and Comprehensive Virtual Web Application Firewall - Security Collaboration between FPT Cloud and Penta Security.
The Next generation firewall security service
Easily store, manage, deploy, and secure Container images
Safe, secure, stable, high-performance Kubernetes platform
Provided as a service to deploy, monitor, backup, restore, and scale MongoDB databases on cloud.
Provided as a service to deploy, monitor, backup, restore, and scale Redis databases on cloud.
Provided as a service to deploy, monitor, backup, restore, and scale PostgreSQL databases on cloud. System Monitoring Solution anywhere, anytime, anyplatform
 Helps reduce operational costs by up to 40% compared to traditional BI solutions, while improving efficiency through optimized resource usage and infrastructure scaling.
 - Pricing
- Partner
- Event


Overview
A subnet is a unique CIDR block with a range of IP addresses in a VPC. All resources in a VPC must be deployed on subnets.
-
By default, all instances in different subnets of the same VPC can communicate with each other. If you have a VPC with two subnets in it, they can communicate with each other by default.
-
After a subnet is created, its CIDR block cannot be modified. Subnets in the same VPC cannot overlap.
-
When creating a GPU VM, an active Subnet in the VPC is required. The system will automatically assign a Private IP from that subnet to the new virtual machine.
Step-by-Step
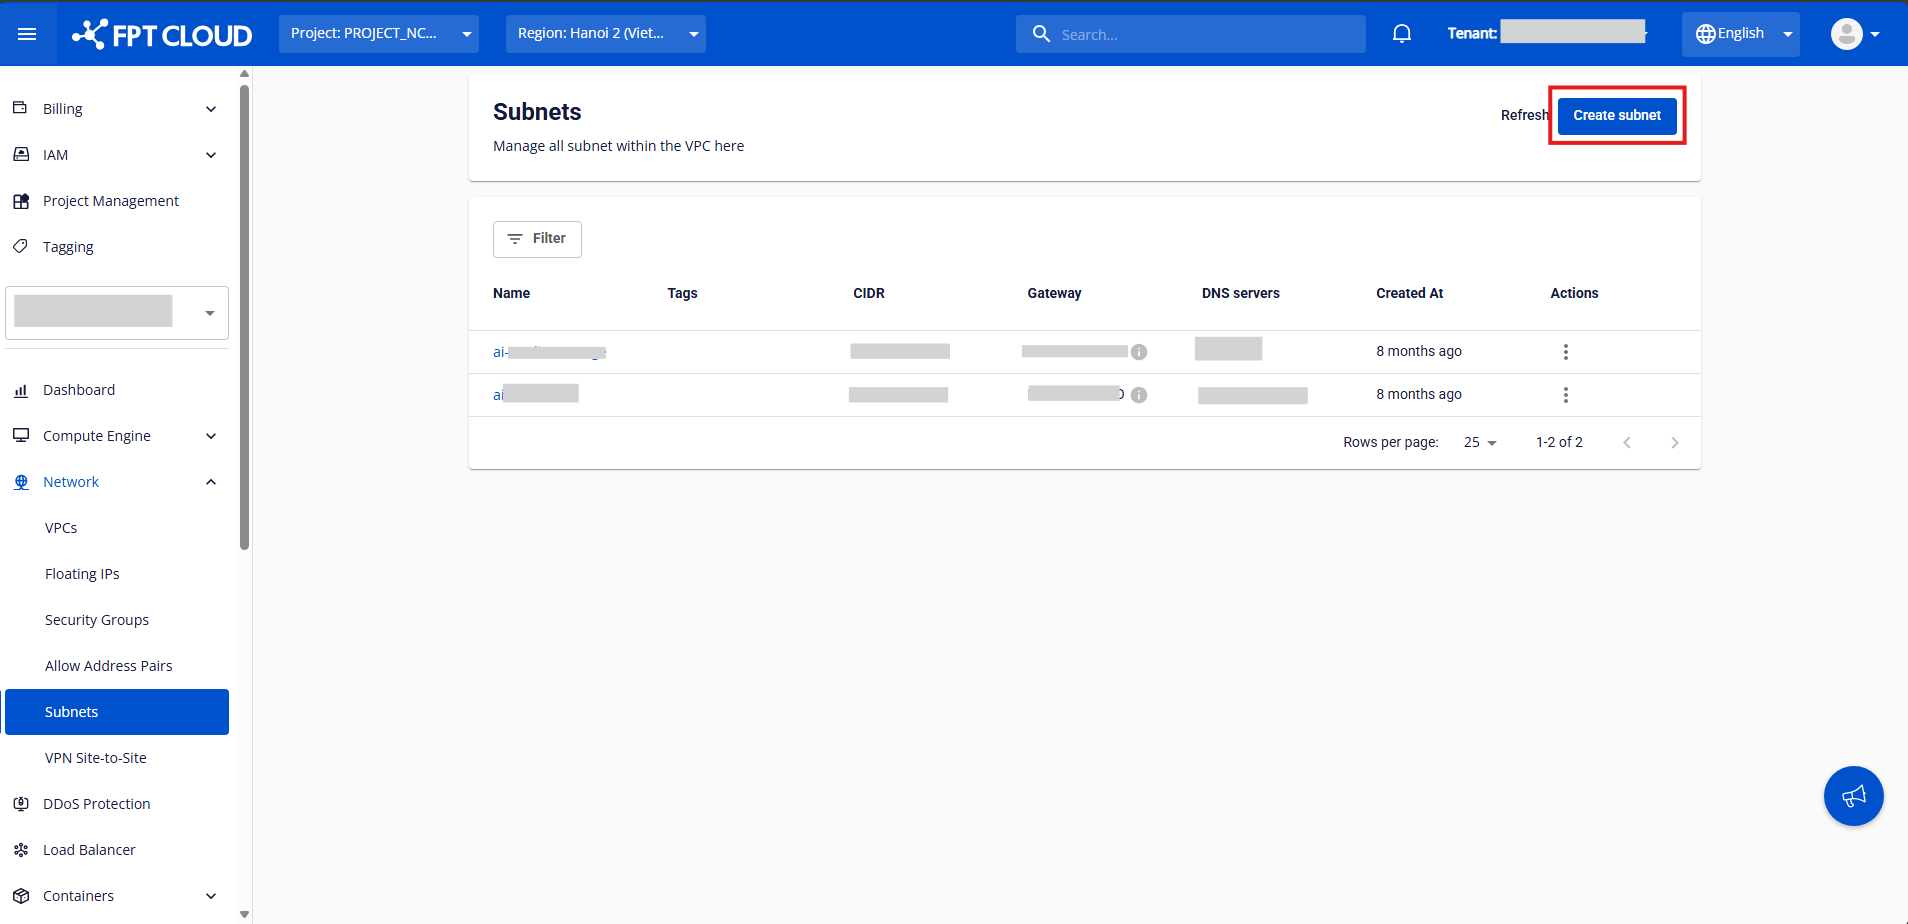
Step 1: In the left-side menu, go to Networking → Subnets, then click Create Subnet.
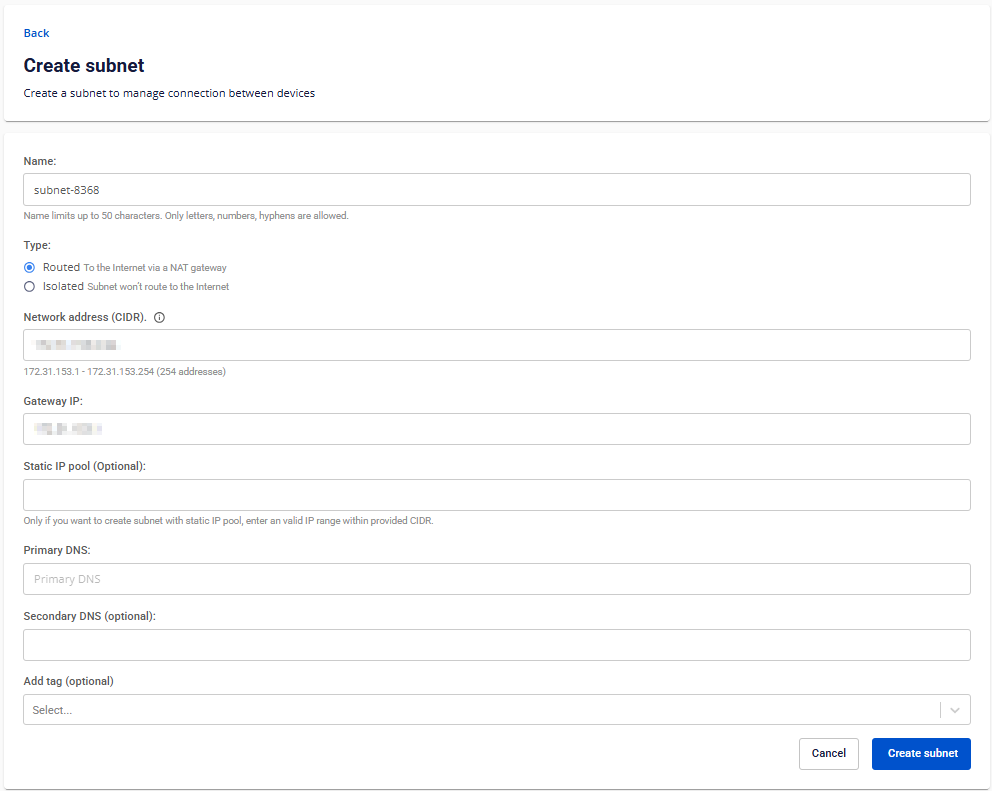
Step 2: Enter a name for your subnet in the Name field.
Step 3: Select the type of subnet. We currently support two types:
-
Routed: The subnet is routed to the internet via a NAT gateway.
-
Isolated: The subnet has no internet routing.
Step 4: Specify the IP range (subnet) your network will use, in CIDR notation (e.g. 172.30.65.0/24) using Network Address (CIDR).
Note: The CIDR range must not overlap with any other subnet within the same VPC.
Step 5: Specify the IP address of the default gateway within your subnet using Gateway IP. This is usually the first usable IP (e.g. 172.30.65.1).
Step 6: Define a Static IP Pool — a specific range of IPs reserved for static assignments.
Note: Ensure your static IP range is within the subnet’s CIDR and does not include the gateway IP.
Step 7: Configure DNS Settings:
Specify the IP address of DNS servers that network clients will use to resolve domain names.
-
Primary DNS: Required DNS server for domain name resolution.
-
Secondary DNS (optional): Backup DNS server if the primary fails.
Step 8: Assign a Tag to categorize or organize your subnet.
Note: Tags help you manage and filter networking resources across large environments.