- About Us
-
 Secure, unlimited storage to ensures efficiency as well as high and continuous data access demand.
 Virtual server integration for 3D Rendering, AI or ML
 Enhance application capacity and availability.
 Access to an all-inclusive stack for AI development, driven by NVIDIA’s powerful technology!
 FPT Web Application Firewall provides powerful protection for web applications
 Advanced virtual server with rapid scalability
 Backup and restore data instantly, securely and maintain data integrity.
Advanced virtual server with rapid scalability
Access to an all-inclusive stack for AI development, driven by NVIDIA’s powerful technology!
Enhance application capacity and availability.
Backup and restore data instantly, securely and maintain data integrity.
Recovery, ensuring quick operation for the business after all incidents and disasters.
Backup and restore data instantly, securely and maintain data integrity.
Advanced virtual server with rapid scalability
Access to an all-inclusive stack for AI development, driven by NVIDIA’s powerful technology!
Enhance application capacity and availability.
Backup and restore data instantly, securely and maintain data integrity.
Recovery, ensuring quick operation for the business after all incidents and disasters.
 Diverse throughput and capacity to meet various business workloads.
Secure, unlimited storage to ensures efficiency as well as high and continuous data access demand.
FPT Web Application Firewall provides powerful protection for web applications
Intelligent and Comprehensive Virtual Web Application Firewall - Security Collaboration between FPT Cloud and Penta Security.
The Next generation firewall security service
Easily store, manage, deploy, and secure Container images
Safe, secure, stable, high-performance Kubernetes platform
Provided as a service to deploy, monitor, backup, restore, and scale MongoDB databases on cloud.
Provided as a service to deploy, monitor, backup, restore, and scale Redis databases on cloud.
Provided as a service to deploy, monitor, backup, restore, and scale PostgreSQL databases on cloud. System Monitoring Solution anywhere, anytime, anyplatform
 Helps reduce operational costs by up to 40% compared to traditional BI solutions, while improving efficiency through optimized resource usage and infrastructure scaling.
 - Pricing
- Partner
- Event


FPT Object Storage supports integration with S3-SDKs or S3-Clients following the AWS S3 standard. This lets you use familiar tools and libraries to interact with your bucket's data.
Before integration, you need to gather the necessary authentication information, such as Endpoint and Access Key from FPT Object Storage, following the instructions in the Access Key Management section.
S3CMD (Unix/Linux)
S3CMD: This is a command-line tool for Linux/Unix that allows you to manage data on FPT Object Storage or AWS S3. You can upload, download, and organize files and folders.
A. Installation:
CentOS/RHEL:
$ sudo yum install s3cmd -yUbuntu/Debian:
$ sudo apt-get install s3cmdMacOS:
$ brew install s3cmdOther operating systems can be referenced at the S3CMD homepage: https://s3tools.org/download
B. Configuration:
Step 1: Open a terminal and run the following command to start the configuration process:
$ s3cmd --configureStep 2: The command above will prompt you to enter the following information:
- Access Key: Access Key obtained from FPT Portal.
- Secret Key: Secret Key obtained from FPT Portal.
- Default Region: Obtained from FPT Portal.
- S3 Endpoint: Endpoint obtained from FPT Portal (remove "https://"). For example: s3-sgn09.fptcloud.com.
- DNS-style bucket+hostname: Leave it empty.
- Encryption password: Leave it empty.
- Use HTTPS protocol:
- HTTP Proxy server name: Leave it empty.
After entering the correct information, S3CMD will automatically save these configurations in its configuration file.
You can create a separate configuration file by creating or editing the ~/.s3cfg file. Below is an example of the configuration file content:
[default]

access_key = YOUR_ACCESS_KEY

secret_key = YOUR_SECRET_KEY

bucket_location = YOUR_BUCKET_LOCATION

host_base = YOUR_S3_ENDPOINT

host_bucket = YOUR_S3_ENDPOINT

use_https = True

signature_v2 = False
Step 3: Check the Connection
After you have finished configuring, you can use the following command to check the connection status and display a list of buckets:
$ s3cmd lsIf you see the list of displayed buckets, you have successfully connected to FPT Object Storage.
Cyberduck (Mac and Windows)
CyberDuck: This is an open-source GUI application for Mac and Windows that allows you to manage files directly on FPT Object Storage or AWS S3. It provides a more user-friendly environment for uploading, downloading, and managing files.
A. Installation:
Visit the Cyberduck homepage to download the appropriate version for your device: Cyberduck Download
After downloading, open the installation file and follow the application's instructions to complete the Cyberduck installation.
B. Configuration:
Step 1: Open the Cyberduck application after installation.
Step 2: Click the Open Connection button on the main interface or select File -> Open Connection from the menu.
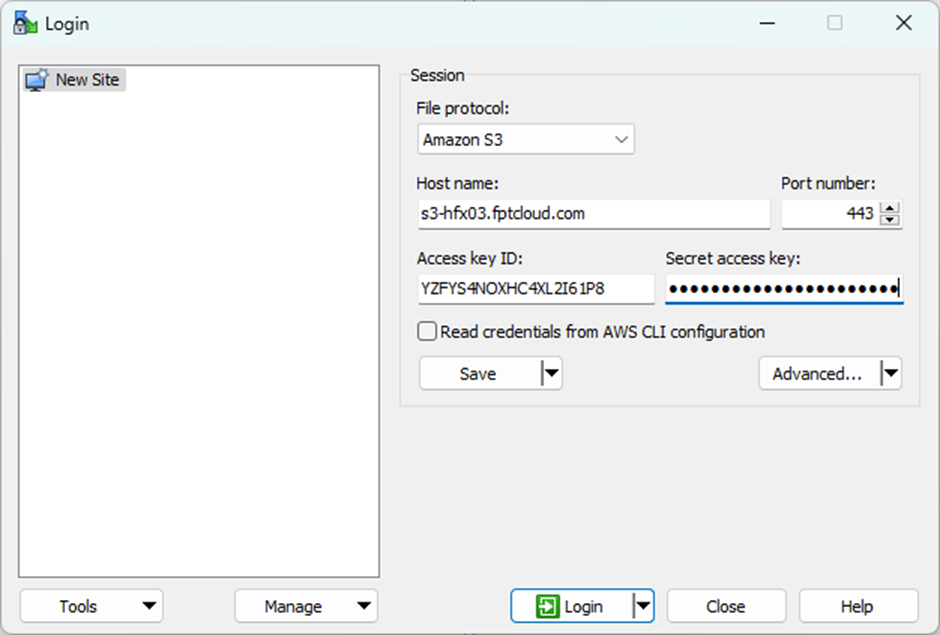
 Step 3: An Open Connection dialog will appear. In this dialog, enter the authentication information as follows:
- Protocol: Select Amazon S3.
- Server: FPT Object Storage Endpoint. Please omit the "https" part, for example: s3-sgn09.fptcloud.com.
- Port: 443 (default port for HTTPS).
- Access Key ID: Access Key obtained from FPT Portal.
- Secret Key ID: Secret Key obtained from FPT Portal.
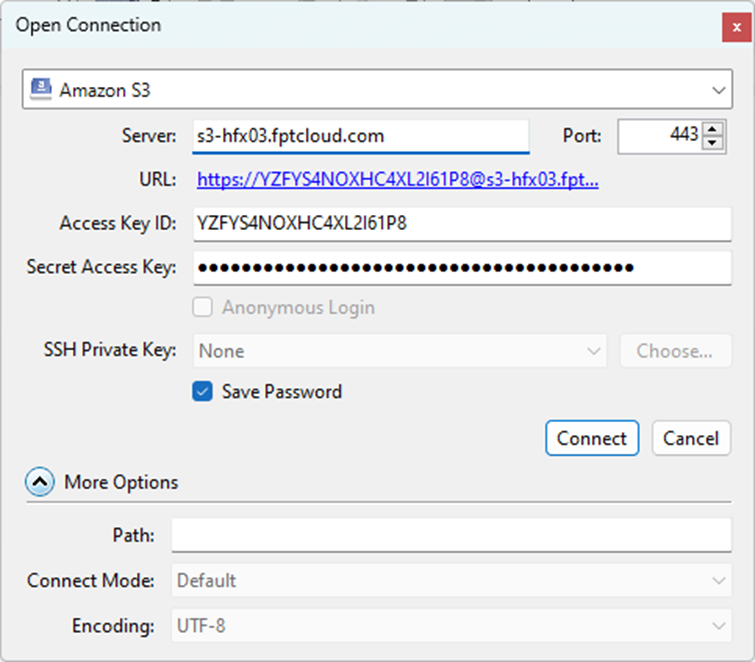 After entering the authentication information, press Connect to establish the connection.
Cyberduck will connect to FPT Object Storage using the provided authentication information. Once the connection is successful, the folder structure on FPT Object Storage appears in the Cyberduck window.
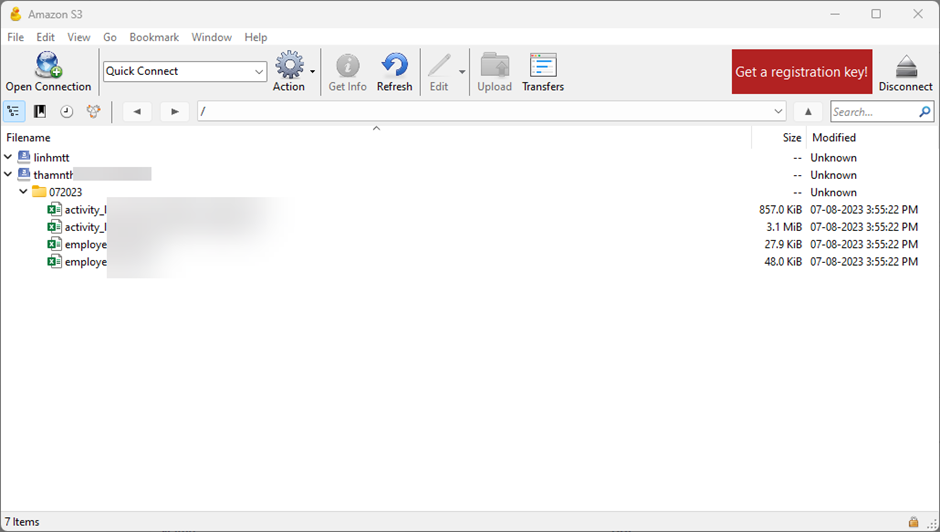 From here, you can perform various operations such as uploading, downloading, and managing files directly through the intuitive interface of Cyberduck.
AWS CLI (Linux, Mac, and Windows)
A. Installation:
Download the latest version from the official AWS CLI website or install it using the following instructions: Linux/Unix:
Use cURL to download the AWS CLI zip file:
$ curl "https://awscli.amazonaws.com/awscli-exe-linux-x86_64.zip" -o "awscliv2.zip"Extract a zip file:
$ unzip awscliv2.zipRun the installation file:
$ sudo ./aws/installWindows:
Open Command Prompt or Windows PowerShell.
Enter the following command to download and install AWS CLI using the MSI file:
msiexec.exe /i https://awscli.amazonaws.com/AWSCLIV2.msiFollow the on-screen instructions to complete the installation.
B. Configuration:
After installation, open Command Prompt, PowerShell, or Terminal, depending on your operating system.
Enter the following command to start the configuration process:
aws configureTo enter the following information in sequence:
- Access Key ID: Access Key obtained from FPT Portal.
- Secret Access Key: Secret Key obtained from FPT Portal.
- Default region name: Default Region obtained from FPT Portal.
- Default output format: Enter "json".
- S3 Endpoint: Endpoint obtained from FPT Portal. Please note to remove the "https" part, for example: s3-sgn09.fptcloud.com.
After entering the correct information, AWS CLI will automatically save this configuration, and you have completed the configuration.
Check Installation and Configuration:
To check if AWS CLI has been installed and configured successfully or not, you can use the following command to view the AWS CLI version:
aws --versionIf the above command returns the version of AWS CLI, it indicates that you have successfully installed and configured it.
WinSCP (Windows)
WinSCP stands for Windows Secure Copy Protocol and is a free Windows application used to securely transfer files between a personal computer and a remote server. It is primarily used for managing and sharing files through protocols such as SFTP (Secure File Transfer Protocol), SCP (Secure Copy Protocol), FTP (File Transfer Protocol), AWS S3, etc., via a user-friendly interface.
A. Installation:
Visit the official WinSCP website to download and install the software: WinSCP Download
After downloading, open the installation file and follow the instructions to complete the WinSCP installation.
B. Configuration:
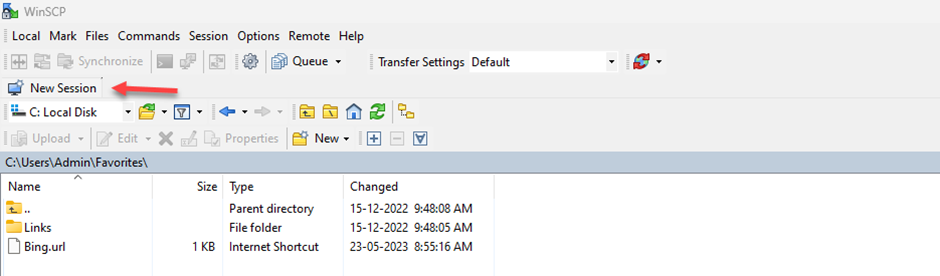
Step 1. Open the WinSCP application after installation.
Step 2. Click on New Session to start setting up a new connection.
 Step 3. In the Login window, follow these steps:
- File protocol: Select "Amazon S3"
- Access Key ID: Access Key obtained from FPT Portal.
- Secret Access Key: Secret Key obtained from FPT Portal.
- Hostname: Endpoint obtained from FPT Portal. Note to exclude the "https" part, for example: s3-sgn09.fptcloud.com.
- Port number: 443.
 Step 4. Click Save to save the configuration and Login to establish the connection.
After a successful connection, you will see a list of buckets on FPT Object Storage appear in the WinSCP window.
From here, you can perform drag-and-drop operations to upload, download, and manage files directly through the intuitive WinSCP interface.
Tool S3sync (FreeBSD, Linux, OpenBSD, MacOS)
s3sync is an open-source tool developed to manage and synchronize files between a personal computer or server with cloud storage services using the S3 protocol, such as Amazon S3 from Amazon Web Services and FPT Object Storage from FPT Cloud. This tool allows you to upload and download files and perform synchronization operations between cloud storage services.
A. Installation:
Access the project's link to download and install the software: S3sync Releases
After downloading, extract and follow the instructions to complete the S3sync installation.
B. Configuration:
You must provide authentication information in the execution commands for the tool to function.
Basic parameters:
- sk: Source access key.
- ss: Source secret key.
- se: Source endpoint.
- tk: Target access key.
- ts: Target secret key.
- te: Target endpoint.
- w: Number of workers used for synchronization.
- sync-progress: Display synchronization progress.
- s3-acl: File permissions when uploading (private, public-read, public-read-write). The default value is private.
- disable-http2: Disable client's HTTP2 mode.
- ratelimit-objects: RATELIMIT-OBJECTS (Rate limit objects per second).
- ratelimit-bandwidth: RATELIMIT-BANDWIDTH (Set bandwidth rate limit, byte/s, Allow suffixes: K, M, G).
Commonly used commands:
Upload data from the local system to FPT Object Storage:
./s3sync --tk --ts --the "target endpoint" -w 64 fs:// s3:// --sync-progress --s3-acl public-read
Download data from FPT Object Storage to local:
./s3sync --sk --ss --se "source endpoint" -w 64 s3:// fs:// --sync-progress --disable-http2
Copy data from this bucket to another bucket:
./s3sync --sk --ss --se "source endpoint" --tk --ts --te "target endpoint" -w 64 s3:// s3:// --sync-progress --s3-acl public-read --disable-http2Sync data from Amazon S3 to FPT Object Storage
./s3sync --sk --ss --tk --ts --the "target endpoint" -w 64 s3:// s3:// --sync-progress --s3-acl public-read --disable-http2