- About Us
-
 Secure, unlimited storage to ensures efficiency as well as high and continuous data access demand.
 Virtual server integration for 3D Rendering, AI or ML
 Enhance application capacity and availability.
 Access to an all-inclusive stack for AI development, driven by NVIDIA’s powerful technology!
 FPT Web Application Firewall provides powerful protection for web applications
 Advanced virtual server with rapid scalability
 Backup and restore data instantly, securely and maintain data integrity.
 Advanced virtual server with rapid scalability
 Access to an all-inclusive stack for AI development, driven by NVIDIA’s powerful technology!
 Enhance application capacity and availability.
 Backup and restore data instantly, securely and maintain data integrity.
 Recovery, ensuring quick operation for the business after all incidents and disasters.
 Diverse throughput and capacity to meet various business workloads.
 Secure, unlimited storage to ensures efficiency as well as high and continuous data access demand.
 FPT Web Application Firewall provides powerful protection for web applications
 Intelligent and Comprehensive Virtual Web Application Firewall - Security Collaboration between FPT Cloud and Penta Security.
 The Next generation firewall security service
 Easily store, manage, deploy, and secure Container images
 Safe, secure, stable, high-performance Kubernetes platform
 Provided as a service to deploy, monitor, backup, restore, and scale MongoDB databases on cloud.
 Provided as a service to deploy, monitor, backup, restore, and scale Redis databases on cloud.
 Provided as a service to deploy, monitor, backup, restore, and scale PostgreSQL databases on cloud.
 System Monitoring Solution anywhere, anytime, anyplatform
 Helps reduce operational costs by up to 40% compared to traditional BI solutions, while improving efficiency through optimized resource usage and infrastructure scaling.
 - Pricing
- Partner
- Event
All documents
FPT Object Storage
SubUser in FPT Object Storage is a sub-user created with limited access rights. An admin can assign roles to SubUsers such as Full, Read-Write, Read Only, or None depending on the usage needs.
FPT Object Storage supports five basic roles:
- None: No access to the bucket.
- Read: Read-only access.
- Write: Write-only access.
- Read - Write: Read and write access.
- Full: Full access rights, including bucket configuration actions.
Using SubUsers helps you manage security and access rights more efficiently for your buckets.
Creating a New SubUser
Step 1: In the menu, select Object Storage, and open the SubUser tab. Choose a Region.
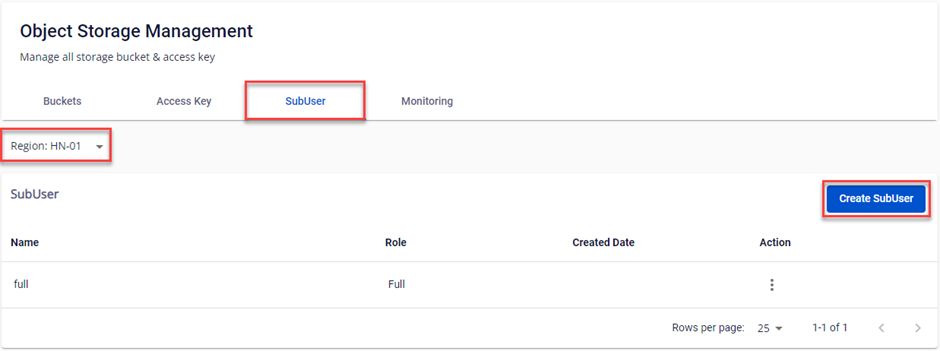 Step 2: Select Create SubUser.
Step 3: Enter the necessary information:
- Name: A memorable name.
- Access level: Choose a Role for the SubUser.
Step 4: Select Create, and the system will create a SubUser with the provided information.
Editing the Role of a SubUser
Step 1: In the SubUser you want to edit, select Edit.
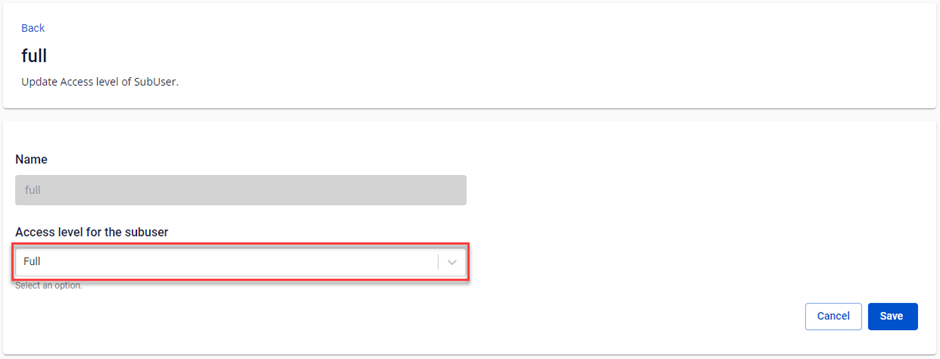 Step 2: Choose a new Role and click Save.
Deleting a SubUser
Step 1: In the SubUser you want to delete, select Delete.
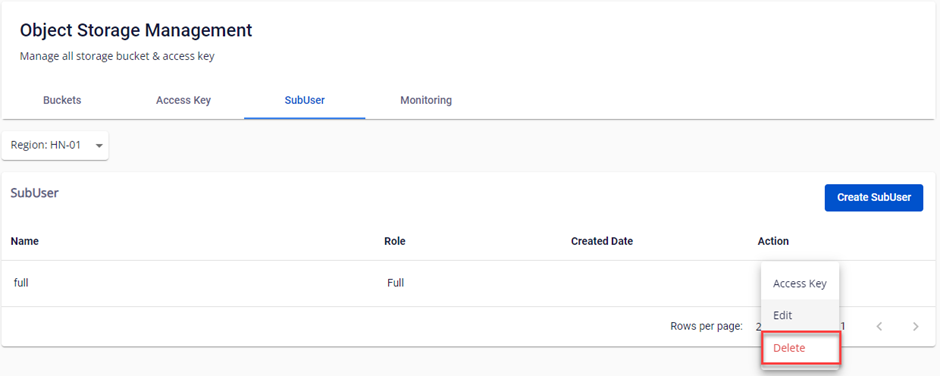 Step 2: A confirmation dialog will appear, displaying the SubUser's name and requesting user confirmation. Choose Delete to proceed.
Managing SubUser Access Key
Each SubUser can have a maximum of 2 SubUser Access Keys.
A. Creating a SubUser Key
Step 1: In the SubUser where you want to create a Key, select Access Key.
Step 2: Choose Generate Key.
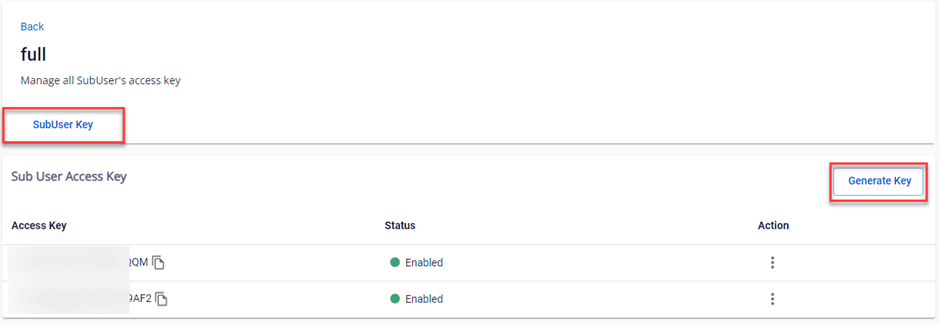 Step 3: The system will automatically generate a new key pair consisting of an Access Key and a Secret Key. You need to copy and securely store these two keys. Then select Confirm access key.
B. Deleting an Access Key
After deleting an Access Key, any clients using this key pair will lose access. You can delete it on the FPT Portal by following these instructions:
Step 1: In the SubUser where you want to delete a Key, select Access Key.
Step 2: In the Action section of the Key to be deleted, select Delete.
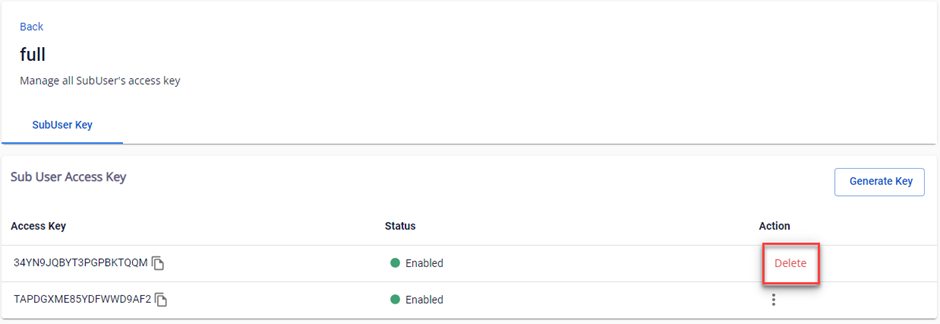 Step 3: A confirmation dialog will appear, displaying the Access Key name and requesting user confirmation. Choose Delete to proceed.


