Using FPT Object Storage with S3 Browser
In addition to direct usage on FPT Portal, you can log in and use FPT Object Storage with any S3-SDK or S3-Client that follows AWS S3 standards.
Here are instructions on how to use it with S3 Browser, a user-friendly client with a graphical user interface that provides easy access. FPT Cloud encourages you to use this application as it is free, widely used, and fully functional.
If you need guidance on integrating it with other SDKs or Clients, please refer to the Integrating FPT Object Storage with S3-Clients section.
Download and install S3 Browser from: https://s3browser.com/download.aspx
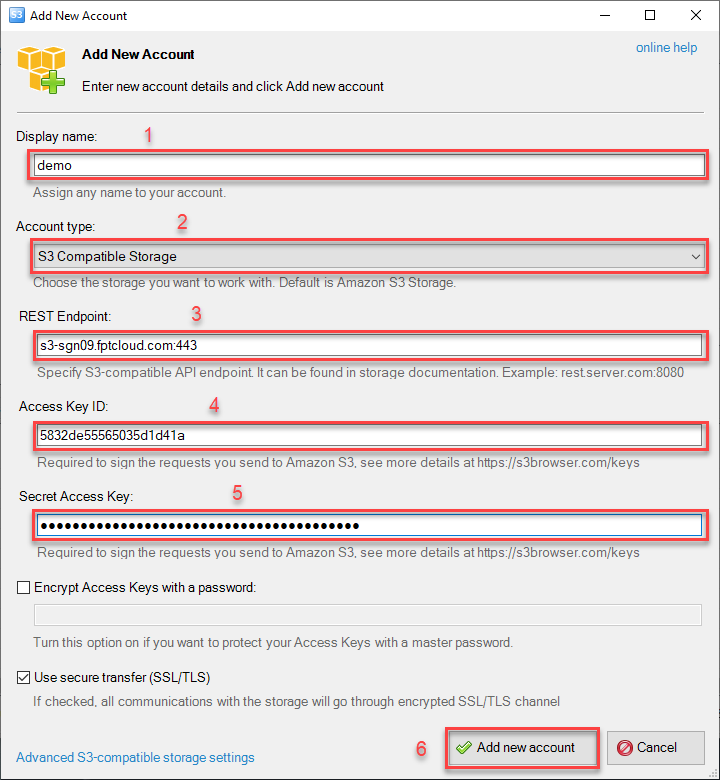
Information required to log in to S3 Browser:
| Login Information | Example |
|---|---|
| Account Name | User Name (Can choose any optional name) |
| Account Type | S3 Compatible Storage |
| REST Endpoint | Obtained from FPT Portal using HTTPS method |
| Access Key | Admin Access Key or SubUser Access Key |
| Secret Access Key | Admin Secret Key or SubUser Secret Key |
Logging into FPT Object Storage Account with S3 Browser
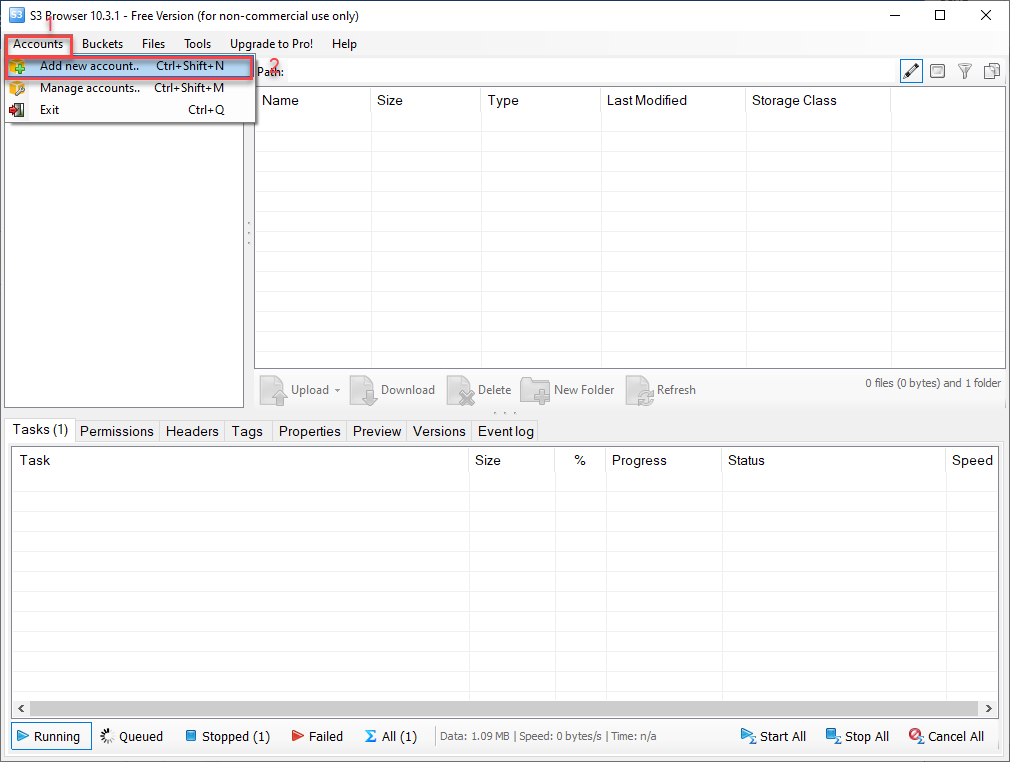
Step 1: In the S3 Browser application interface, select the Accounts menu and choose Add new account.
Step 2: Enter the prepared information in the Add New Account popup. Select Add new account.
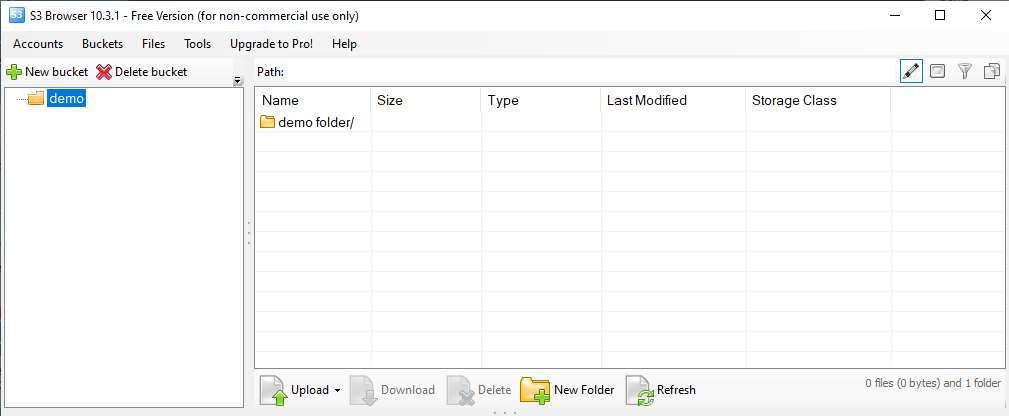
After a successful connection, the application will display a list of all the Buckets in your storage.
Creating a New Bucket
Step 1: In the S3 Browser interface, select New bucket.
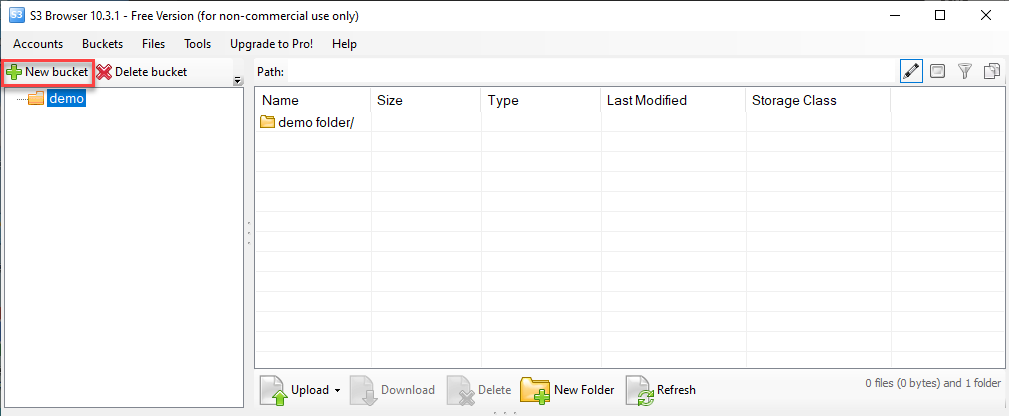
Step 2: Enter the name of the new bucket and select Create new bucket.
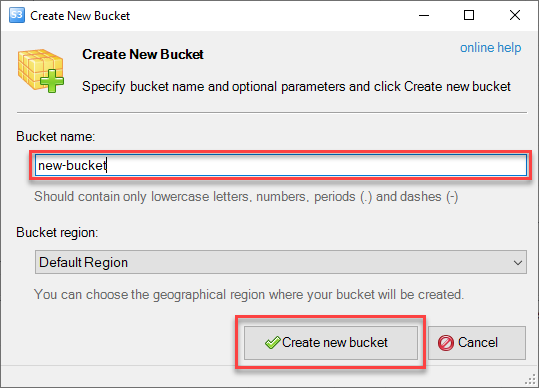
Uploading Files/Folders to a Bucket
Step 1: Navigate to where you want to upload a File/Folder and select Upload.
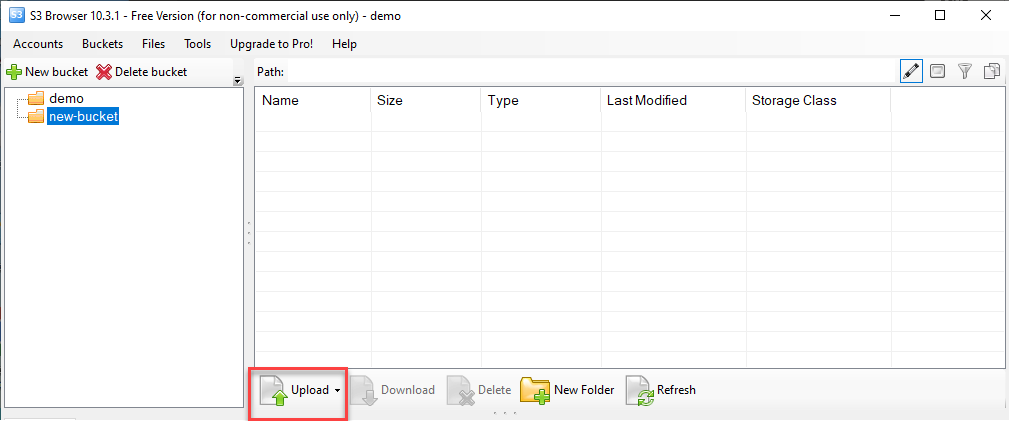
Step 2: Choose either Upload file or Upload folder.
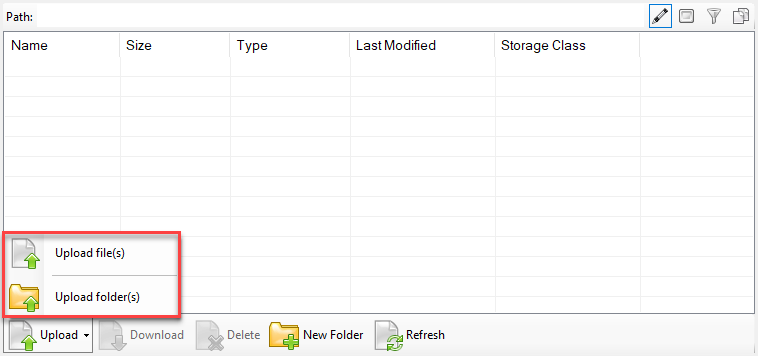
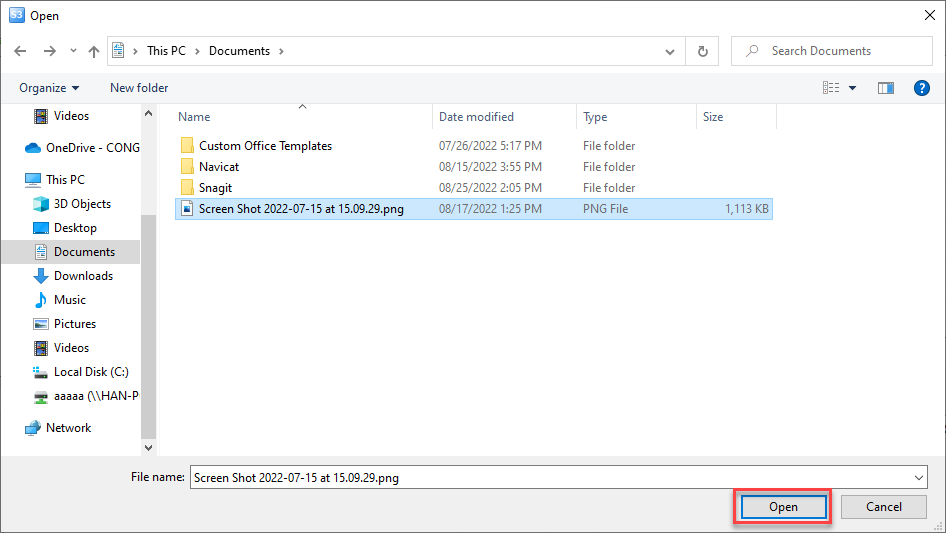
Step 3: Select the File/Folder from your local storage to upload it to the S3 bucket.
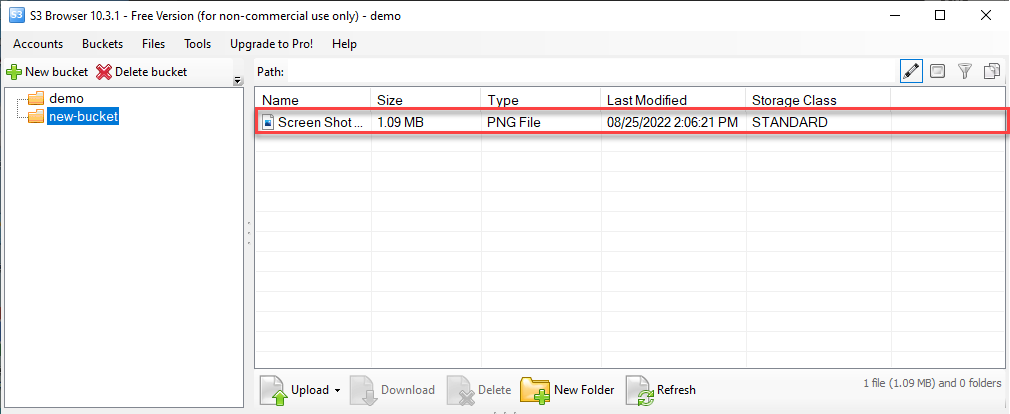
After a successful upload, the File/Folder will be displayed in S3 Browser.
Downloading Files/Folders from a Bucket
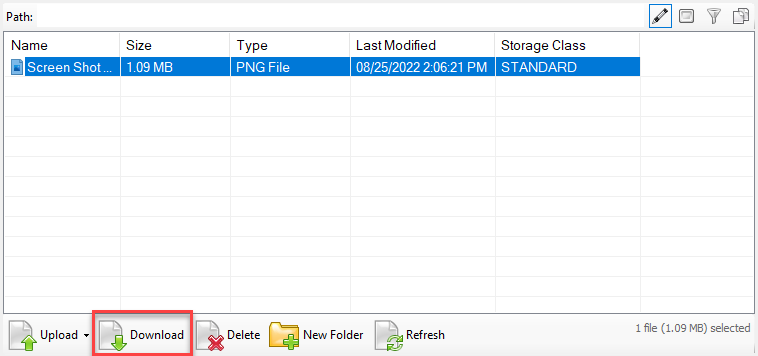
Step 1: Select the File/Folder you want to download from the list and choose Download.
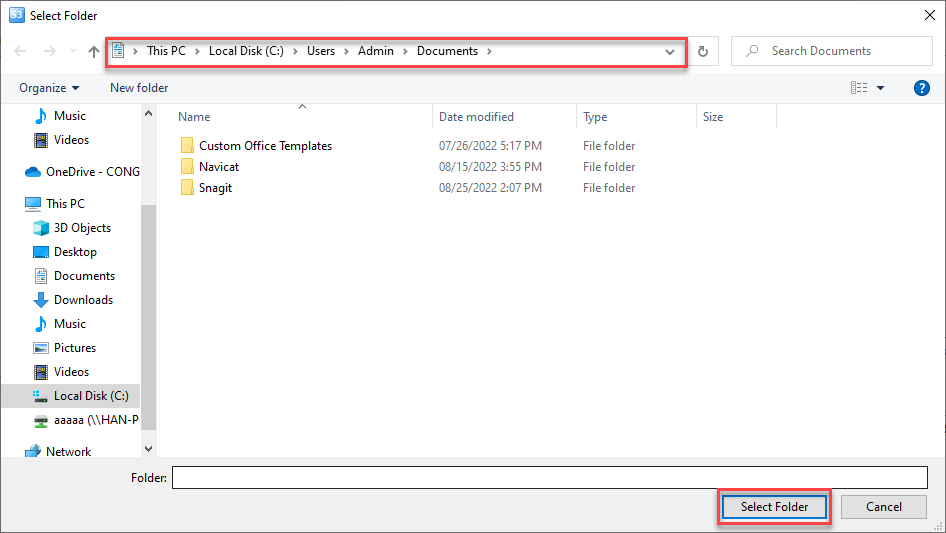
Step 2: Choose the local folder where you want to save the downloaded File/Folder from the S3 bucket and select Select Folder to confirm.
Enabling Versioning for a Bucket
Versioning is a feature that allows you to store and manage multiple versions of the same object in FPT Object Storage. You can use the Versioning feature to store, retrieve, and restore all versions of any object stored in your bucket.
To enable this feature for a bucket, follow these steps:
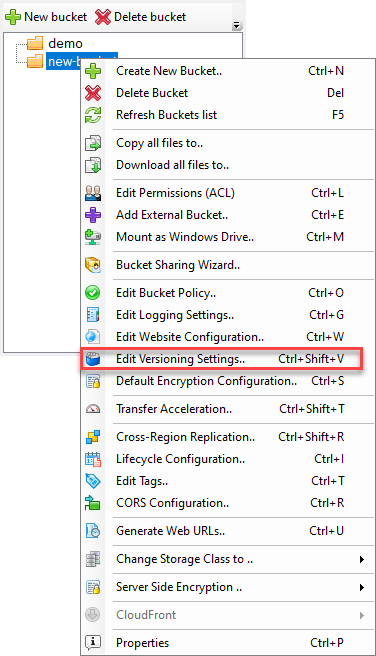
Step 1: In the S3 Browser interface, select the bucket you want to enable Versioning for and choose Edit Versioning Settings.
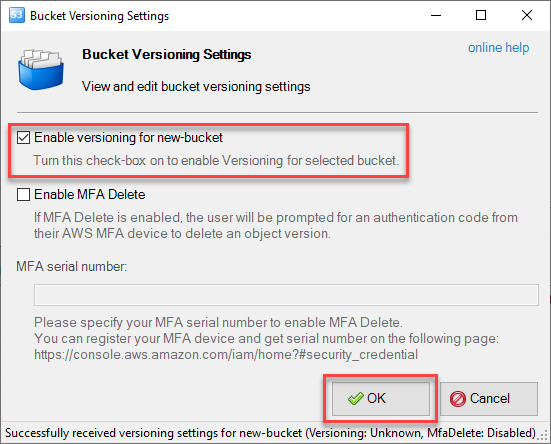
Step 2: Tick the box for Enable versioning for new-bucket and select OK to save the settings.
Restoring Deleted Files
After enabling Versioning, all actions that result in file changes, including deletion, are stored and numbered. If you want to restore a deleted file, remove the (delete) marked version from the Version list, and the file will be rolled back to the normal version before deletion.
To restore a deleted file, follow this example:
First, upload any file to a bucket with Versioning enabled and then select Delete to delete it.
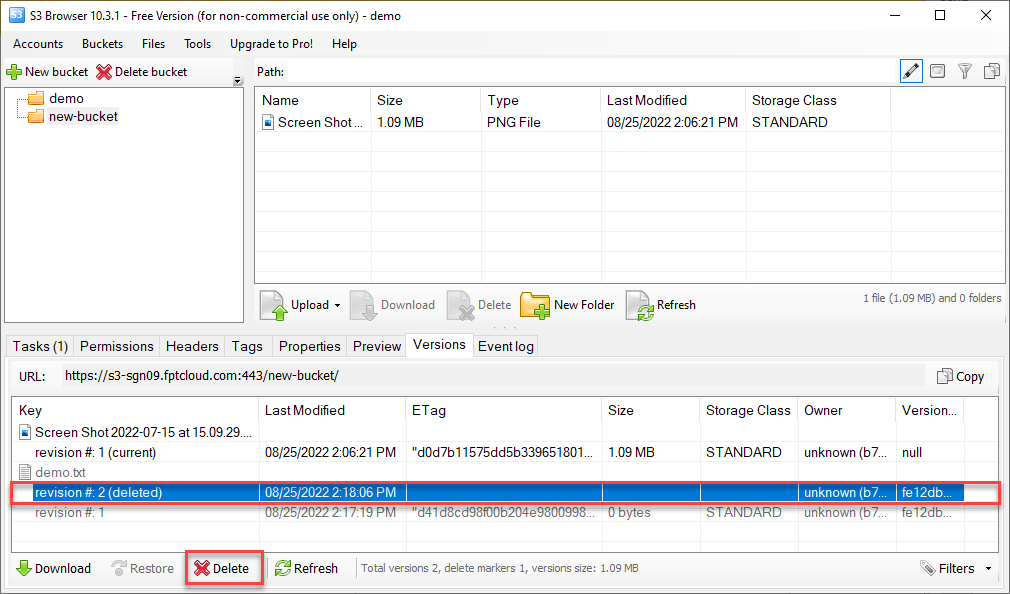
In the Versions tab, you will see the latest version marked (delete). Select that version and choose Delete.
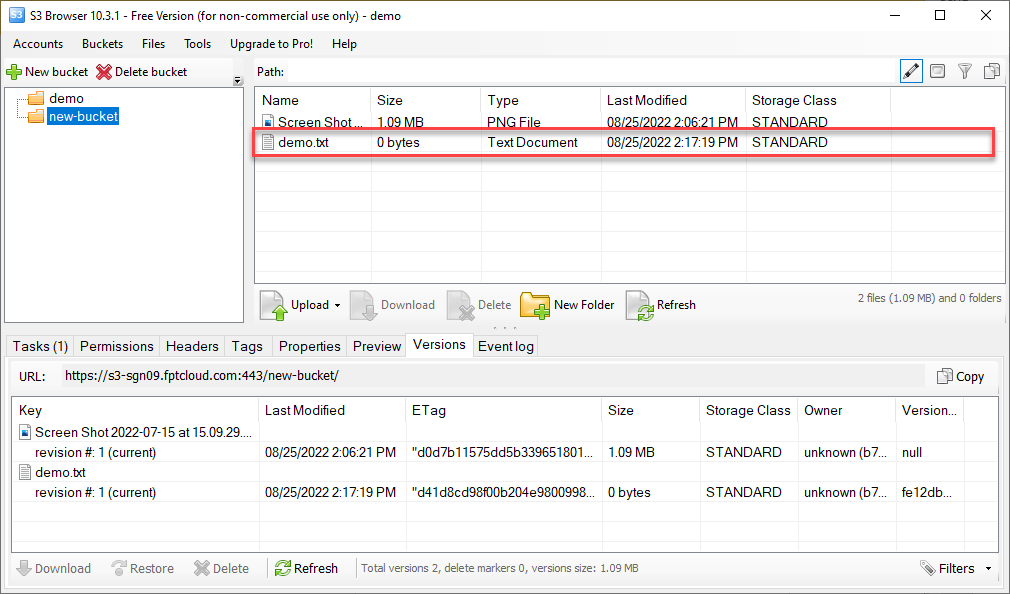
The file will be restored.
Downloading Older Versions of a File
If Versioning is enabled, you can download older versions of a file as follows:
Step 1: In the S3 Browser interface, select the file for which you want to download older versions.
Step 2: Open the Versions tab and select the version you want to download.
Step 3: Choose Download, then select the location to save the file on your local machine and click Select folder.
Setting Up Bucket Lifecycle Policies
The Bucket Lifecycle feature allows you to automatically delete files, groups of files, or file versions from Storage after a specified period. Deleting unnecessary files or versions can save you valuable resources and costs for Storage.
To enable Bucket Lifecycle, follow these steps:
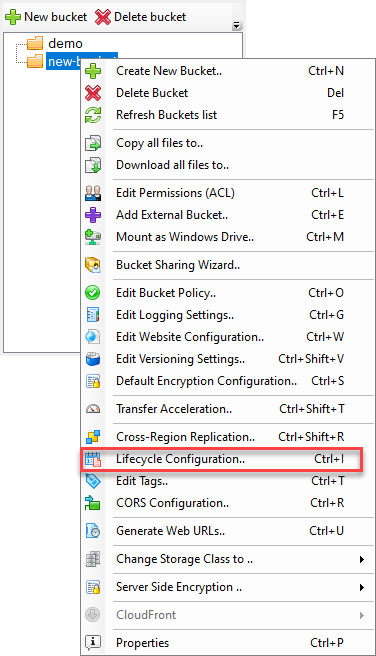
Step 1: In the S3 Browser interface, select the bucket you want to enable Bucket Lifecycle and choose Lifecycle Configuration.
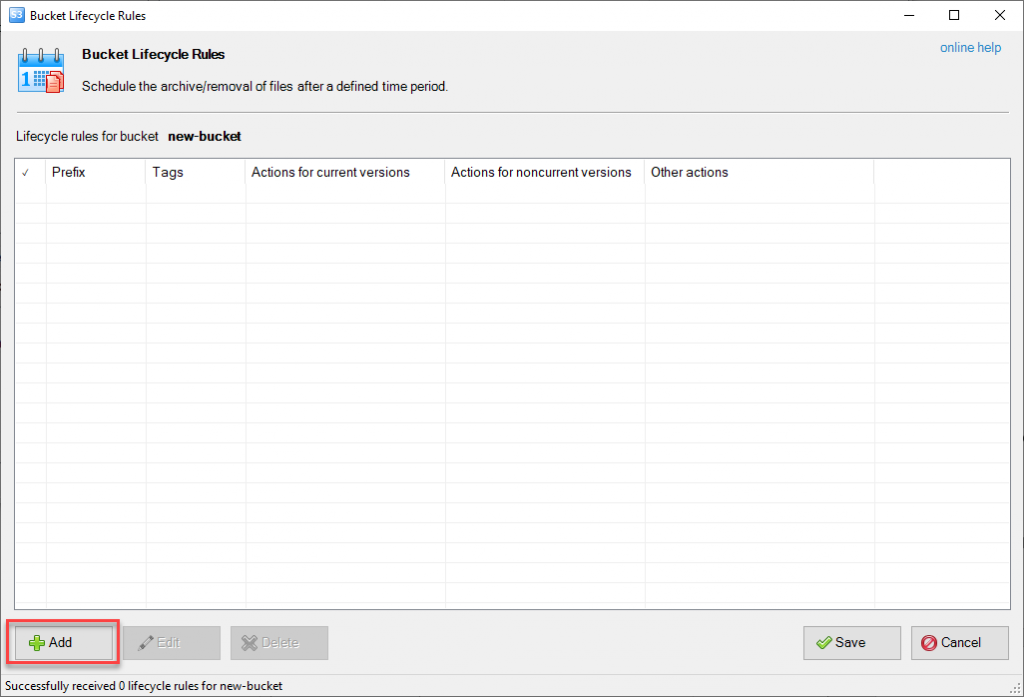
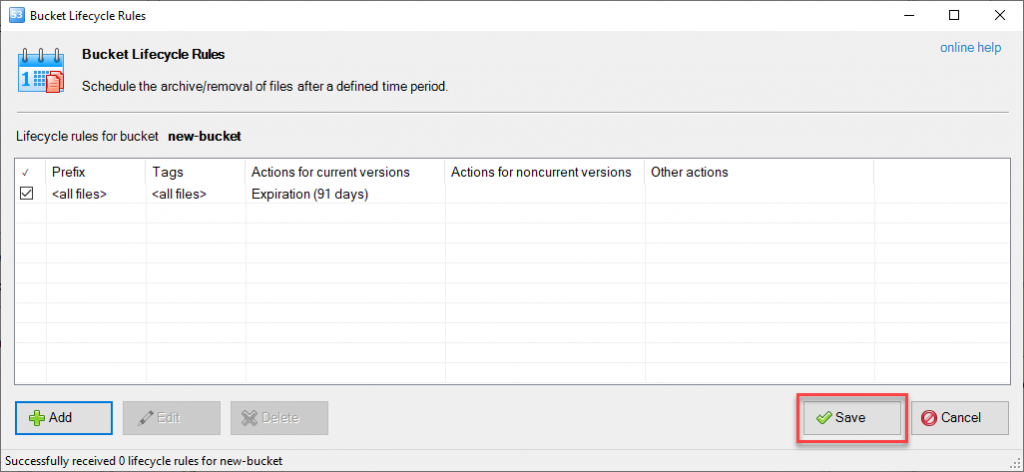
Step 2: Select Add in the Bucket Lifecycle Rules popup to add a new rule.
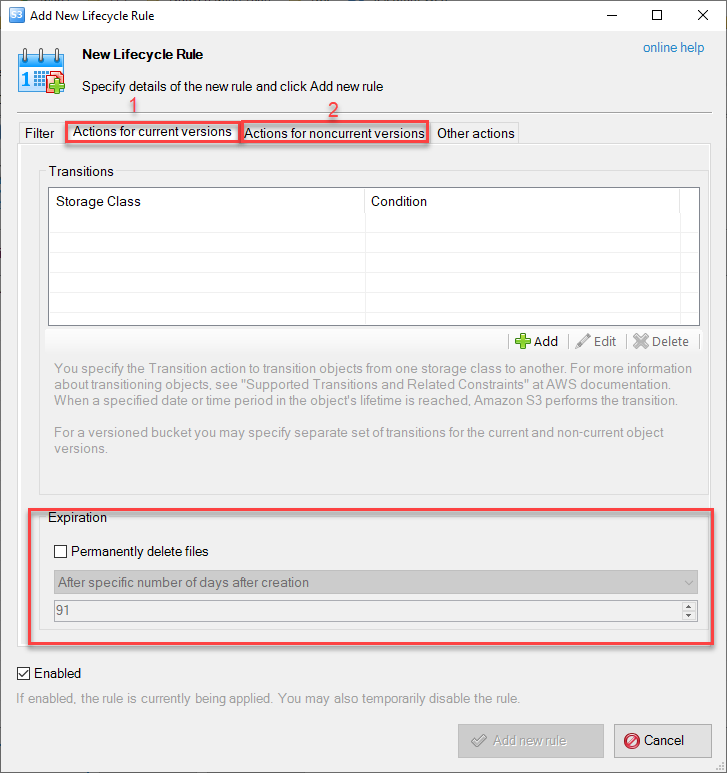
Step 3: In the Add New Lifecycle Rule popup, pay attention to two tabs:
- Action for current versions: Add actions that will affect the file's current version.
- Action for noncurrent versions: Add actions affecting older file versions.
Depending on your needs, open the corresponding tab and select Permanently delete files under Expiration.
Step 4: Choose the deletion mode:
- After a specific number of days after creation: Files will be deleted after a certain number of days.
- On a particular date (UTC Midnight): Files will be deleted on a specific date (in UTC).

Step 5: Enter the number of days or a specific date, depending on the deletion mode, and select Add new rule.
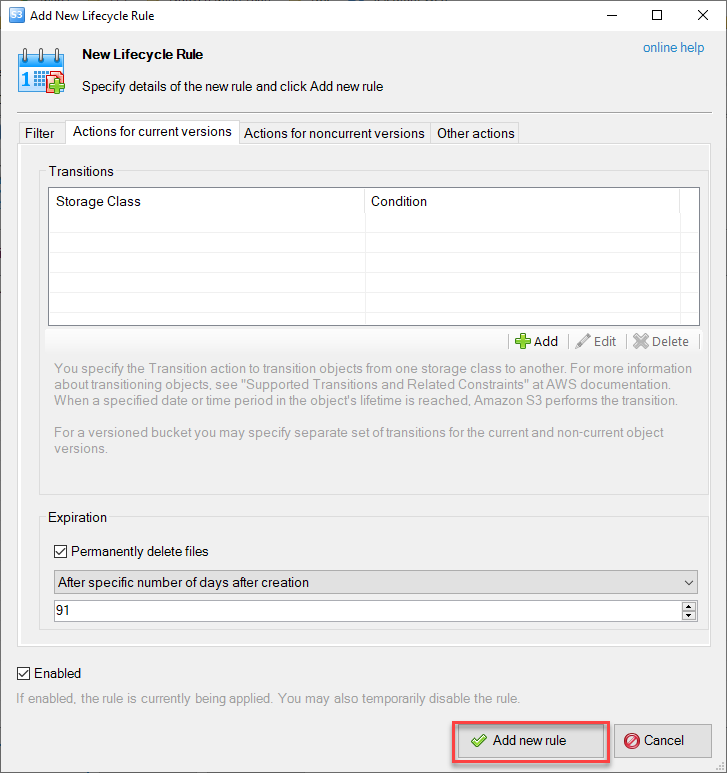
Step 6: Add more rules if needed, and once you have set up all the rules, select Save.
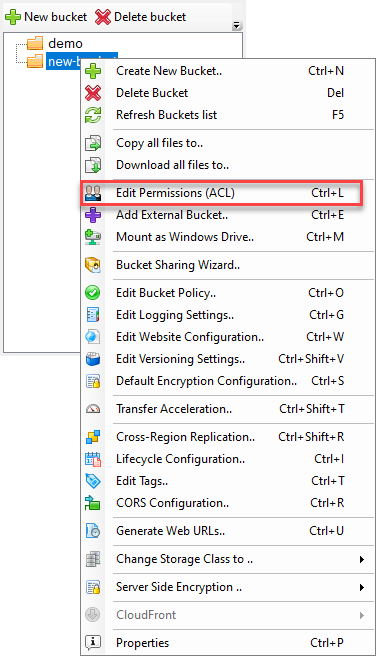
Setting Up Bucket ACL (Access Control List)
Bucket ACL (Access Control List) is a feature that allows you to manage access rights to groups and objects in your bucket.
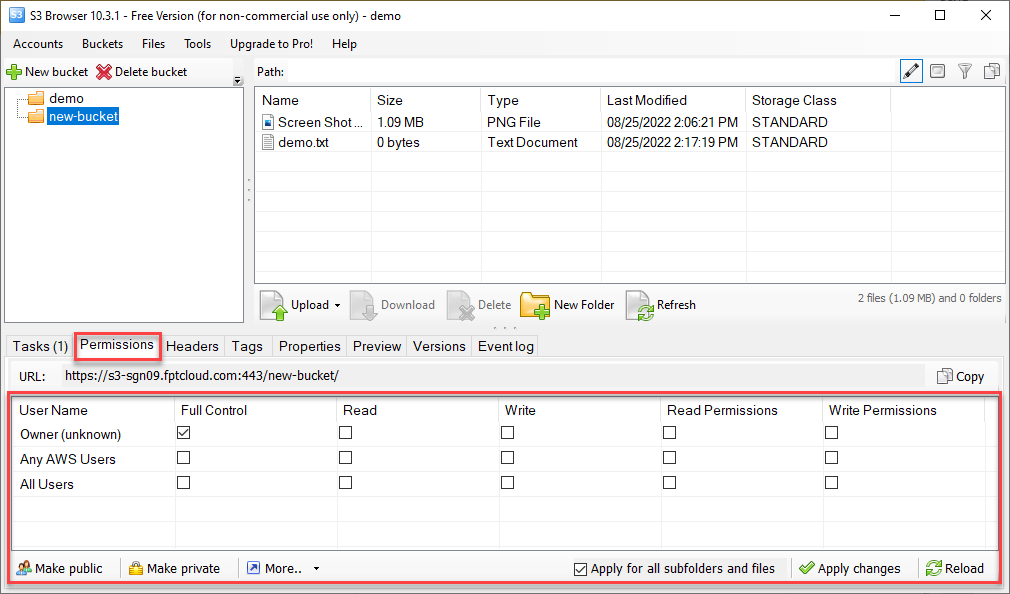
Bucket ACL supports three basic user types with Full Control, Read, Write, Read Permissions, and Write Permissions. Users can quickly set permissions by choosing one of two ACL types:
- Make public: All users can access the bucket with Read permissions.
- Make private: Only the owner can operate with the bucket.
Using a Bucket as a Static Website
Using a bucket as a static website allows you to create a static website that can be made public on the Internet and accessed via the S3 WEBSITE ENDPOINT.
Step 1: Upload the entire website source to the S3 bucket.
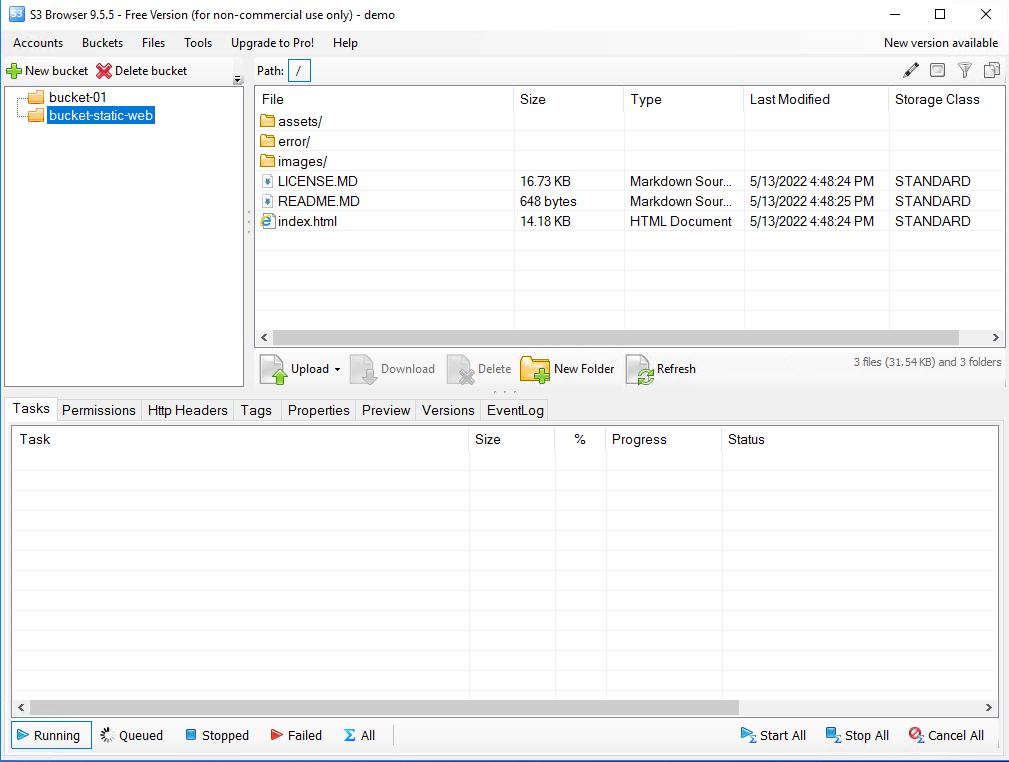
Step 2: Select the bucket you want to use as a static website and choose Edit Website Configuration.
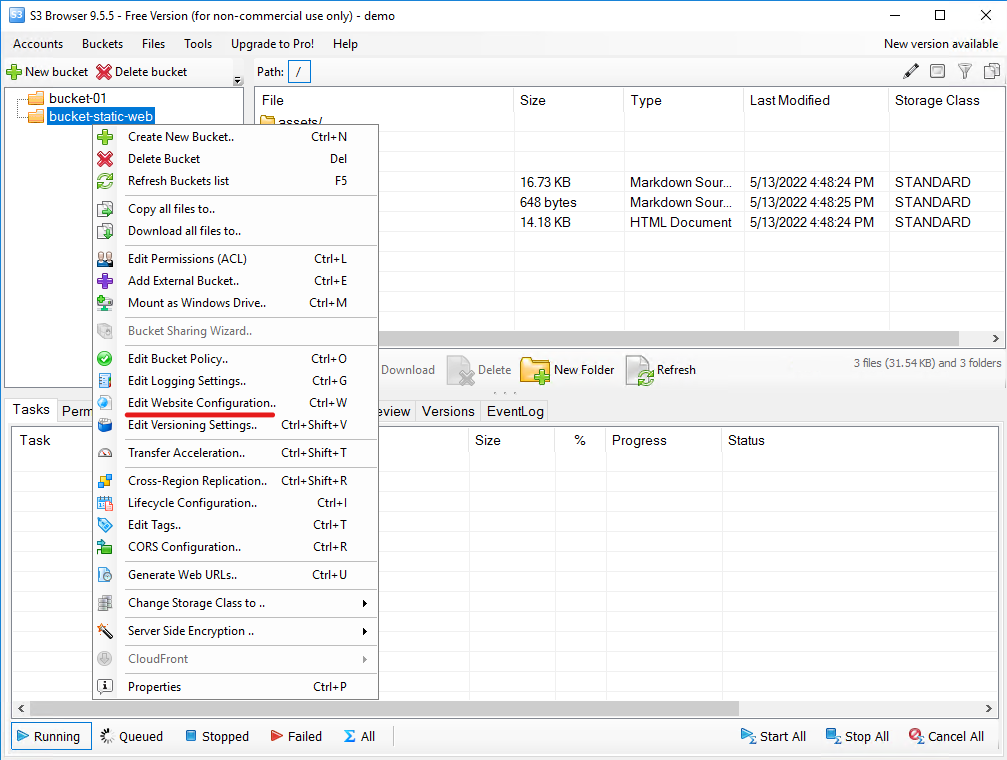
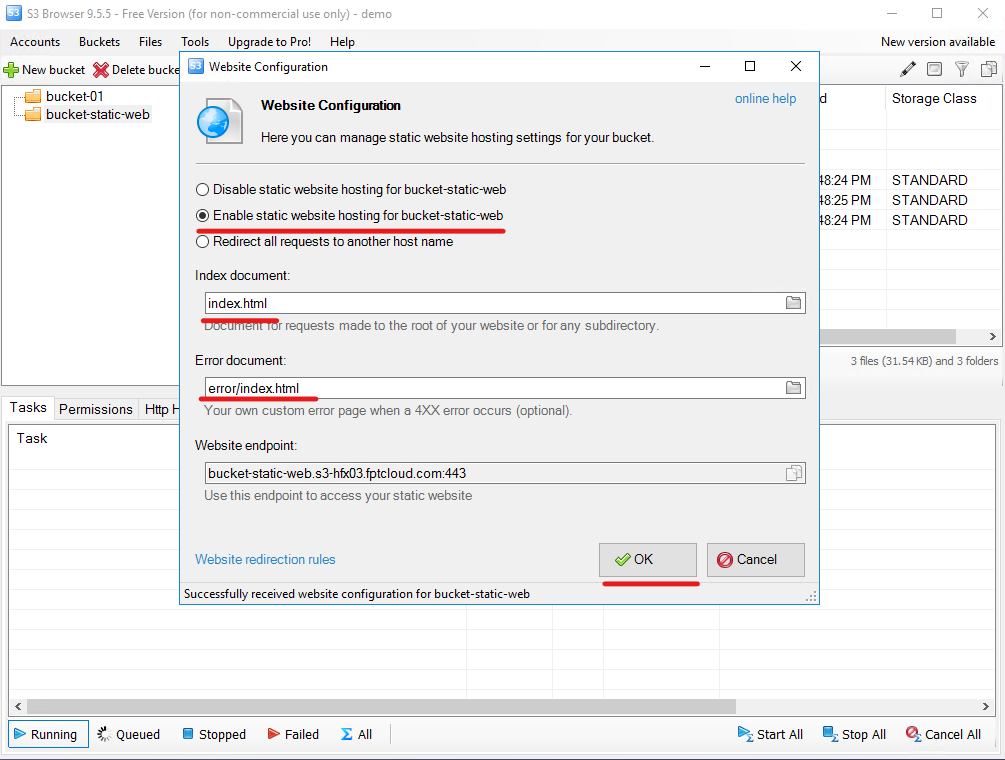
Step 3: Select Enable static website hosting, choose the Index document, and Error document corresponding to the source uploaded to the bucket.
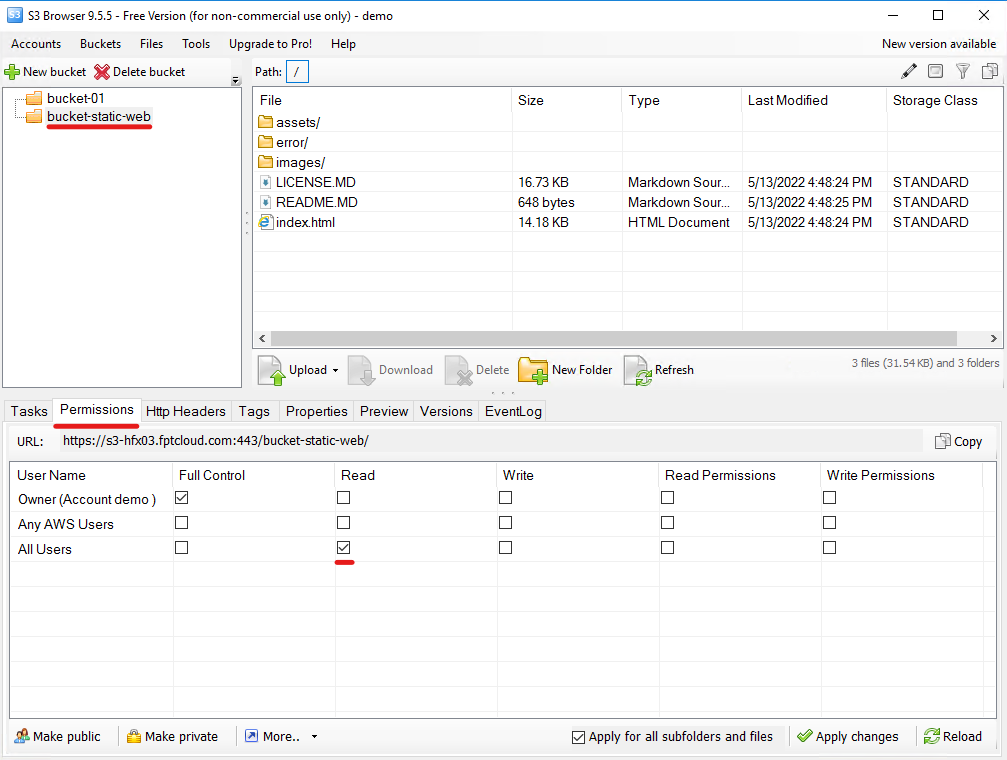
Step 4: Select Permissions and set Read permissions for all users for the bucket.
Step 5: Access the static website using the provided S3 WEBSITE ENDPOINT link from the Object Storage Management section.
Creating Public Links with a Specific Time Frame
The feature of creating public links within a specific time frame allows you to make the source web content stored in a bucket public. Typically, this can be used for testing web sources or demonstrations.
Note: Creating public links within a specific time frame requires using S3 Browser Pro.
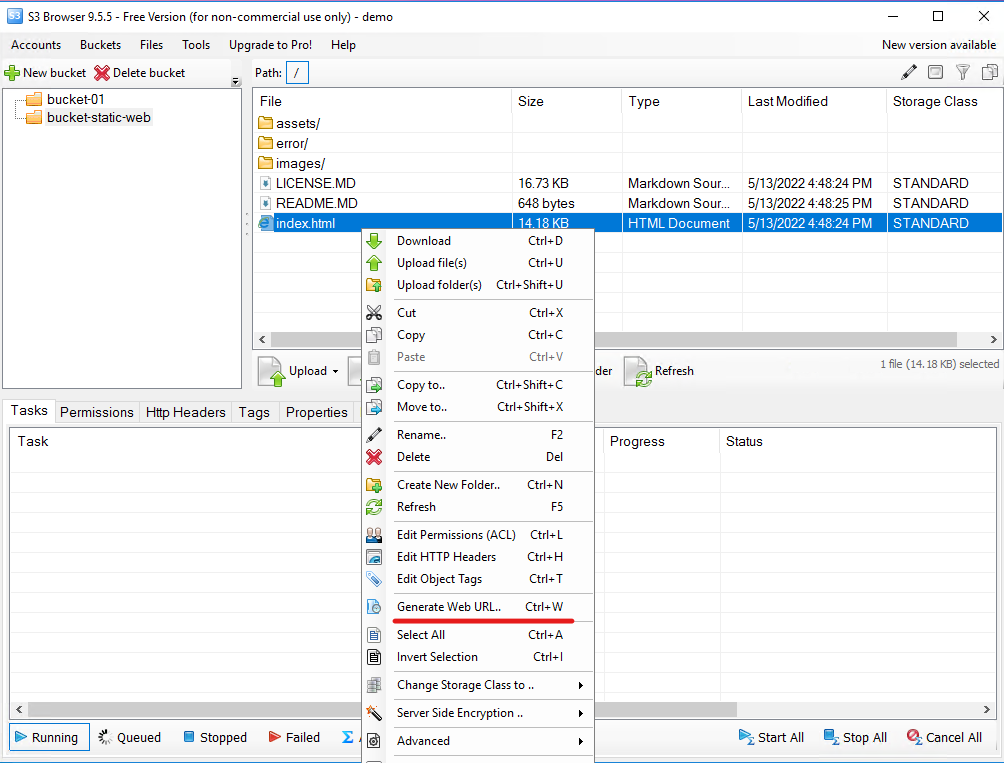
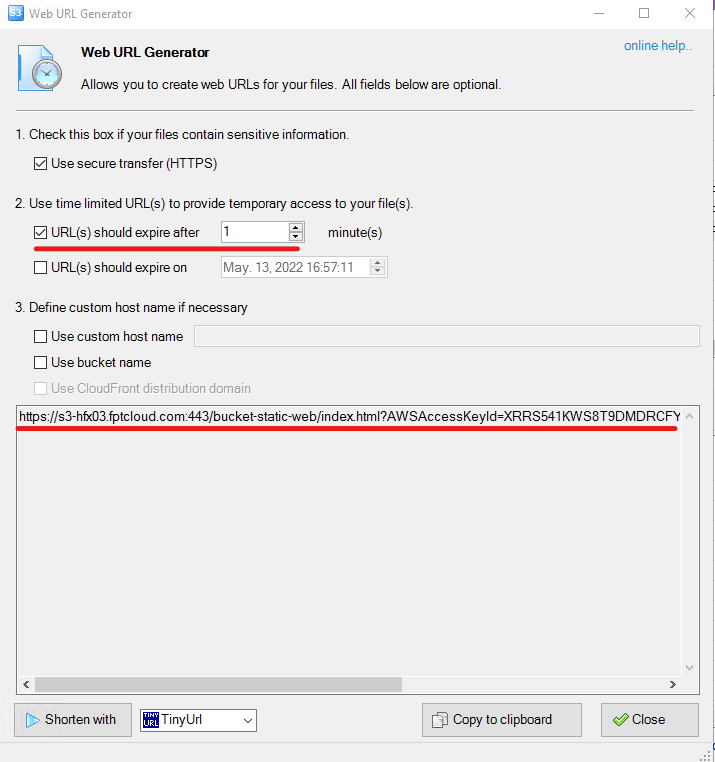
Step 1: Select an HTML file in the bucket and choose Generate Web URL.
Step 2: Choose either an expiration time in minutes or a specific expiration date and time (day-month-year-hour-minute-second). Copy and access the link.
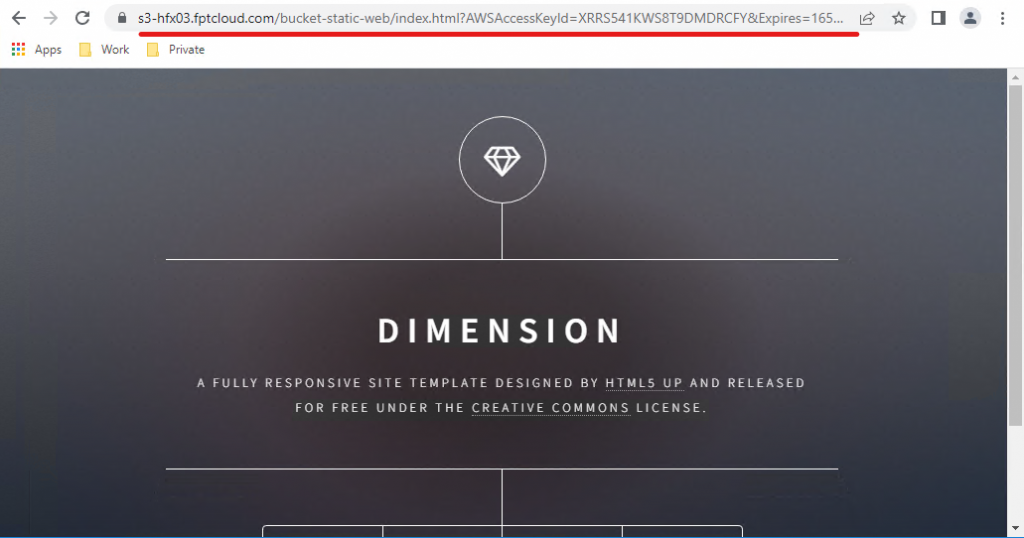
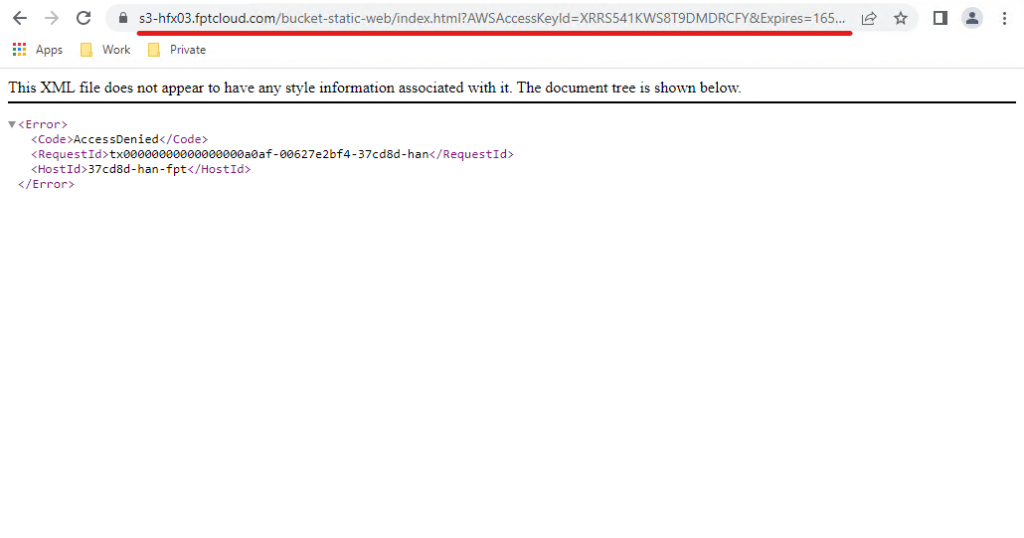
You can verify that the link becomes inaccessible after the expiration time.
CORS (Cross-Origin Resource Sharing)
Step 1: Access the CORS Configuration in S3 Browser.
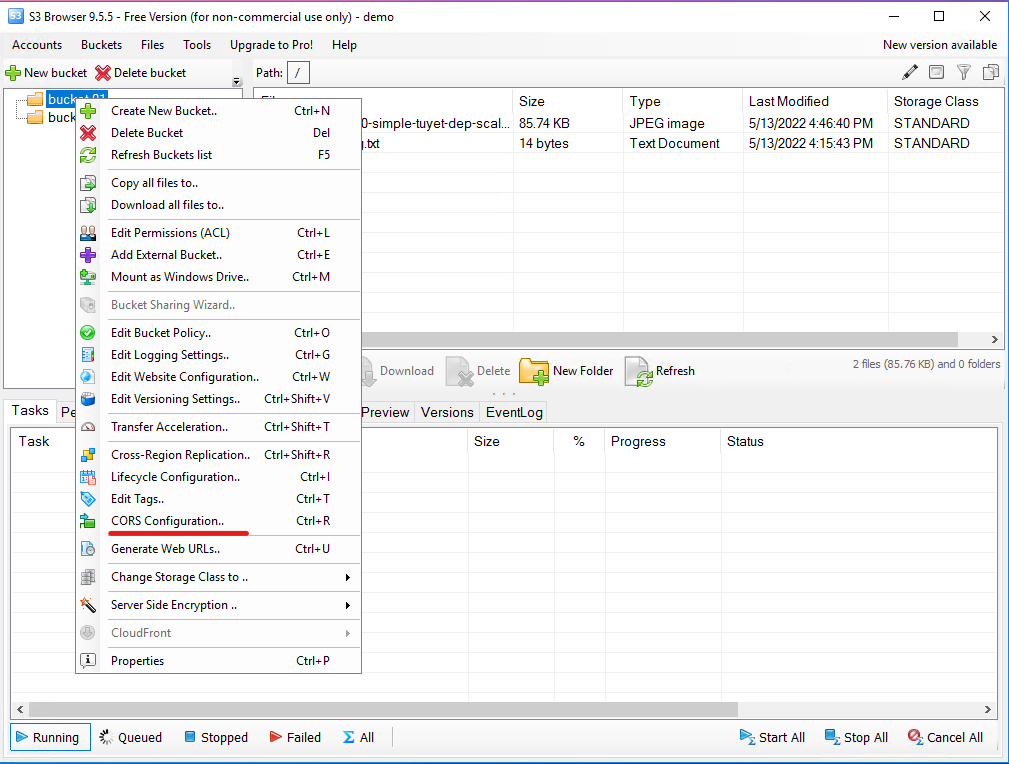
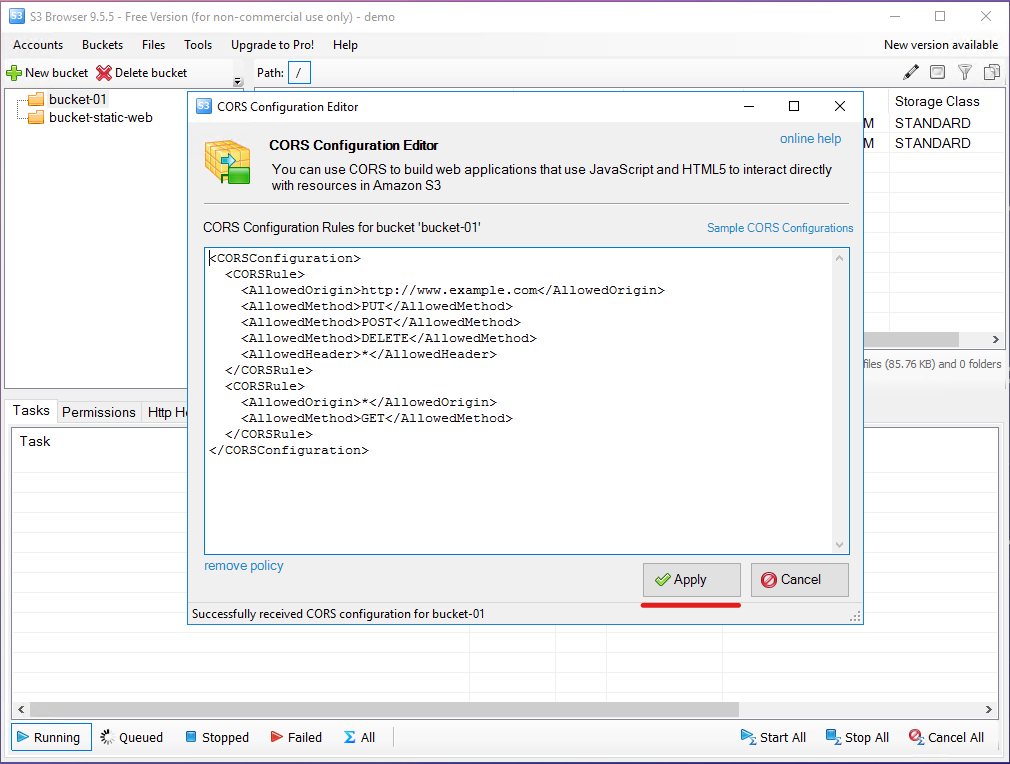
Step 2: Add a CORS Configuration Rule as XML and select Apply.
<CORSRule>
   <AllowedOrigin>http://www.example.com</AllowedOrigin>
   <AllowedMethod>PUT</AllowedMethod>
   <AllowedMethod>POST</AllowedMethod>
   <AllowedMethod>DELETE</AllowedMethod>
   <AllowedHeader>*</AllowedHeader>
   <MaxAgeSeconds>3000</MaxAgeSeconds>
   <ExposeHeader>*</ExposeHeader>
</CORSRule>