- About Us
-
 Secure, unlimited storage to ensures efficiency as well as high and continuous data access demand.
 Virtual server integration for 3D Rendering, AI or ML
 Enhance application capacity and availability.
 Access to an all-inclusive stack for AI development, driven by NVIDIA’s powerful technology!
 FPT Web Application Firewall provides powerful protection for web applications
 Advanced virtual server with rapid scalability
 Backup and restore data instantly, securely and maintain data integrity.
Advanced virtual server with rapid scalability
Access to an all-inclusive stack for AI development, driven by NVIDIA’s powerful technology!
Enhance application capacity and availability.
Backup and restore data instantly, securely and maintain data integrity.
Recovery, ensuring quick operation for the business after all incidents and disasters.
Backup and restore data instantly, securely and maintain data integrity.
Advanced virtual server with rapid scalability
Access to an all-inclusive stack for AI development, driven by NVIDIA’s powerful technology!
Enhance application capacity and availability.
Backup and restore data instantly, securely and maintain data integrity.
Recovery, ensuring quick operation for the business after all incidents and disasters.
 Diverse throughput and capacity to meet various business workloads.
Secure, unlimited storage to ensures efficiency as well as high and continuous data access demand.
FPT Web Application Firewall provides powerful protection for web applications
Intelligent and Comprehensive Virtual Web Application Firewall - Security Collaboration between FPT Cloud and Penta Security.
The Next generation firewall security service
Easily store, manage, deploy, and secure Container images
Safe, secure, stable, high-performance Kubernetes platform
Provided as a service to deploy, monitor, backup, restore, and scale MongoDB databases on cloud.
Provided as a service to deploy, monitor, backup, restore, and scale Redis databases on cloud.
Provided as a service to deploy, monitor, backup, restore, and scale PostgreSQL databases on cloud. System Monitoring Solution anywhere, anytime, anyplatform
 Helps reduce operational costs by up to 40% compared to traditional BI solutions, while improving efficiency through optimized resource usage and infrastructure scaling.
 - Pricing
- Partner
- Event
VPN Site-to-Site
-
 Quick Guide
-
 Detailed Instructions
-
 FAQs
FAQs
-
 VPN Site-to-Site (new version)
-
Common VPN Device Configuration
- VPN Site-to-Site Configuration with Palo Alto
- VPN Site-to-Site Configuration with Fortigate
- VPN Site-to-Site Configuration between FCI and AWS (Virtual private gateways)
- VPN Site-to-Site Configuration between FCI and AWS (Transit-Gateway)
- VPN Site-to-Site Configuration between Openstack portal and VMW
-
VPN Connection Management
- Create a VPN Connection
- Edit VPN Connection
- Enable/Disable VPN Connection
- Delete VPN Connection
- Create Customer gateway
- Edit Customer gateway
- Delete Customer gateway
- Service Authorization Management
- Setting up alerts via the Cloud Guard service
- Service monitoring via the Monitoring feature
- Monitoring service through Logging feature
- FAQs
-
Common VPN Device Configuration
You must ensure the following conditions are met:
- VPN Site-to-Site has been created on the Portal
- Fortigate has been installed, enabled, and licensed on the customer side
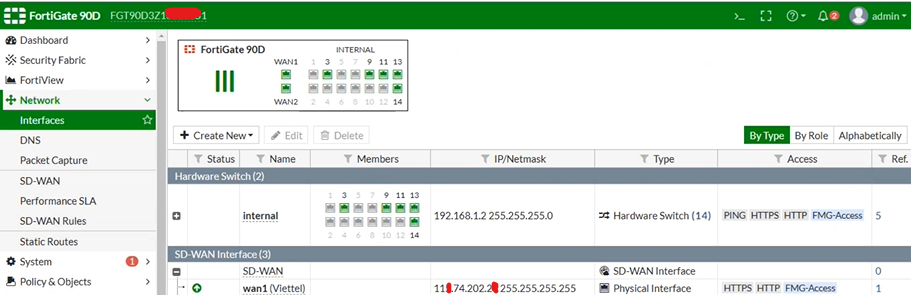
- Fortigate has been configured with LAN and WAN IPs
Step 1: Configure VPN Site-to-Site
Access and create a VPN Site-to-Site connection on https://console.fptcloud.com/ .
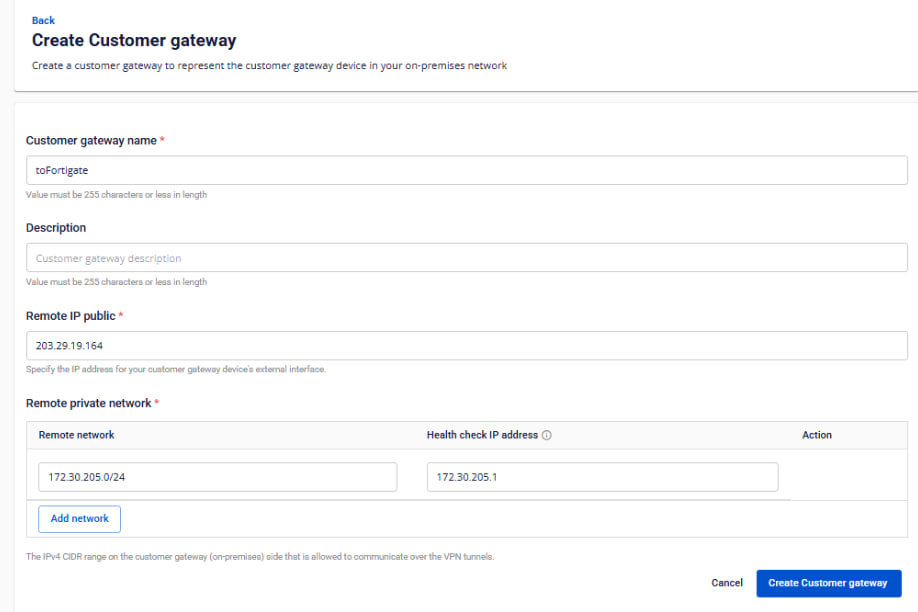
-Create a Customer Gateway:
-
Remote private network: LAN subnet range to be peered with Fortigate
-
Remote IP public: Public IP of Fortigate
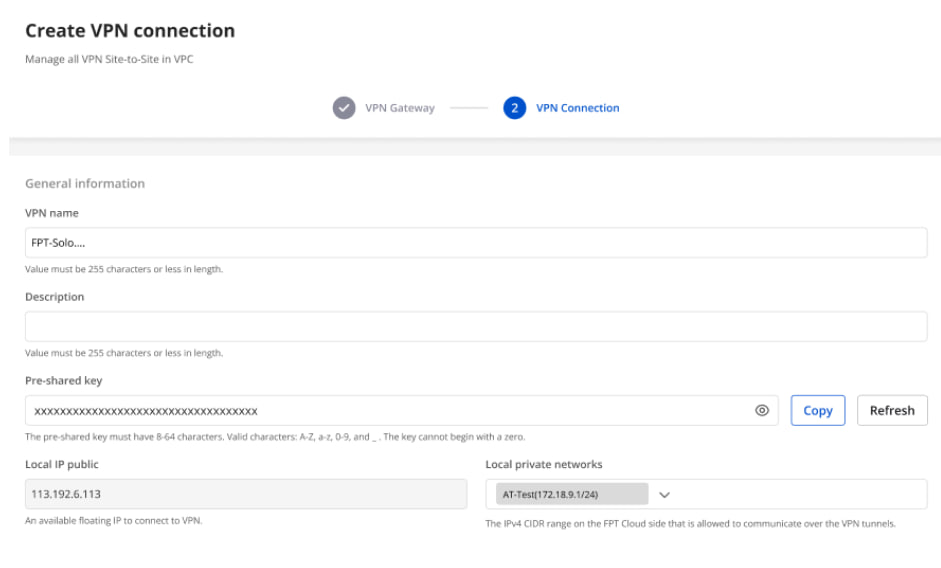
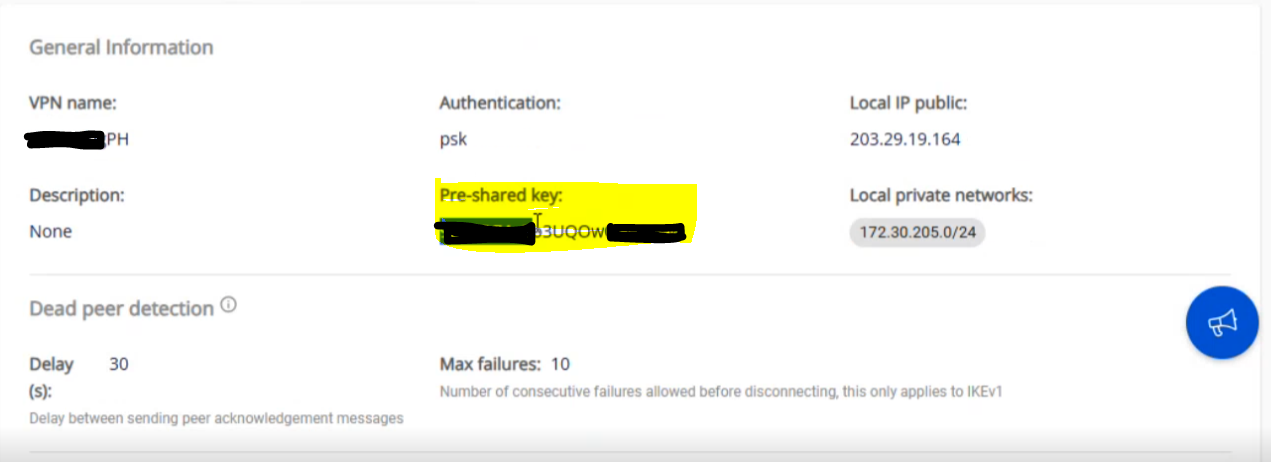
-Create a VPN Connection:
The “Pre-shared key” value should be saved for configuration on Fortigate.
The VPN connection includes three main sections:
-
General Information (contains basic connection details)
-
Remote VPN Information (contains encryption and customer-side details)
-
Dead Peer Detection (number of automatic retries if the connection encounters issues)
Section 1: General Information
 Section 2: Remote VPN Information
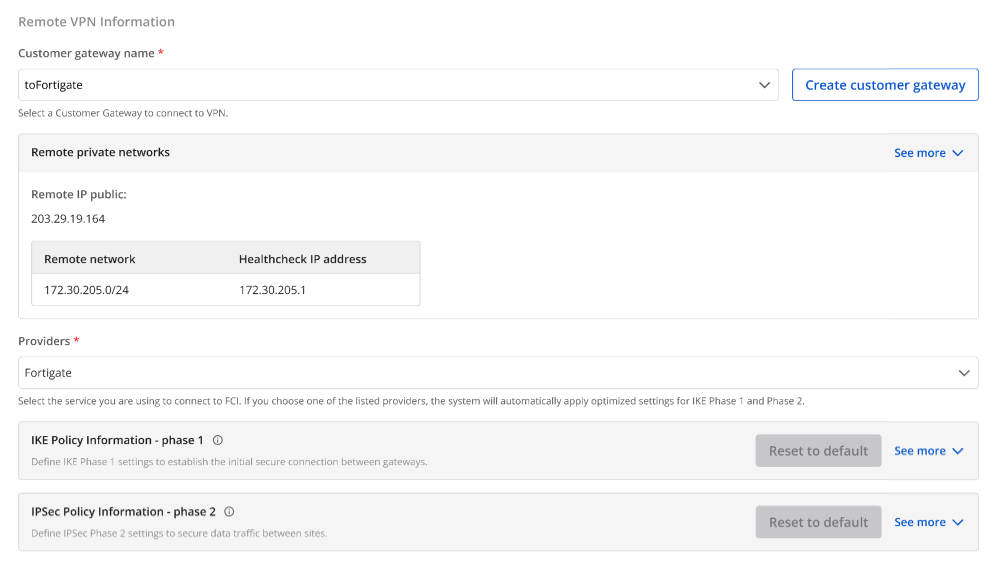
When selecting the provider “Fortigate,” the system automatically fills in the IKE and IPsec information as follows:
For IKE:
-
Encryption algorithm: aes-256
-
Authorization algorithm: sha256
-
IKE version: ikev2
-
Lifetime units: seconds
-
Lifetime value: 28800
-
DH Group: GROUP_14
-
Phase 1 negotiation mode: main
For IPsec:
-
Encapsulation mode: tunnel
-
Encryption algorithm: aes-256
-
Authorization algorithm: sha256
-
Lifetime units: seconds
-
Lifetime value: 3600
-
Perfect forward secrecy (PFS): GROUP_14
-
Transform protocol: esp
Section 3: Dead Peer Detection
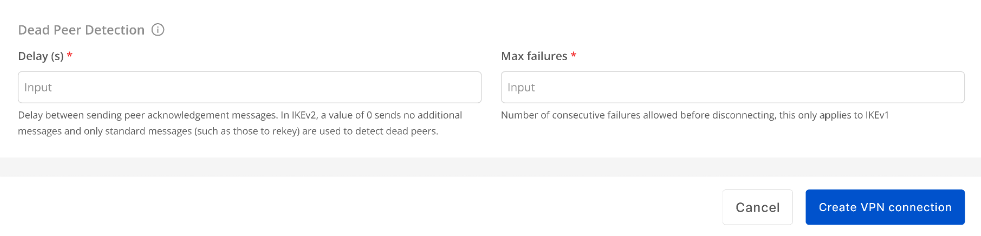
Enter the Delay and Max failures values, then click Create VPN Connection.
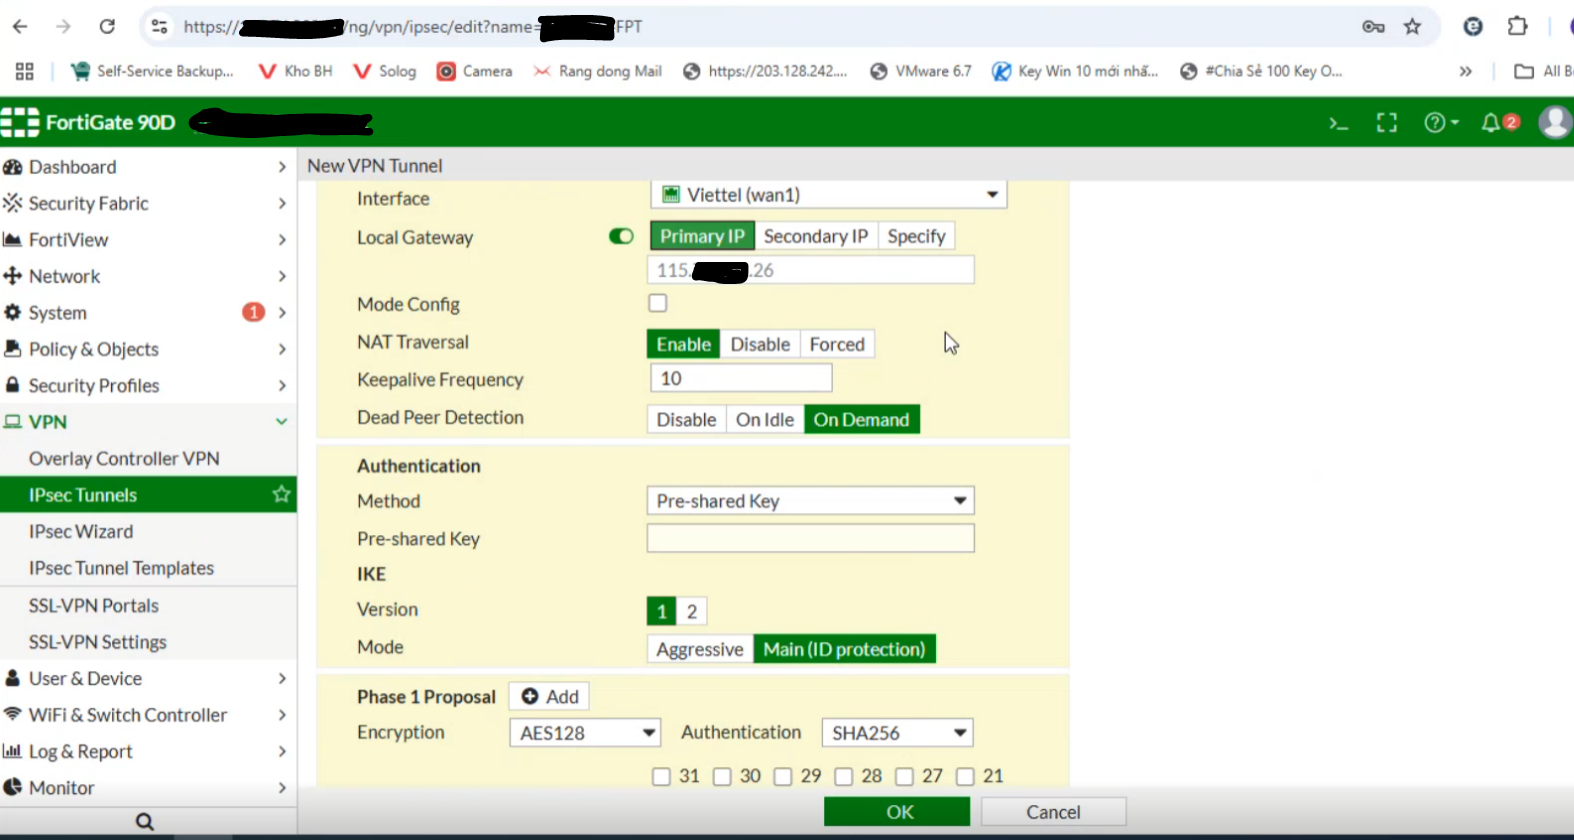
Step 2: Configure IPsec on Fortigate
-
Log in to the Fortigate web interface:
-
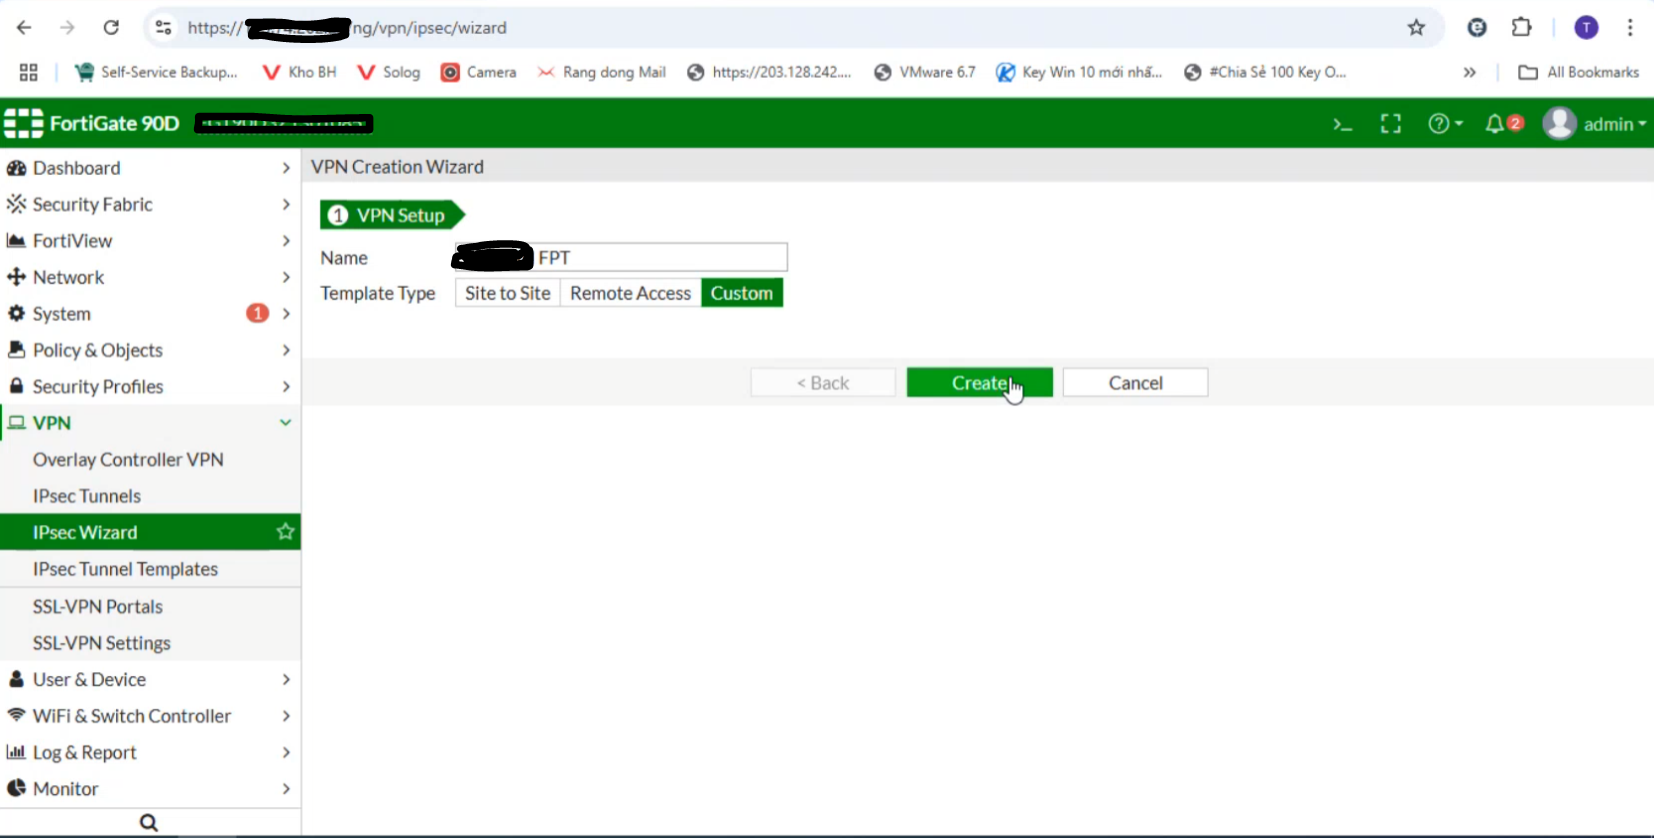
Select IPsec Wizard:
-
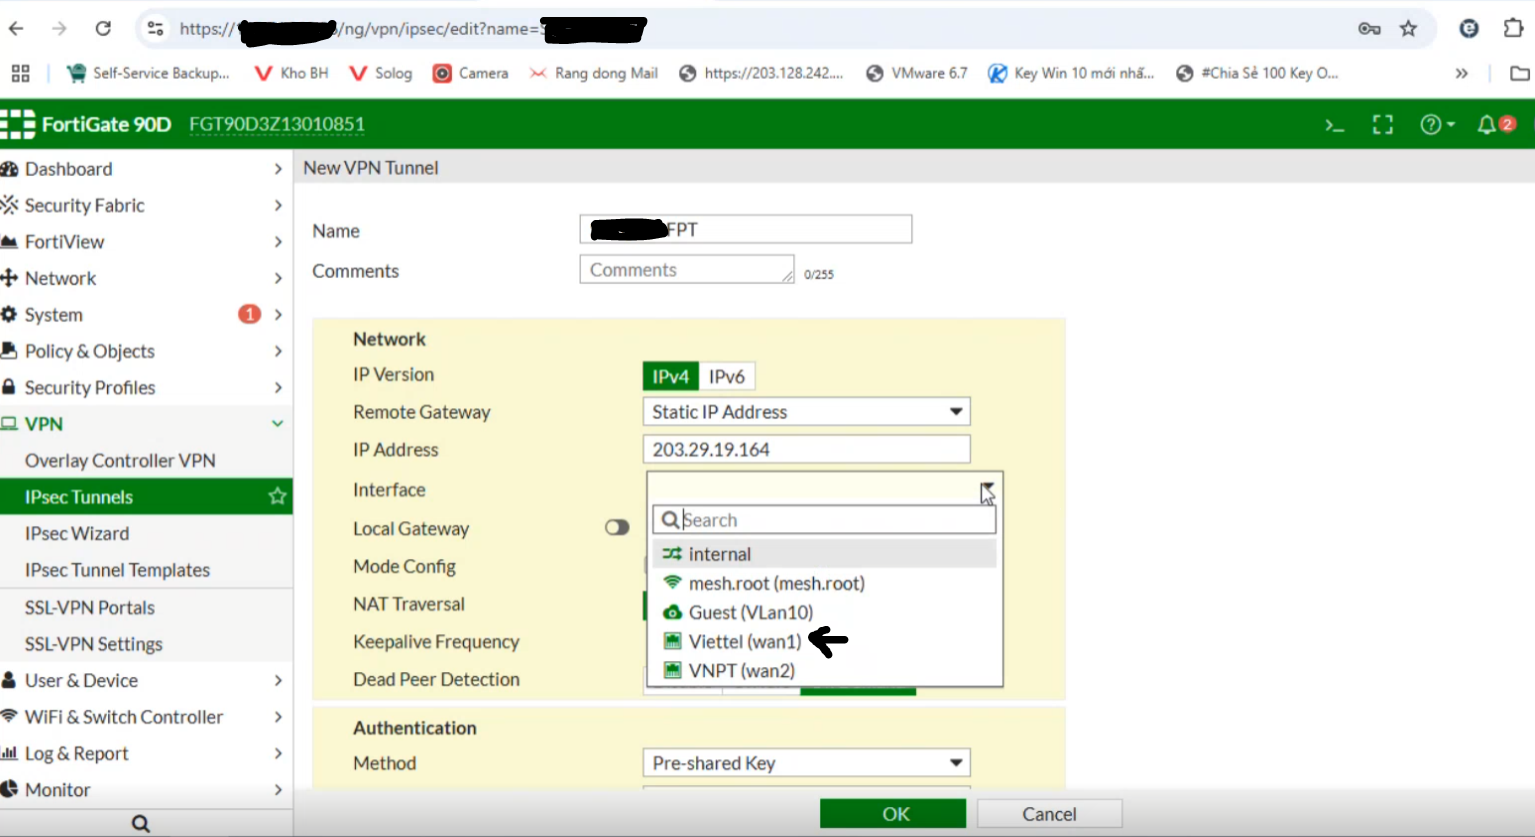
Go to IPsec Tunnels:
-Enter the IP Address of FPT created in Step 1
-Select the WAN interface (if multiple WANs exist, specify the one you want to use).
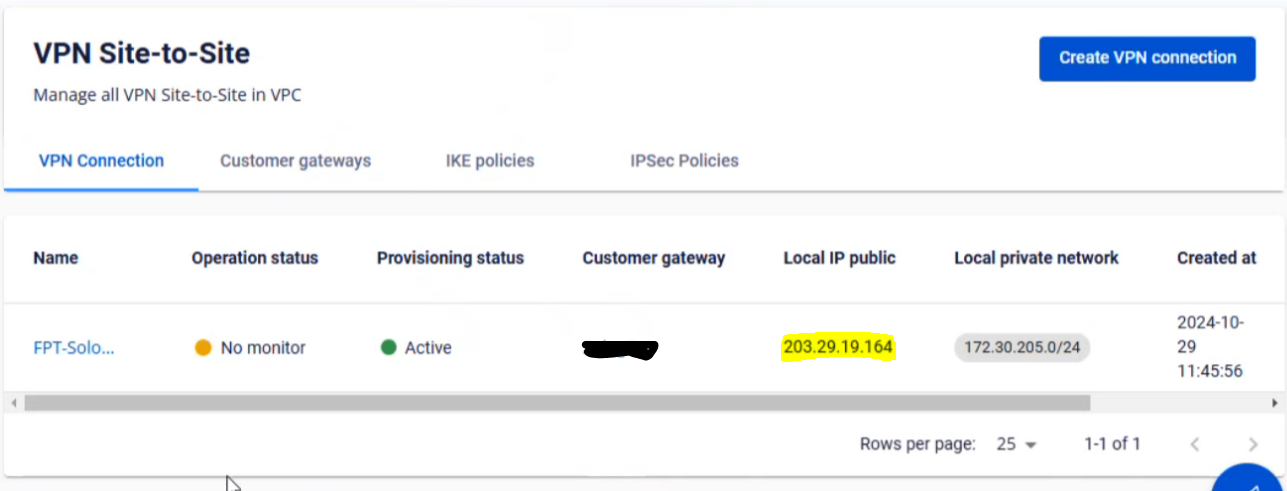
Check the connection status on the FPT Smart Cloud Portal:
-
Enable Local Gateway and select Primary IP
-
Set the Method to Pre-shared Key and enter the same key as in Step 1:
Note: If the customer’s setup is behind NAT, configure as shown below and contact L3-FPT Smart Cloud for support.

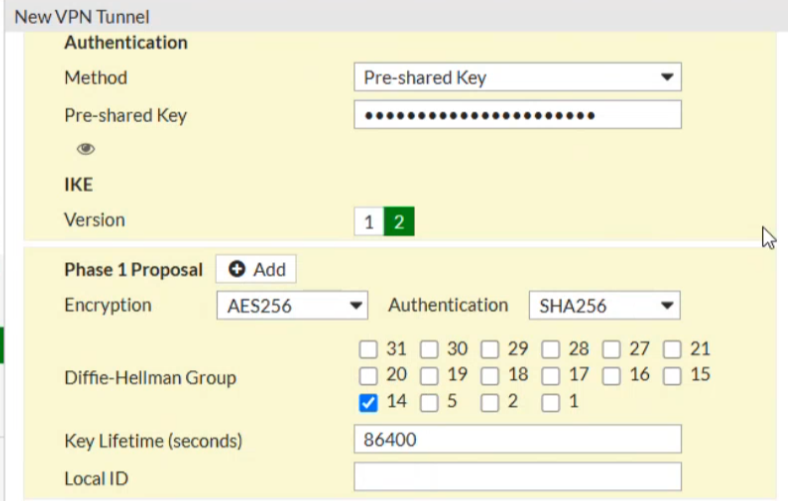
- Configure Phase 1 as follows:
If NAT is not used, ensure that NAT mode is disabled.
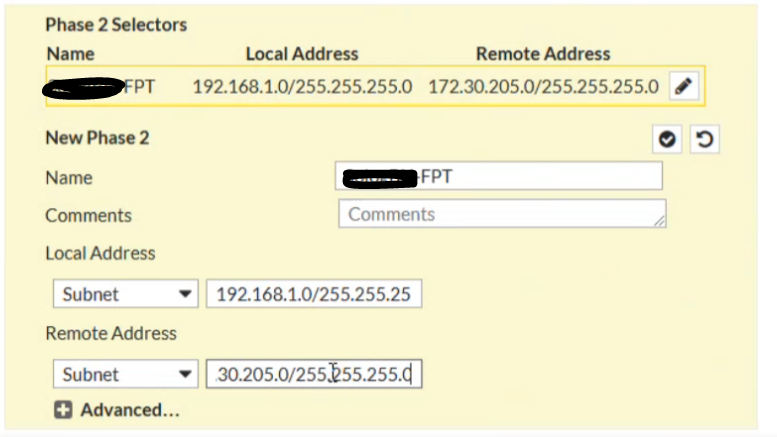
- Configure Phase 2 as follows:
-Local IP: The customer’s network range to be connected
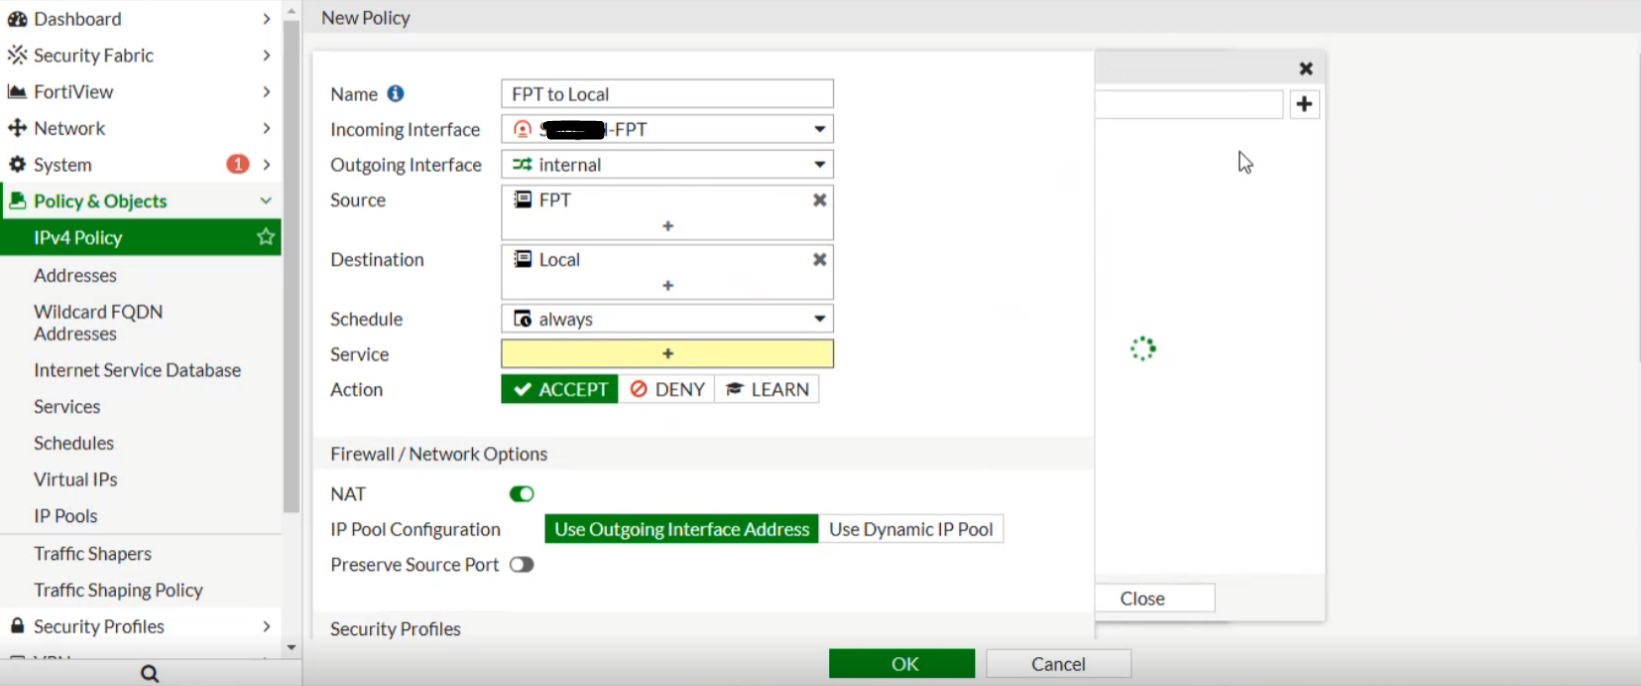
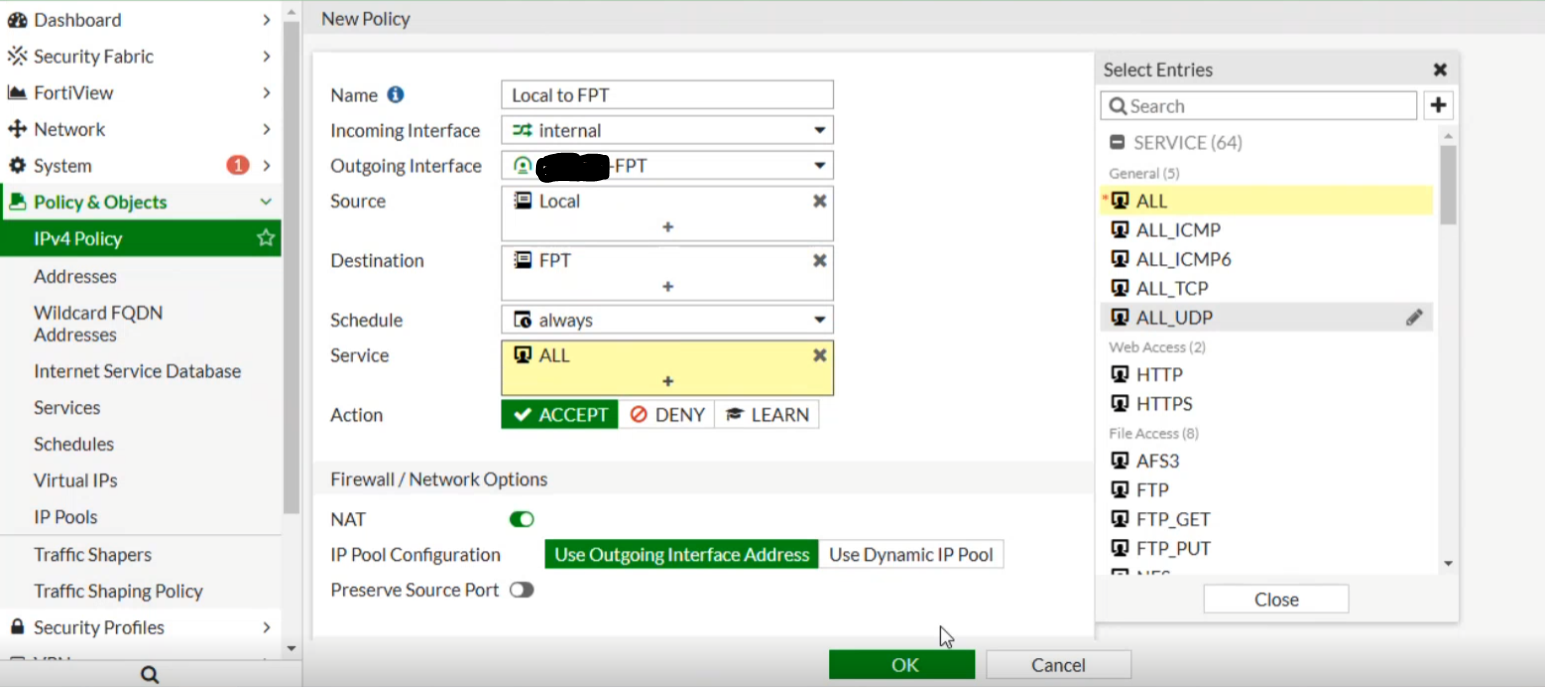
Step 3: Configure Firewall and Routing on Fortigate
- Set the firewall to Allow All for both incoming and outgoing traffic as shown below:
From FPT Cloud to Fortigate:
From Fortigate to FPT Cloud:
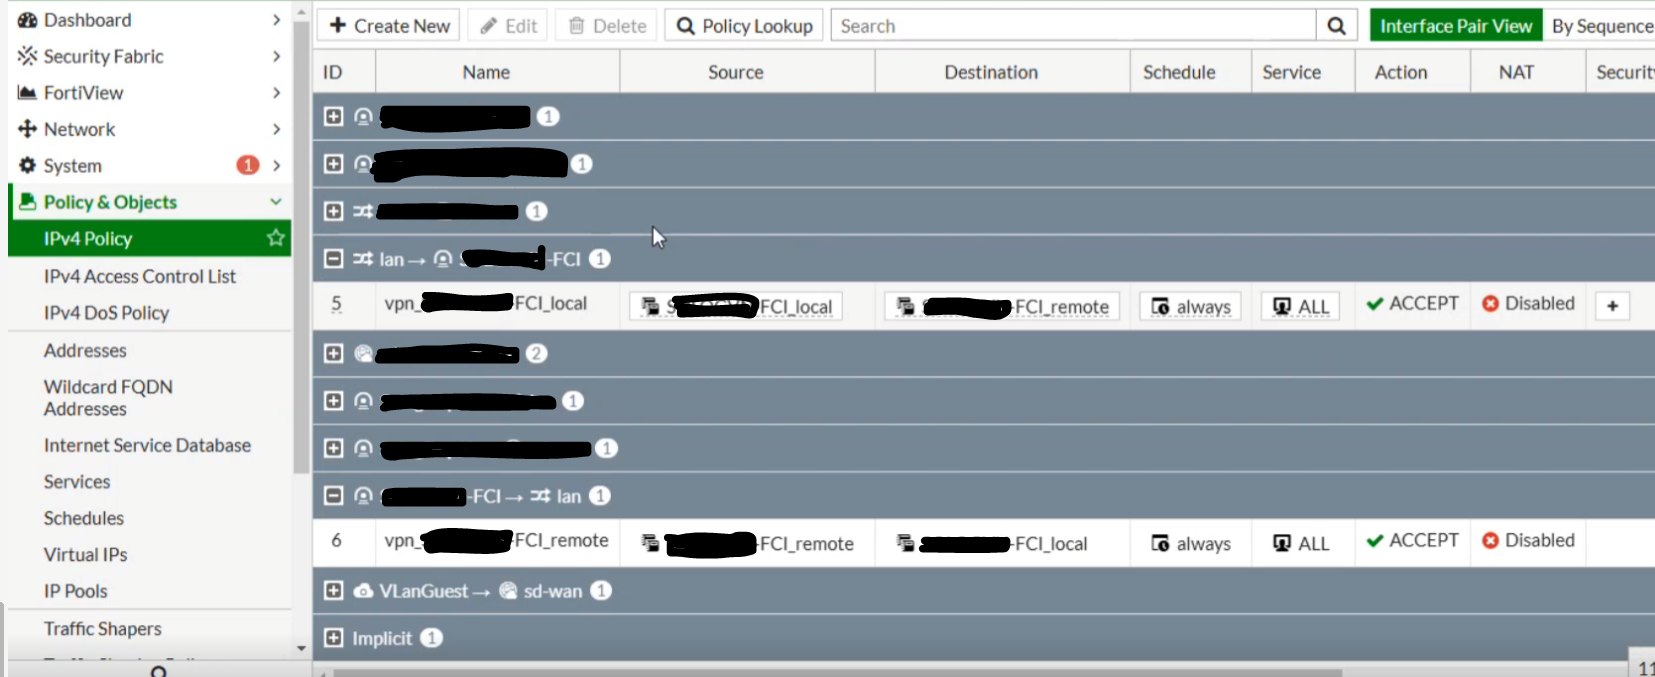
Connection successfully established between FPT Cloud and Fortigate:
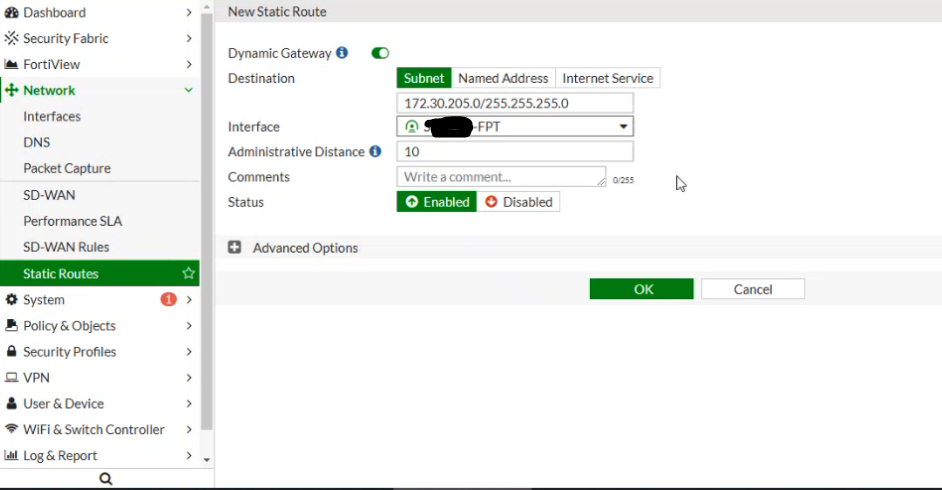
- Set the routing as shown below, where Destination is the FPT-side network (e.g., FCI – 172.30.205.0/255.255.255.0) and Interface is the IPsec Tunnel created in the previous step.
 At this point, you can open the Terminal / Command Line and test network connectivity using ping.