- About Us
-
 Secure, unlimited storage to ensures efficiency as well as high and continuous data access demand.
 Virtual server integration for 3D Rendering, AI or ML
 Enhance application capacity and availability.
 Access to an all-inclusive stack for AI development, driven by NVIDIA’s powerful technology!
 FPT Web Application Firewall provides powerful protection for web applications
 Advanced virtual server with rapid scalability
 Backup and restore data instantly, securely and maintain data integrity.
Advanced virtual server with rapid scalability
Access to an all-inclusive stack for AI development, driven by NVIDIA’s powerful technology!
Enhance application capacity and availability.
Backup and restore data instantly, securely and maintain data integrity.
Recovery, ensuring quick operation for the business after all incidents and disasters.
Backup and restore data instantly, securely and maintain data integrity.
Advanced virtual server with rapid scalability
Access to an all-inclusive stack for AI development, driven by NVIDIA’s powerful technology!
Enhance application capacity and availability.
Backup and restore data instantly, securely and maintain data integrity.
Recovery, ensuring quick operation for the business after all incidents and disasters.
 Diverse throughput and capacity to meet various business workloads.
Secure, unlimited storage to ensures efficiency as well as high and continuous data access demand.
FPT Web Application Firewall provides powerful protection for web applications
Intelligent and Comprehensive Virtual Web Application Firewall - Security Collaboration between FPT Cloud and Penta Security.
The Next generation firewall security service
Easily store, manage, deploy, and secure Container images
Safe, secure, stable, high-performance Kubernetes platform
Provided as a service to deploy, monitor, backup, restore, and scale MongoDB databases on cloud.
Provided as a service to deploy, monitor, backup, restore, and scale Redis databases on cloud.
Provided as a service to deploy, monitor, backup, restore, and scale PostgreSQL databases on cloud. System Monitoring Solution anywhere, anytime, anyplatform
 Helps reduce operational costs by up to 40% compared to traditional BI solutions, while improving efficiency through optimized resource usage and infrastructure scaling.
 - Pricing
- Partner
- Event


Overview
A Security Group is a network-based, stateful firewall service for GPU Virtual Machines. It is provided at no additional cost.
Security Groups control both inbound and outbound traffic — any traffic not explicitly allowed by a rule is automatically blocked.
Note
-
The total number of rules across all Security Groups is limited to 100.
-
To request an increase in this limit, please contact FPT Smart Cloud support.
The Default Security Group
A default security group is automatically created when you create a VPC, and it allows all outbound network traffic. The rules for this security group cannot be modified.
The following outbound rules are added by default:
| Type | Protocol | Port | Action | IP Version | Destination |
|---|---|---|---|---|---|
| Custom | UDP | 547 | ALLOW | IPv6 | ff02::1:2/128 |
| HTTP | TCP | 80 | ALLOW | IPv4 | 169.254.169.254 |
| Custom | UDP | 67 | ALLOW | IPv4 | All |
| HTTP | TCP | 80 | ALLOW | IPv6 | fe80::a9fe:a9fe/128 |
Create a Security Group
Step 1: In the left-side menu, go to Networking → Security Group, then click Create Security Group.
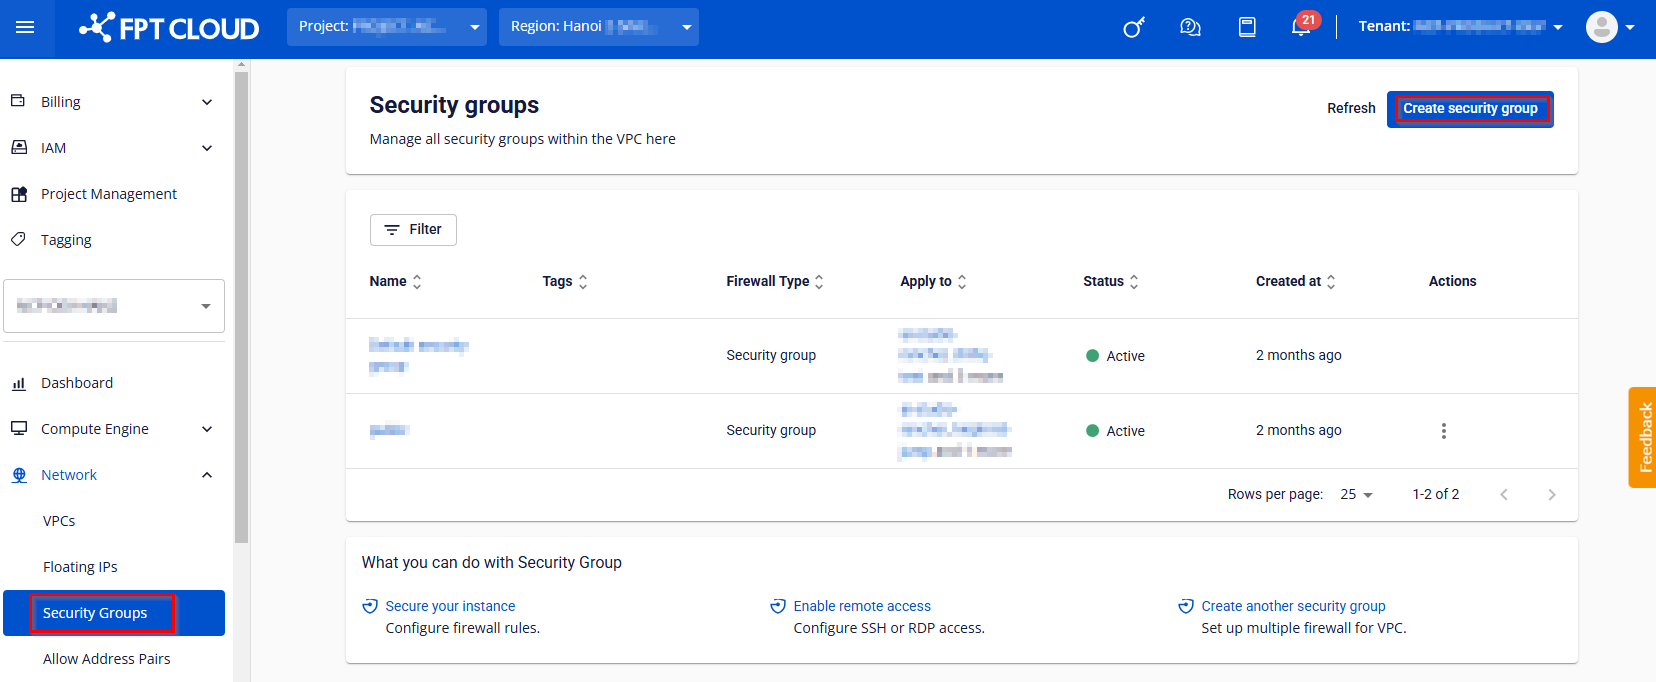
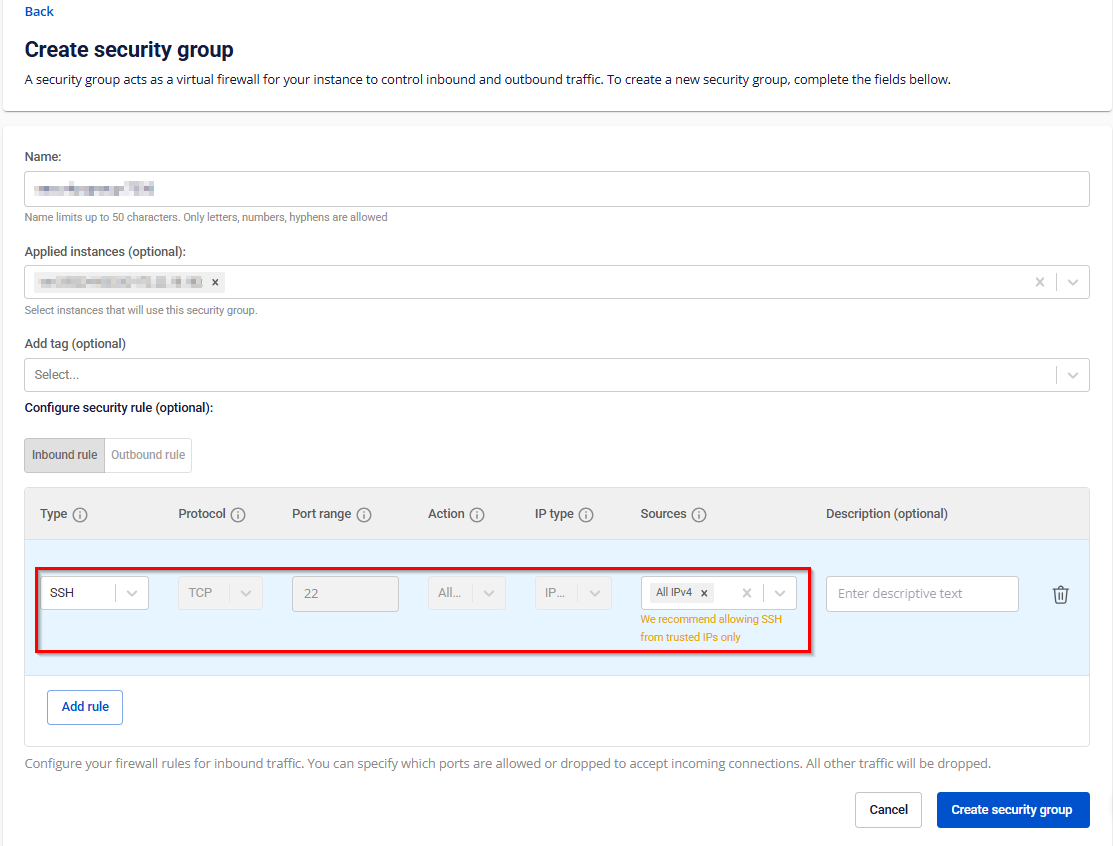
Step 2: Enter the required information in the Create Security Group form:
-
Name: Enter a name for the Security Group. The system automatically generates a default name for quick setup.
-
Applied Instances: Select the GPU VM name to associate it with the Security Group.
-
Add Tags: Optional, for better resource organization.
-
Configure Security Rules: Update Inbound and Outbound rules.
Step 3: Confirm by clicking Create Security Group. The newly created Security Group will appear in the list.
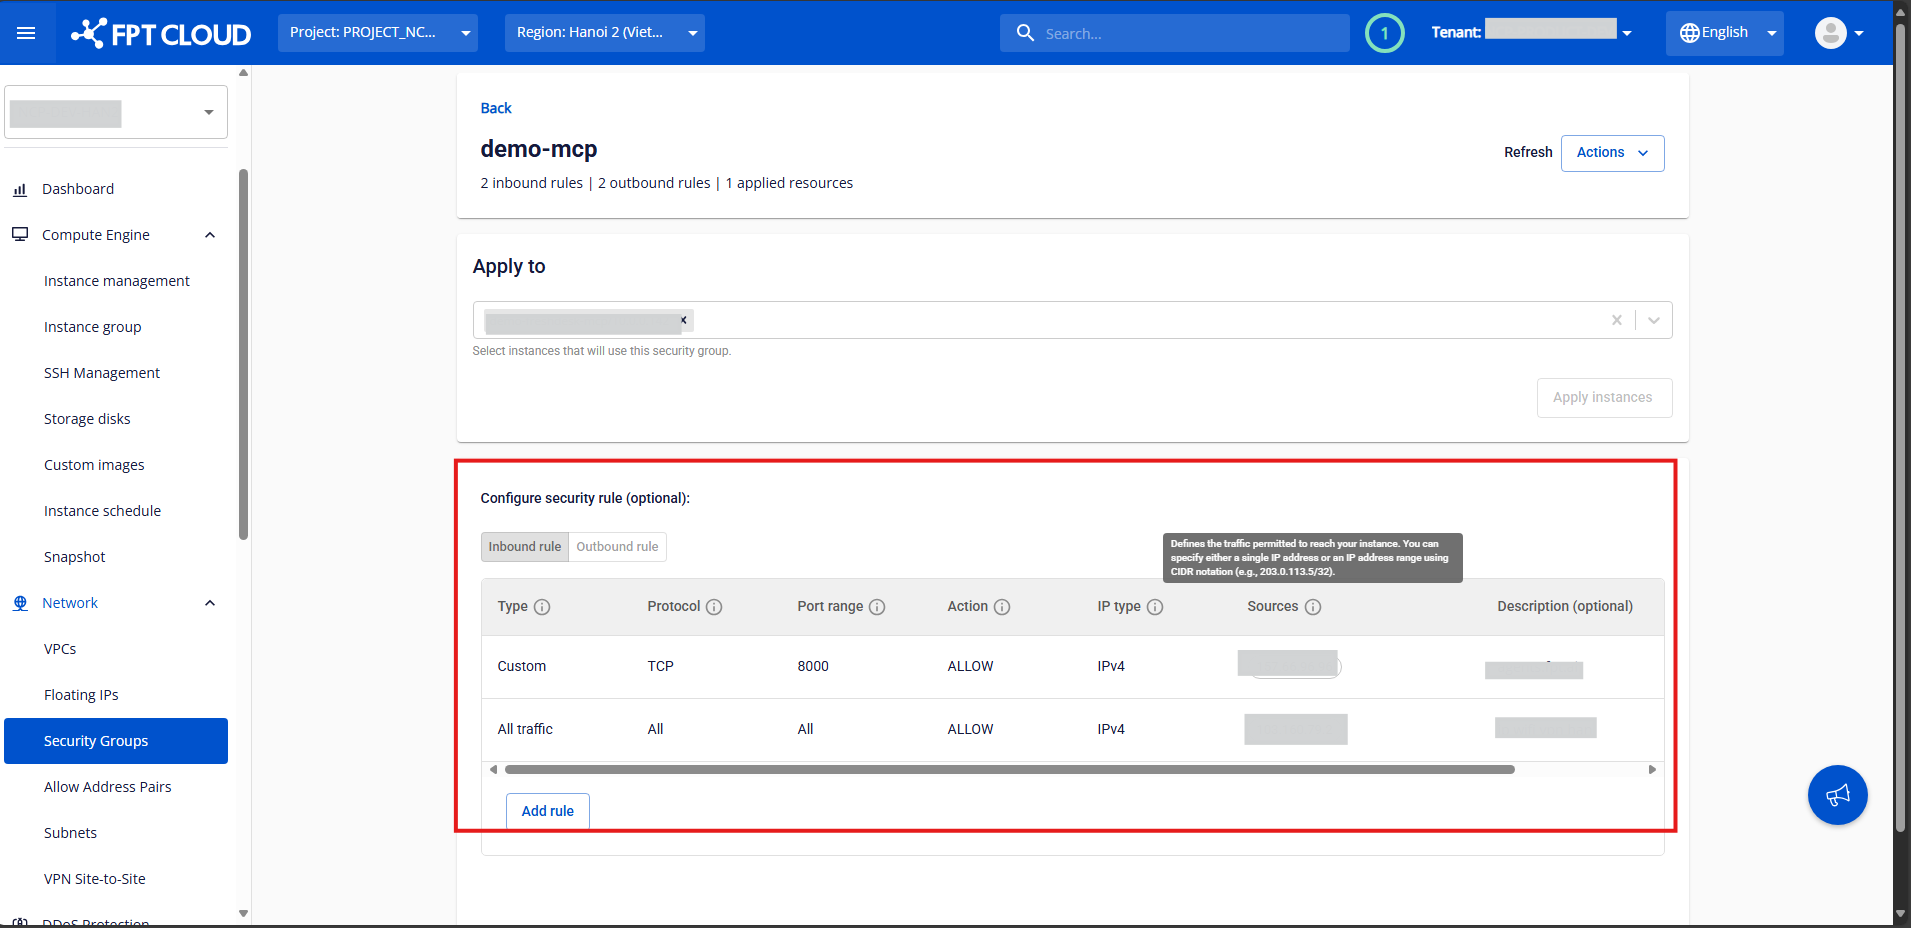
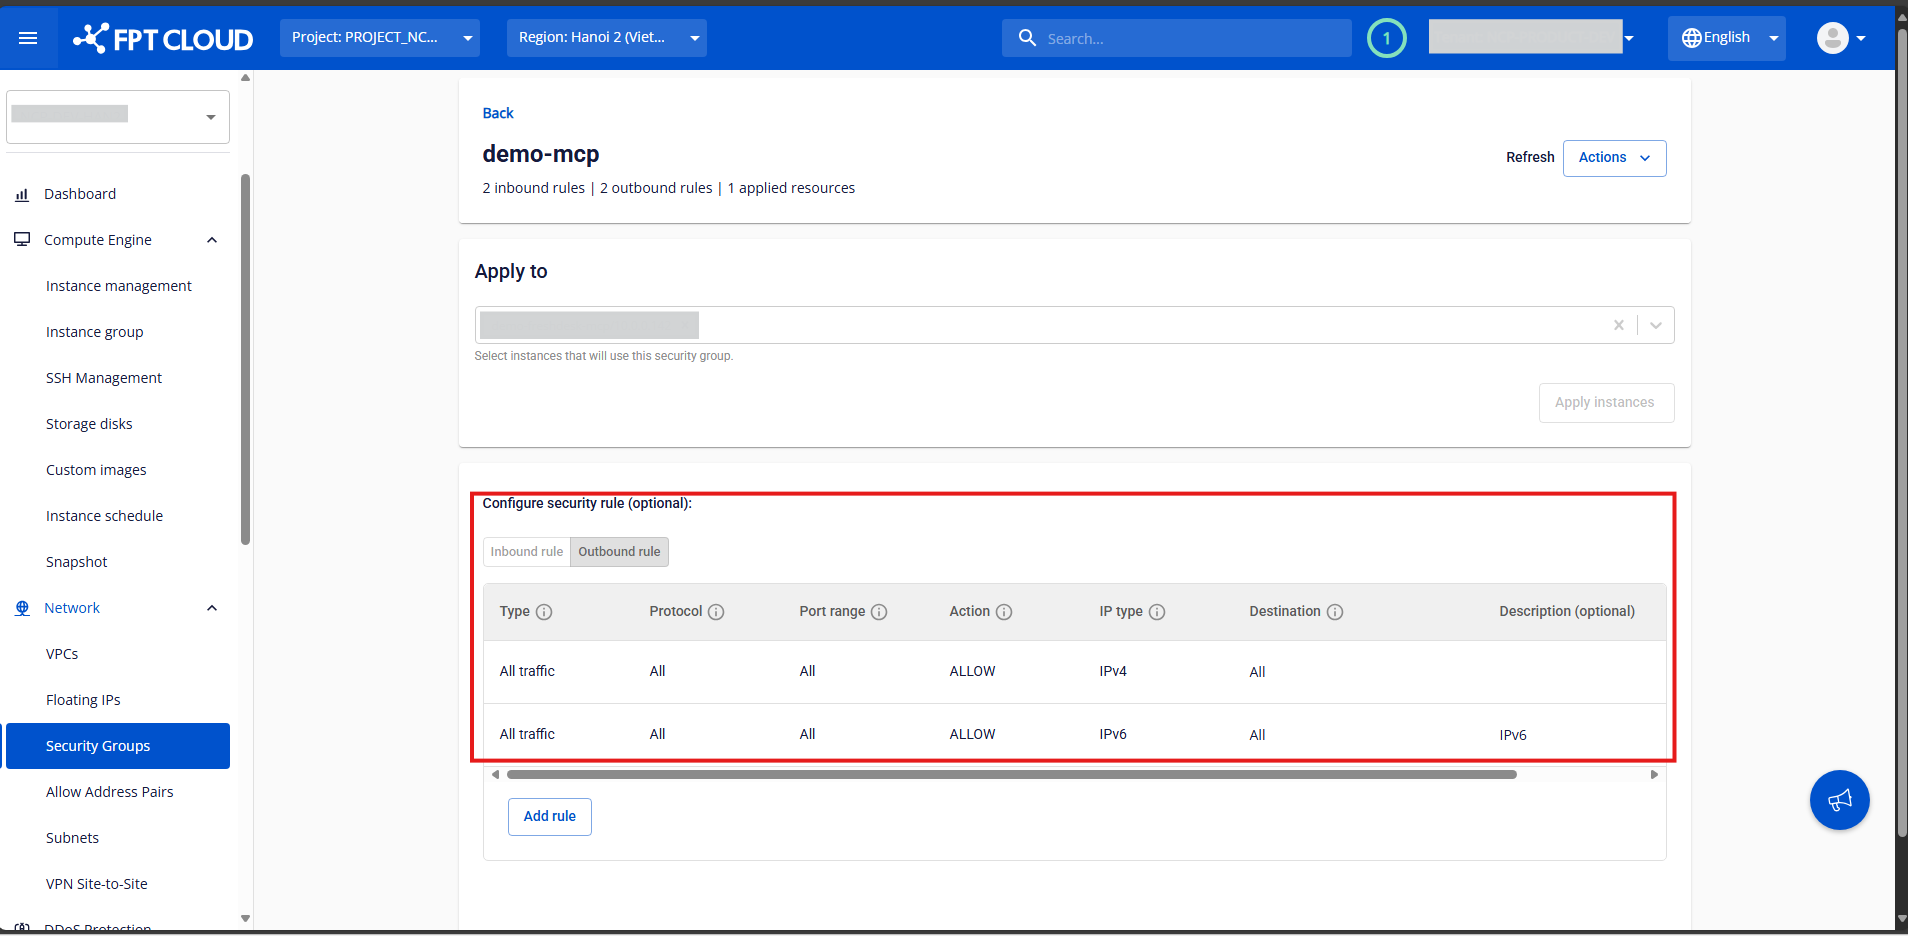
Manage Rules
A single Security Group can contain multiple Inbound and Outbound rules.
- Inbound Rules:
-
Control incoming traffic to the instance.
-
Define which ports on the instance are open and which IP addresses from the internet can access them (Source).
- Outbound Rules:
-
Control outgoing traffic from the instance.
-
Define which ports on the instance can send traffic out and to which destination addresses.
Adding or Editing Rules
Step 1: In the Security Group Management page, select the Security Group you want to manage to open its details page.
Step 2: In the Inbound Rules or Outbound Rules section, click Add New.
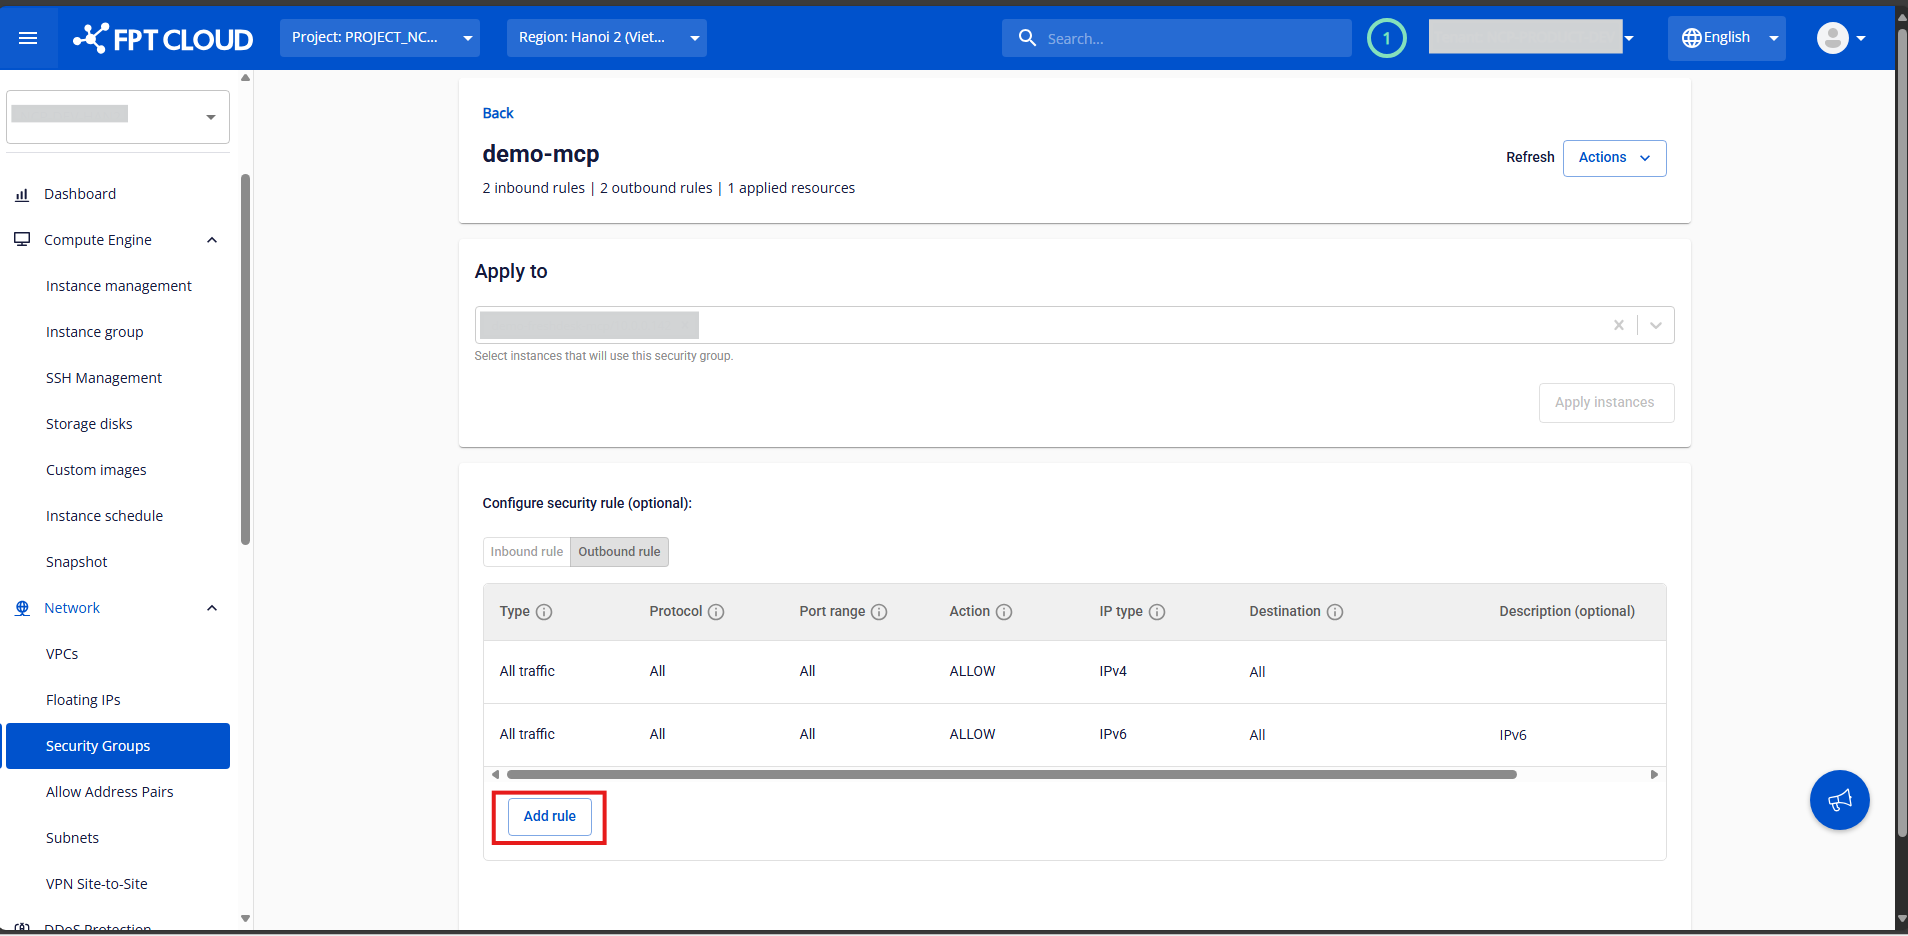
Step 3:
Fill in the rule information:
-
Port: Select the port(s) to open.
-
Choose All Ports to open all ports.
-
Choose Customize Ports to specify one or a range of ports.
-
The system provides quick options for common services like SSH (22), RDP (3389), MySQL (3306), HTTP (80), and HTTPS (443).
-
-
Sources / Destinations: Enter the IP addresses allowed to connect to the specified ports.
-
All IPv4: Allow connections from all IPs.
-
My IP: Allow only your current public IP.
-
Custom: Enter one or more specific IP addresses.
-
⚠️ For sensitive ports like 22 (SSH) or 3389 (RDP), the system will display a warning if you allow All IPv4: “We recommend allowing SSH from trusted IPs only.”
- Description: Optional notes for the rule.
Click Add Rule to continue adding more, or Edit Security Group to save your changes.
The system will process the configuration and display a result notification.
⚠️ Recommendation
-
Add a new inbound rule for SSH access: Type: SSH; Port Range: 22; Source: All IPv4
-
To enhance security when enabling SSH access, please allow only trusted IP addresses and avoid using “All IPv4” (0.0.0.0/0).
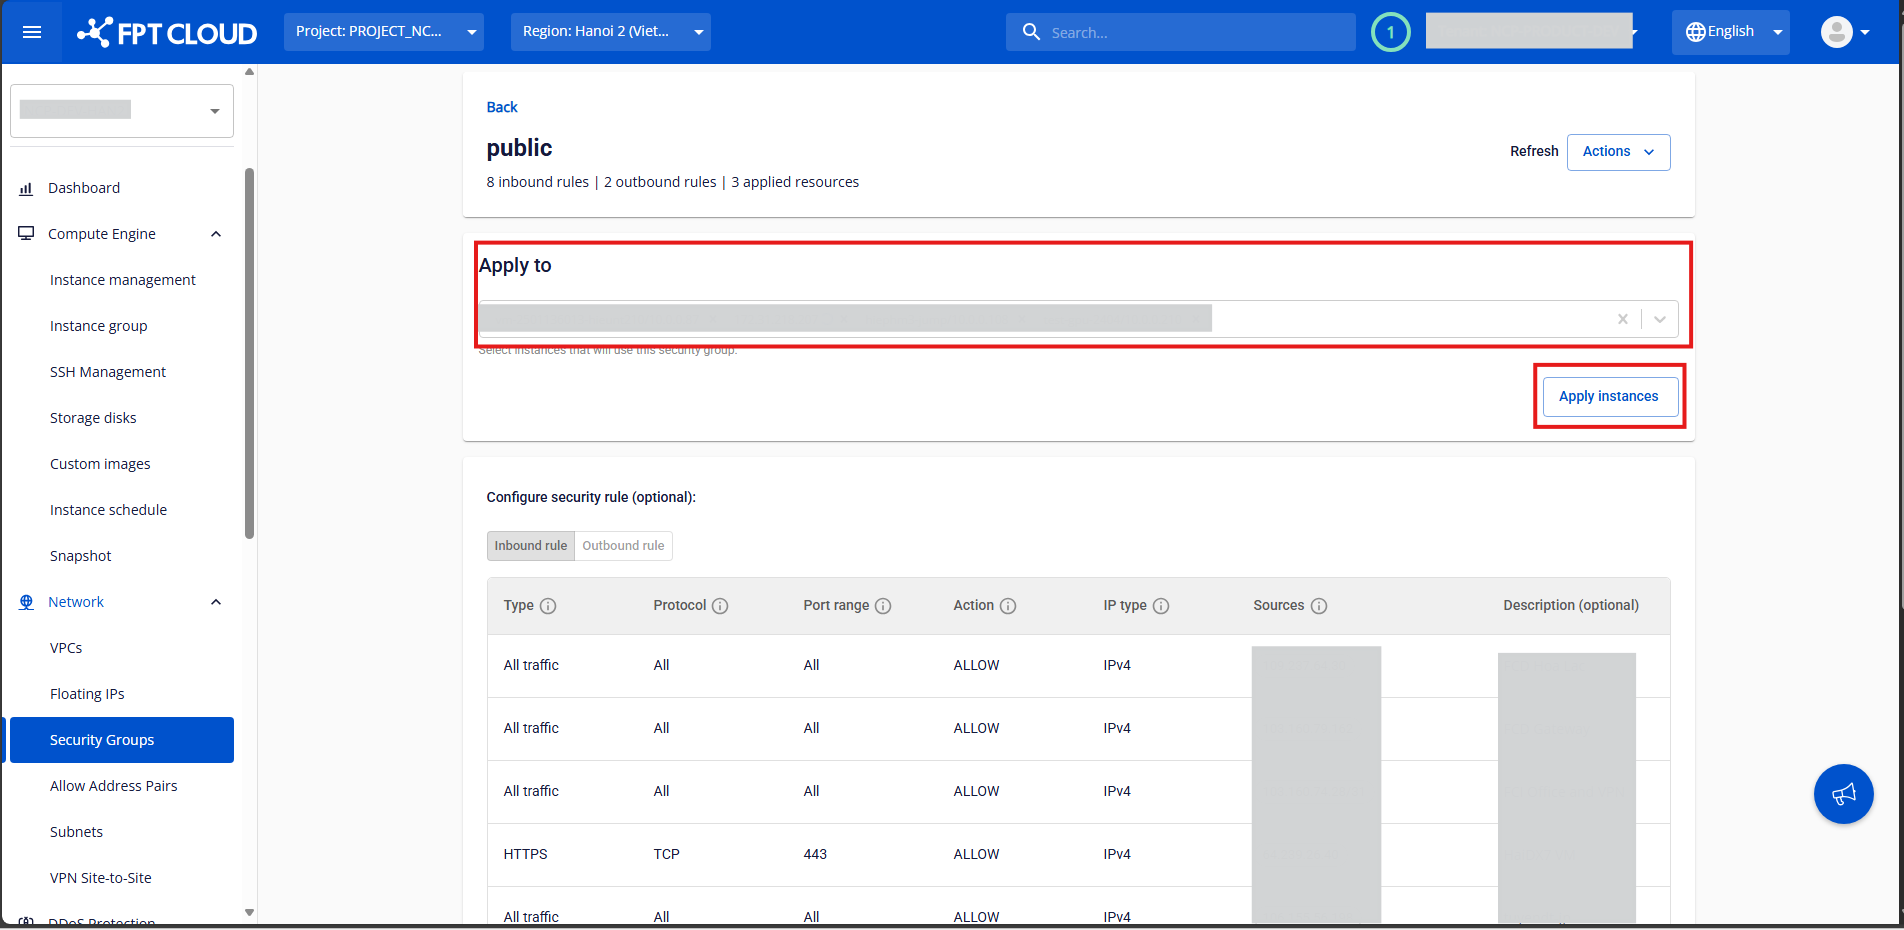
Attach a GPU VM
Step 1:
In the Security Group Management page, select the Security Group you want to attach to a virtual machine.

Step 2:
In the Apply To section, select the virtual machines to attach.
You can also specify a CIDR range to apply the Security Group to a network segment.
Click Apply Instances to confirm.
The system will process and display the result.
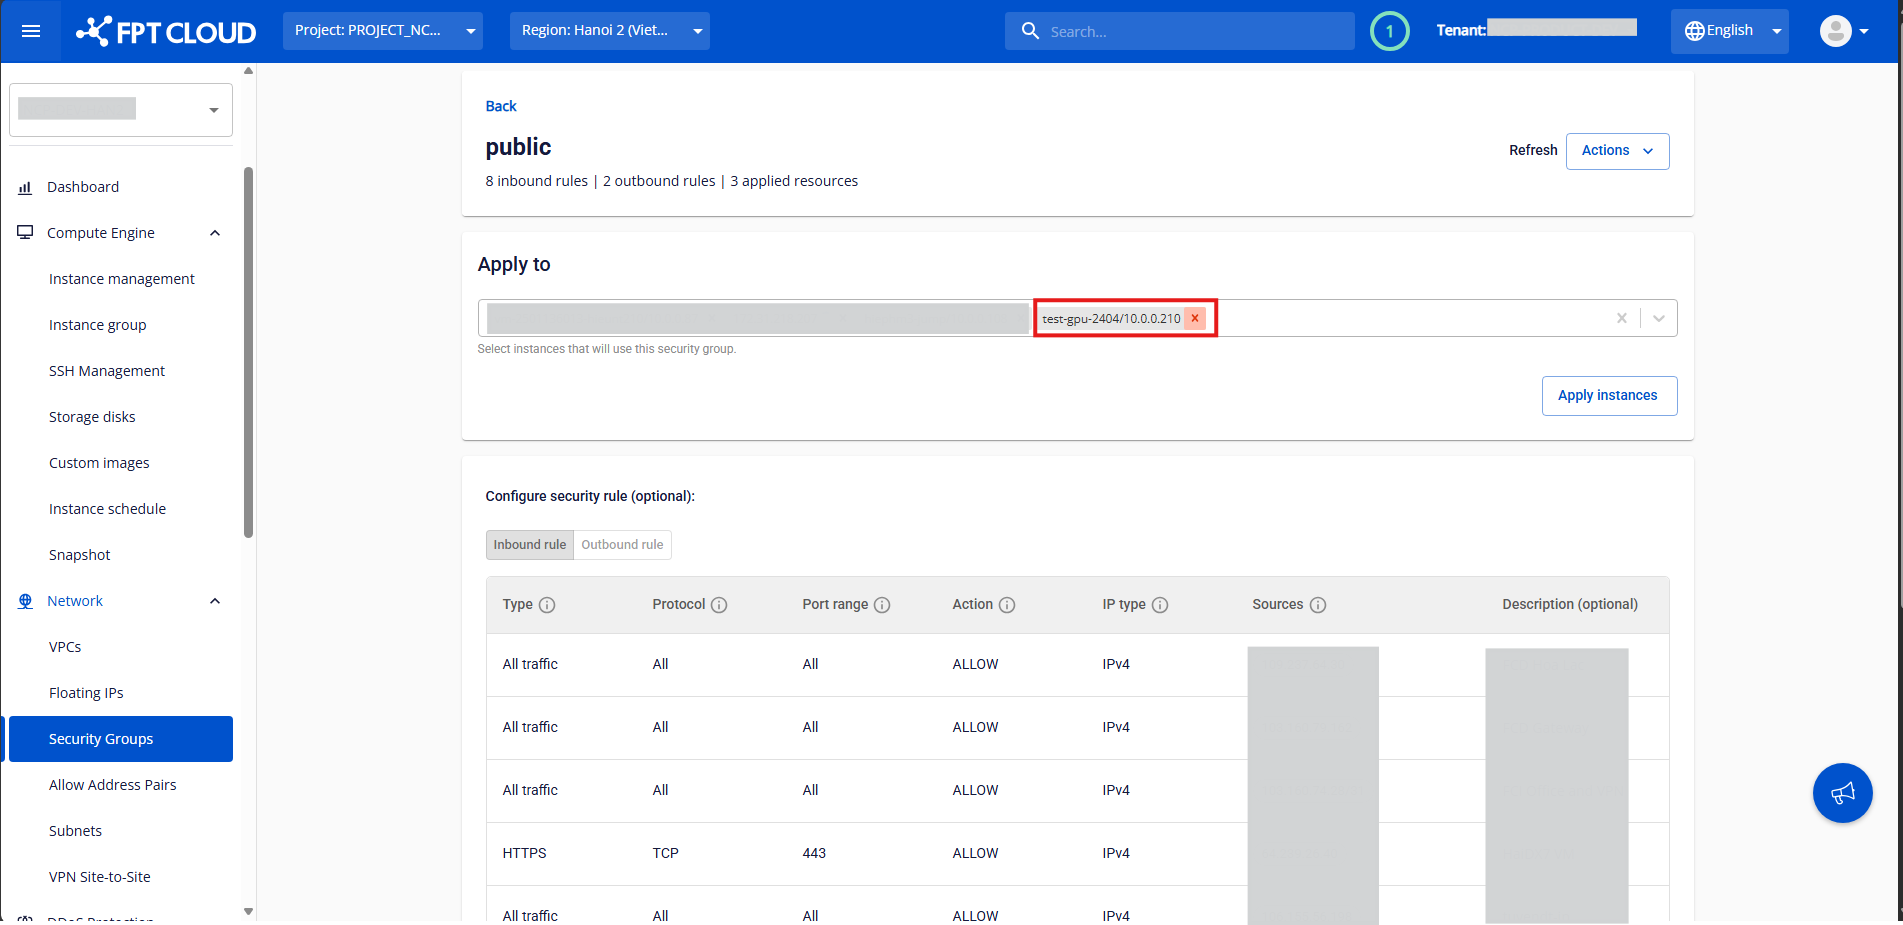
Detach a GPU VM
Step 1:
In the Security Group Management page, select the Security Group currently attached to the virtual machine.
Step 2:
In the Apply To section, locate the instance you want to remove.
Click the X icon next to it, then click Apply Instances to confirm.
The system will process and display the result.
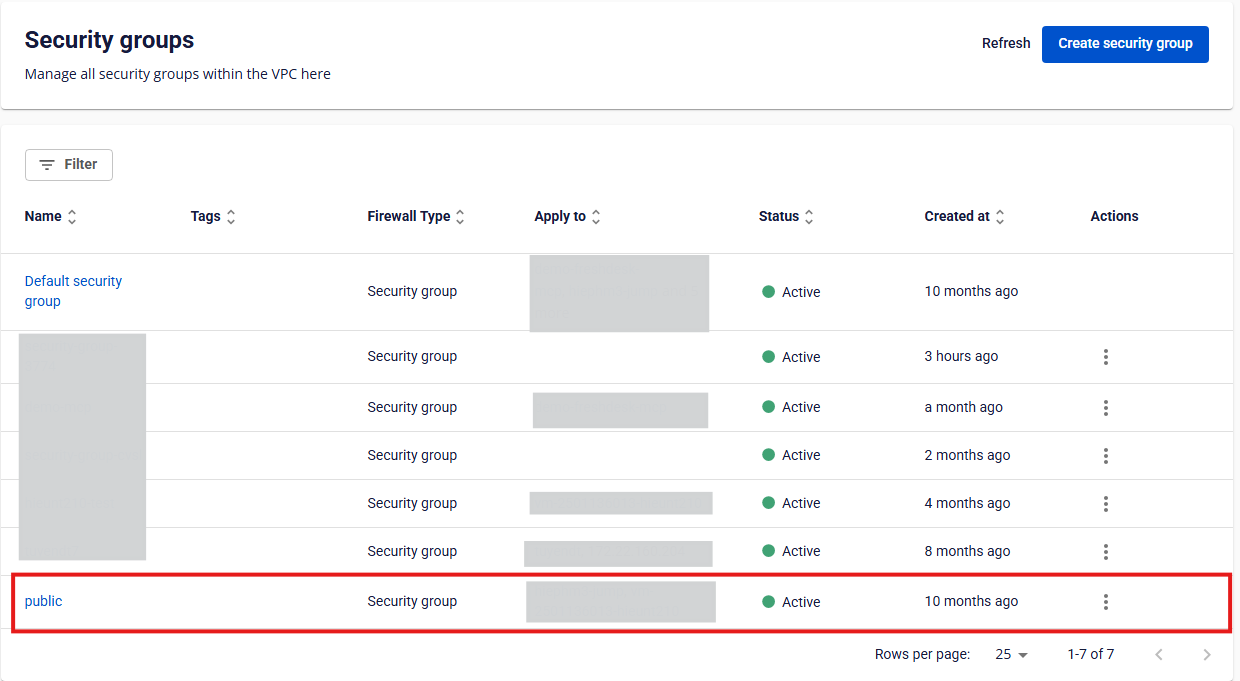
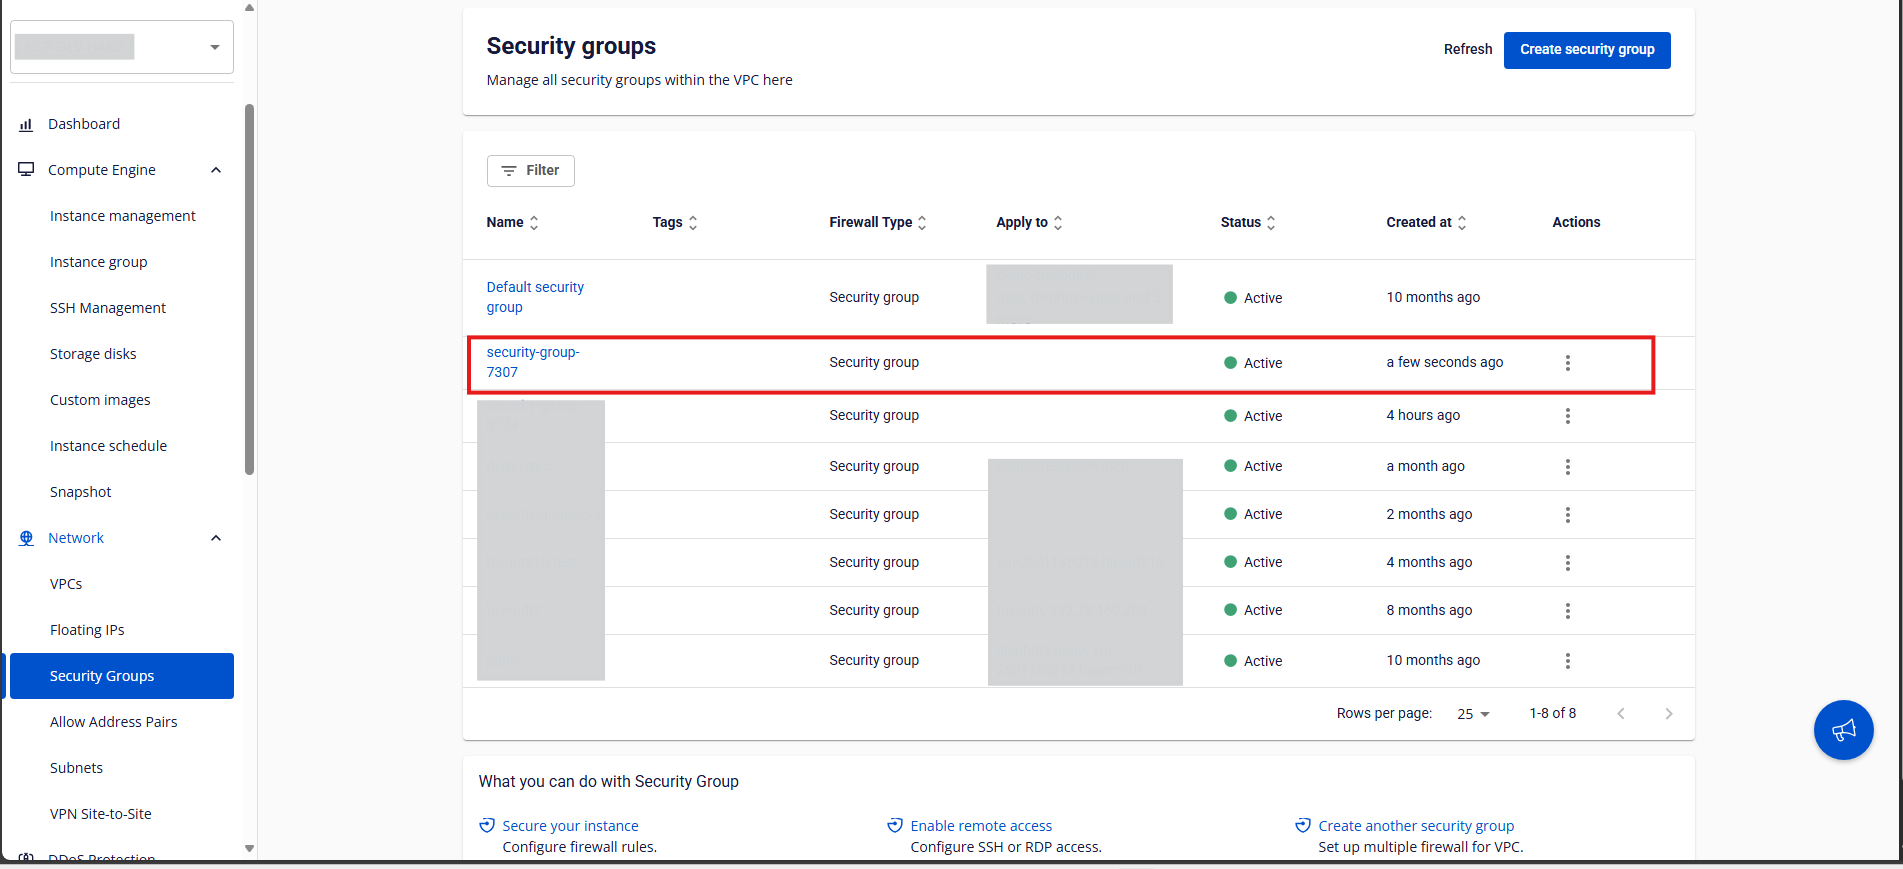
Delete a Security Group
If you no longer need a Security Group, you can delete it from the VPC.
⚠️ Note: All rules must be deleted first before the Security Group can be removed.
Step 1:
In the Security Group Management page, select the Security Group you want to delete to open its details page.
Step 2:
Delete all rules by clicking the trash icon next to each rule and confirming deletion.
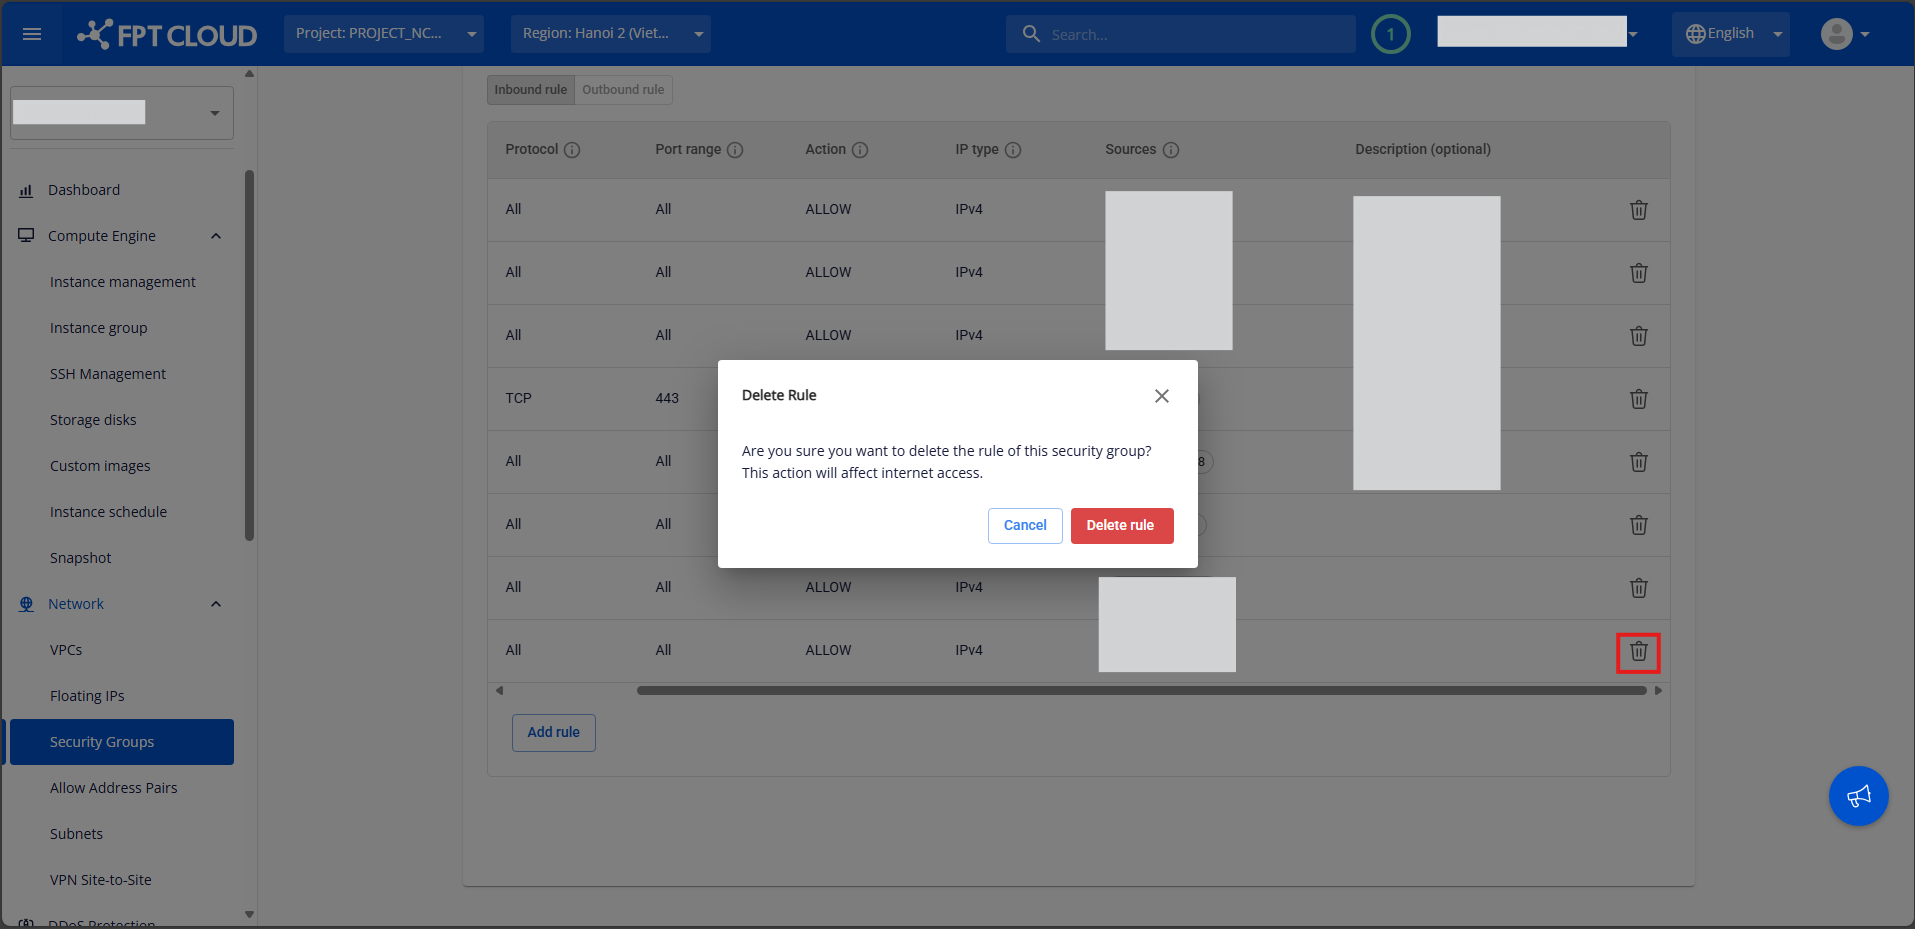
Step 3:
After all rules have been deleted, return to the Security Group list.
Under the Actions column, select Delete for the Security Group you want to remove.
Step 4:
A confirmation pop-up will appear.
Click Delete Security Group to confirm.
The system will process and display the result.
