- About Us
-
 Secure, unlimited storage to ensures efficiency as well as high and continuous data access demand.
 Virtual server integration for 3D Rendering, AI or ML
 Enhance application capacity and availability.
 Access to an all-inclusive stack for AI development, driven by NVIDIA’s powerful technology!
 FPT Web Application Firewall provides powerful protection for web applications
 Advanced virtual server with rapid scalability
 Backup and restore data instantly, securely and maintain data integrity.
Advanced virtual server with rapid scalability
Access to an all-inclusive stack for AI development, driven by NVIDIA’s powerful technology!
Enhance application capacity and availability.
Backup and restore data instantly, securely and maintain data integrity.
Recovery, ensuring quick operation for the business after all incidents and disasters.
Backup and restore data instantly, securely and maintain data integrity.
Advanced virtual server with rapid scalability
Access to an all-inclusive stack for AI development, driven by NVIDIA’s powerful technology!
Enhance application capacity and availability.
Backup and restore data instantly, securely and maintain data integrity.
Recovery, ensuring quick operation for the business after all incidents and disasters.
 Diverse throughput and capacity to meet various business workloads.
Secure, unlimited storage to ensures efficiency as well as high and continuous data access demand.
FPT Web Application Firewall provides powerful protection for web applications
Intelligent and Comprehensive Virtual Web Application Firewall - Security Collaboration between FPT Cloud and Penta Security.
The Next generation firewall security service
Easily store, manage, deploy, and secure Container images
Safe, secure, stable, high-performance Kubernetes platform
Provided as a service to deploy, monitor, backup, restore, and scale MongoDB databases on cloud.
Provided as a service to deploy, monitor, backup, restore, and scale Redis databases on cloud.
Provided as a service to deploy, monitor, backup, restore, and scale PostgreSQL databases on cloud. System Monitoring Solution anywhere, anytime, anyplatform
 Helps reduce operational costs by up to 40% compared to traditional BI solutions, while improving efficiency through optimized resource usage and infrastructure scaling.
 - Pricing
- Partner
- Event


Importing YAML file
Importing YAML file
For quick deployment, or when you already have a configuration file prepared, use this feature to create a container rather than configuring it through the user interface.
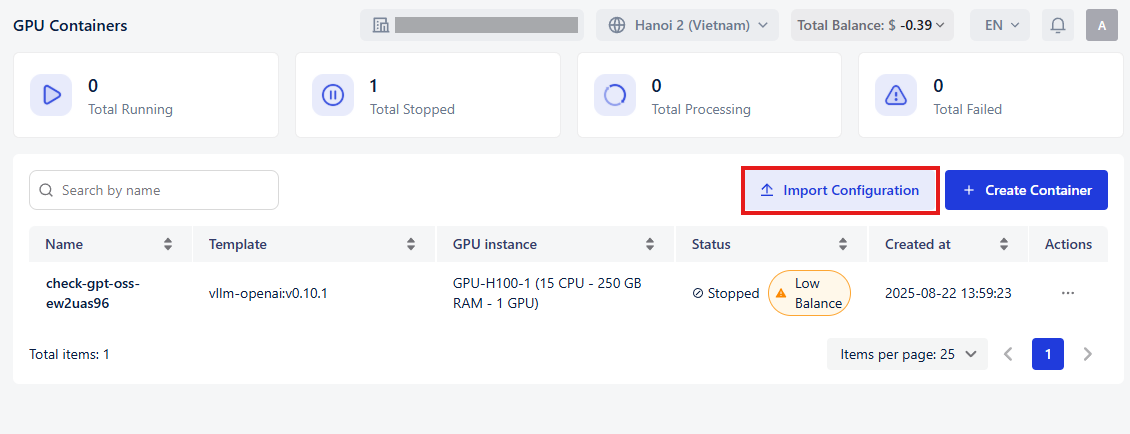
Step 1: Open Import Configuration modal
-
Navigate to GPU Container from the side menu.
-
Click Import Configuration located on the top right of the container list page.
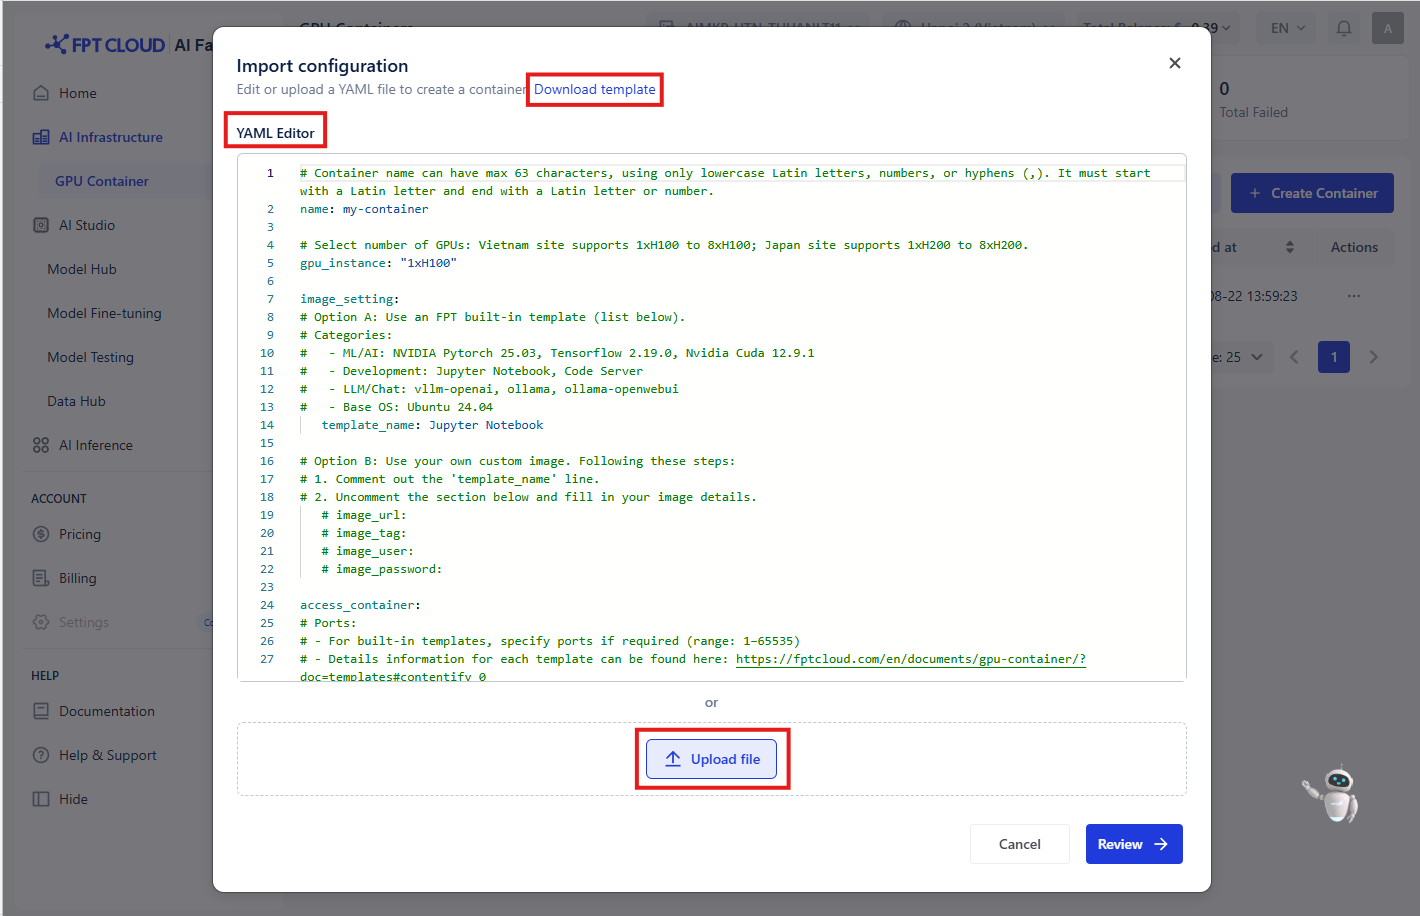
Step 2: Provide configuration file in YAML format
You can import configuration in two ways:
- Paste YAML directly into the YAML editor.
- Upload a YAML file by clicking the Upload file button. Currently, GPU Container supports YAML files only.
A sample YAML template can be downloaded by clicking Download template.
| Field | Data type | Sample data | Description |
|---|---|---|---|
| name | string | my-container | Name of your container. Must be unique per tenant |
| instance_type | string | GPU-H100-1 | Vietnam site supports 1xH100 -> 8xH100; Japan site supports 1xH200 -> 8xH200 |
| image_setting | Since a container can only have 1 image, please provide either template_name or image_url + image_tag | ||
| template_name | string | Jupyter Notebook | Built-in template name. Provides this in case you want to use built-in template provided by FPT. Please input an exact name in the list: Jupyter Notebook, Code Server, vllm-openai, vllm-openai-v0.10.1, ollama, ollama-openwebui, Ubuntu 24.04, Tensorflow 2.19.0, Nvidia Cuda 12.9.1, NVIDIA Pytorch 25.03. |
| image_url | string | registry/myimage:latest | (Optional) Custom image URL. Leave blank if using the built-in template. |
| image_tag | string | v1.0 | (Optional) Tag for custom image. |
| image_user | string | admin | (Optional) Username for private image registry. |
| image_password | string | password123 | (Optional) Password for private image registry |
| access_container | |||
| tcp_ports | list[int] | [22, 33] | TCP ports exposed by the container |
| http_ports | list[int] | [8888, 6006] | HTTP ports exposed by the container |
| ssh_keys | Provide each pair of name-key SSH keys. Allow a maximum of 10 keys | ||
| name | string | key01 | Name of the SSH key |
| key | string | "ssh-rsa AAAAB3..." | SSH public key |
| advanced_settings | |||
| persistent_disk | |||
| mount_capacity | int (GB) | 20 | Amount of persistent storage to attach. |
| mount_path | string | /workspace | Path where persistent disk will be mounted inside the container. |
| environment_variables | |||
| key | string | USERNAME | Environment variables injected at runtime. |
| value | string | admin | |
| startup_commands | |||
| cmds | list[string] | Startup commands (optional). | |
| args | list[string] | Startup command arguments (optional). |
Step 3: Review Configuration

Notice: The button “Review" will only be enabled when all the validations within the YAML editor have passed.
Click Review to continue. On this screen, you can:
- Verify container configuration including template, GPU, CPU, RAM, and disk allocation.
- Check pricing summary to view the estimated hourly cost.
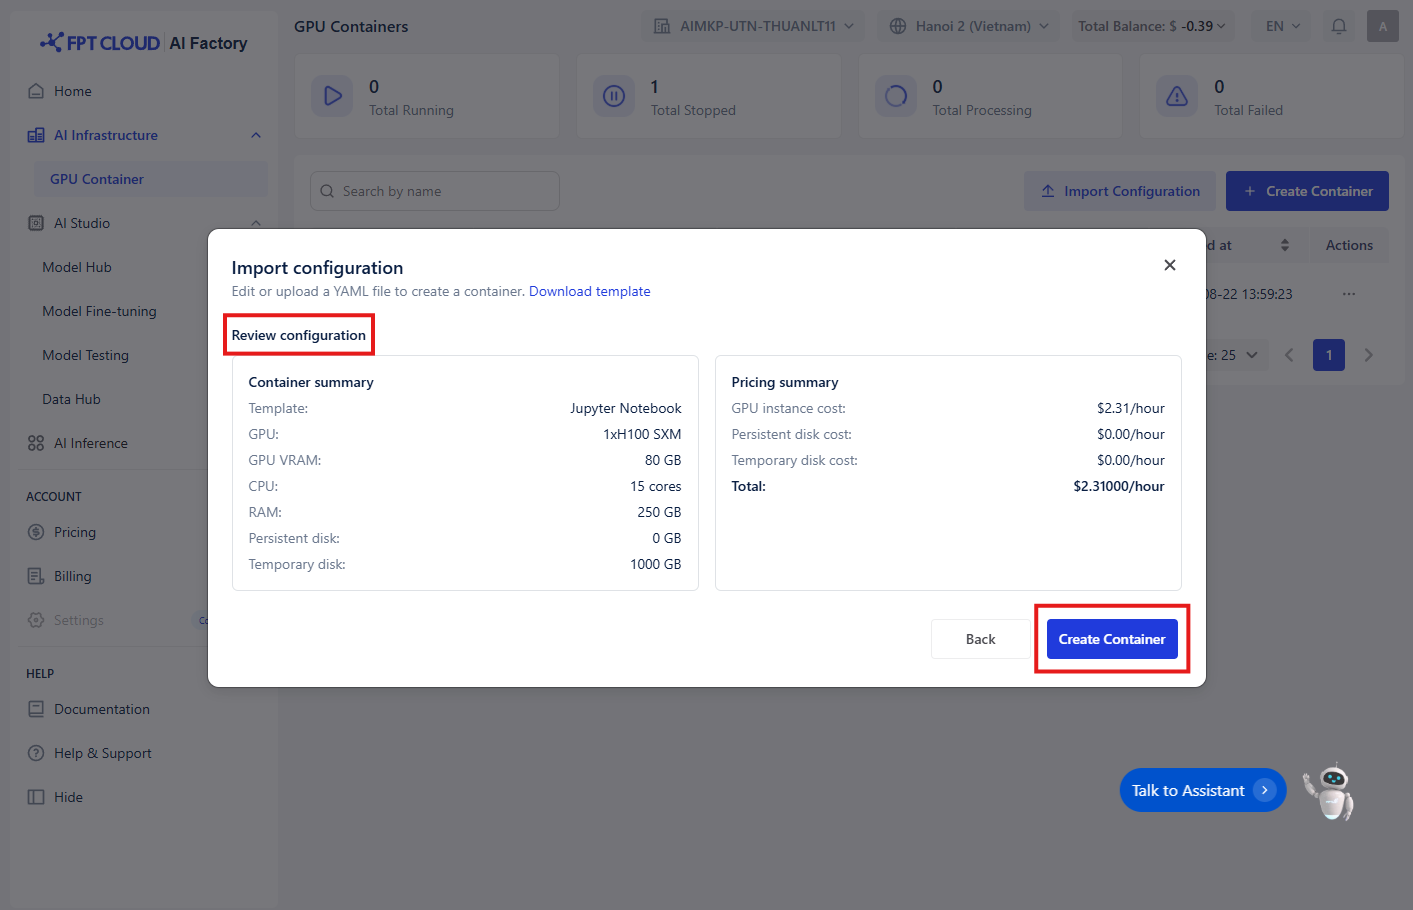
Step 4: Create Container
Once confirmed, click Create Container to start deployment. The system will automatically create and launch your container based on the provided configuration file.
© 2025 FPT Cloud. All Rights Reserved.