- About Us
-
 Secure, unlimited storage to ensures efficiency as well as high and continuous data access demand.
 Virtual server integration for 3D Rendering, AI or ML
 Enhance application capacity and availability.
 Secure your exclusive advance order today and gain priority access to an all-inclusive stack for AI development, driven by NVIDIA’s powerful technology!
 FPT Web Application Firewall provides powerful protection for web applications
 Advanced virtual server with rapid scalability
 Backup and restore data instantly, securely and maintain data integrity.
 Advanced virtual server with rapid scalability
 Secure your exclusive advance order today and gain priority access to an all-inclusive stack for AI development, driven by NVIDIA’s powerful technology!
 Enhance application capacity and availability.
 Backup and restore data instantly, securely and maintain data integrity.
 Recovery, ensuring quick operation for the business after all incidents and disasters.
 Diverse throughput and capacity to meet various business workloads.
 Secure, unlimited storage to ensures efficiency as well as high and continuous data access demand.
 FPT Web Application Firewall provides powerful protection for web applications
 Intelligent and Comprehensive Virtual Web Application Firewall - Security Collaboration between FPT Cloud and Penta Security.
 The Next generation firewall security service
 Easily store, manage, deploy, and secure Container images
 Safe, secure, stable, high-performance Kubernetes platform
 Provided as a service to deploy, monitor, backup, restore, and scale MongoDB databases on cloud.
 Provided as a service to deploy, monitor, backup, restore, and scale Redis databases on cloud.
 Provided as a service to deploy, monitor, backup, restore, and scale PostgreSQL databases on cloud.
 Helps reduce operational costs by up to 40% compared to traditional BI solutions, while improving efficiency through optimized resource usage and infrastructure scaling.
 - Pricing
- Partner
- Event
All documents
Model Hub
-
 Initial Setup
-
 Detailed instructions
- Log in to the Portal page
- Model List
- Model Details
- Create Model
- Edit Model
- Delete Model
- Create Version
- Update version (v1.1)
- Delete version
- Upload file/ Download file
- Delete file
- Add share
- Update share
- Delete share
- Clone model (v1.1)
- Base model (v1.1)
- Create organization (v1.1)
- View/Update organization (v1.1)
- Model deployment (v1.1)
- Model catalog (v1.1)
Purpose: Add a new model to the system
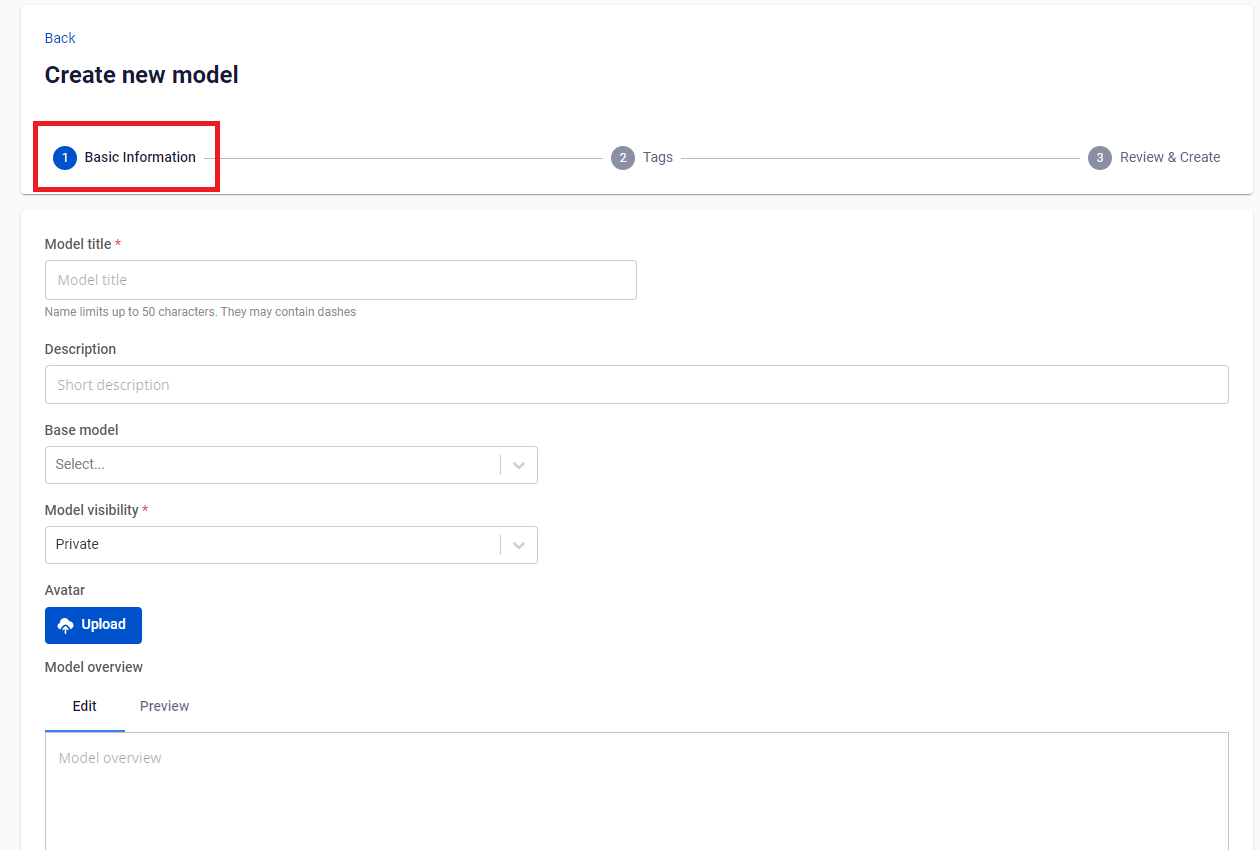
To create a new model, follow these steps:
Step 1: On the Model Hub service screen, click the Create button to go to the creation page.


Step 2: In Step 1 - Basic Information, enter the Model title.
• Note: The model title can include characters a-z, A-Z, numbers, and symbols "-" or "_". The model title must be unique and cannot be left blank.
Step 3: Enter the Description of the model.
Step 4: Select the Model visibility (Private, Public, or Public metadata).
Step 5: Upload an Avatar for the model.
Step 6: Fill in the Model overview to describe the model.
Step 7: Click the Next button to move to Step 2 after filling out the information in Step 1.

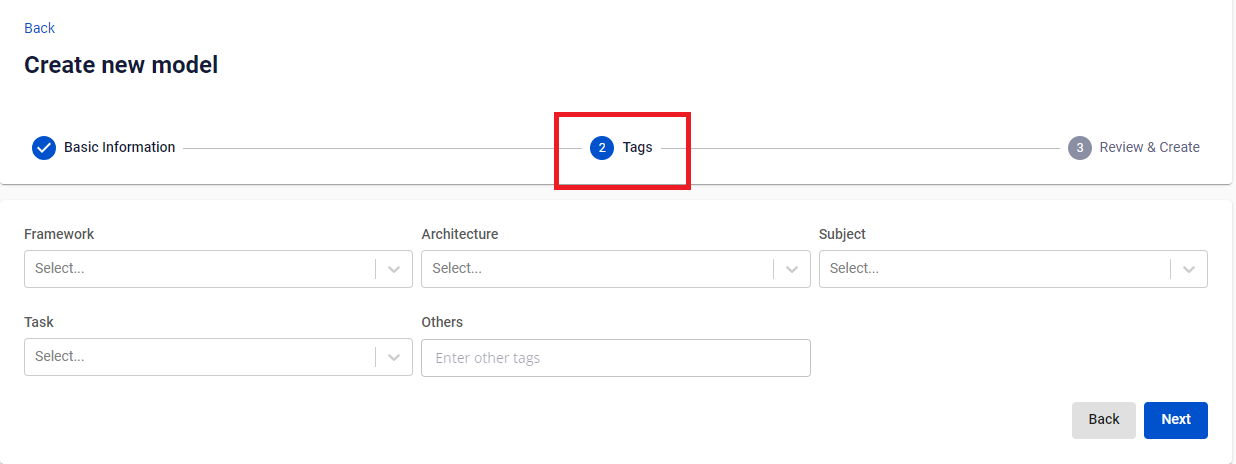
Step 8: In Step 2 - Tags, select the appropriate tags for Framework, Architecture, Subject, Task, and Others.
Step 9: Click Next to move to Step 3, or click Back to return to Step 1 for editing.
Step 10: In Step 3 - Review & Create, review the model information. If everything is correct and complete, click the Create a model button to finish creating the new model. The screen will return to the model list, with the newly created model displayed at the top. If you need to edit the information, click the Back button.
