- About Us
-
 Secure, unlimited storage to ensures efficiency as well as high and continuous data access demand.
 Virtual server integration for 3D Rendering, AI or ML
 Enhance application capacity and availability.
 Access to an all-inclusive stack for AI development, driven by NVIDIA’s powerful technology!
 FPT Web Application Firewall provides powerful protection for web applications
 Advanced virtual server with rapid scalability
 Backup and restore data instantly, securely and maintain data integrity.
Advanced virtual server with rapid scalability
Access to an all-inclusive stack for AI development, driven by NVIDIA’s powerful technology!
Enhance application capacity and availability.
Backup and restore data instantly, securely and maintain data integrity.
Recovery, ensuring quick operation for the business after all incidents and disasters.
Backup and restore data instantly, securely and maintain data integrity.
Advanced virtual server with rapid scalability
Access to an all-inclusive stack for AI development, driven by NVIDIA’s powerful technology!
Enhance application capacity and availability.
Backup and restore data instantly, securely and maintain data integrity.
Recovery, ensuring quick operation for the business after all incidents and disasters.
 Diverse throughput and capacity to meet various business workloads.
Secure, unlimited storage to ensures efficiency as well as high and continuous data access demand.
FPT Web Application Firewall provides powerful protection for web applications
Intelligent and Comprehensive Virtual Web Application Firewall - Security Collaboration between FPT Cloud and Penta Security.
The Next generation firewall security service
Easily store, manage, deploy, and secure Container images
Safe, secure, stable, high-performance Kubernetes platform
Provided as a service to deploy, monitor, backup, restore, and scale MongoDB databases on cloud.
Provided as a service to deploy, monitor, backup, restore, and scale Redis databases on cloud.
Provided as a service to deploy, monitor, backup, restore, and scale PostgreSQL databases on cloud. System Monitoring Solution anywhere, anytime, anyplatform
 Helps reduce operational costs by up to 40% compared to traditional BI solutions, while improving efficiency through optimized resource usage and infrastructure scaling.
 - Pricing
- Partner
- Event
Managed – FPT Database Engine
-
 Concepts
-
 Initial Setup
-
 Tutorials
-
 Peformance & Benchmark
-
 Troubleshooting
-
 FAQs
FAQs
-
 Glossary
-
The Database cluster provisioning function enables rapid deployment of various database engines on the FPT Database Engine platform without manual infrastructure setup. Provisioning a database cluster involves entering configuration details for the engine type, network, cluster identity, and optional services like backups and auto-scaling. This guide outlines the multi-step process.
Step 1: Open the create database cluster page
Access the Database cluster list page corresponding to the type of database engine you wish to create (see section View database cluster list for details), select Create a Database Engine or Create to start provisioning a new database cluster. The Create new database cluster page opens and provides configuration options to define and deploy a new database cluster in the FPT Database Engine environment. Provisioning progress includes 3 steps:
- Step 1 – Database Configuration
- Step 2 – Additional Service Configuration
- Step 3 – Review & Create
Step 2: Define database cluster configuration
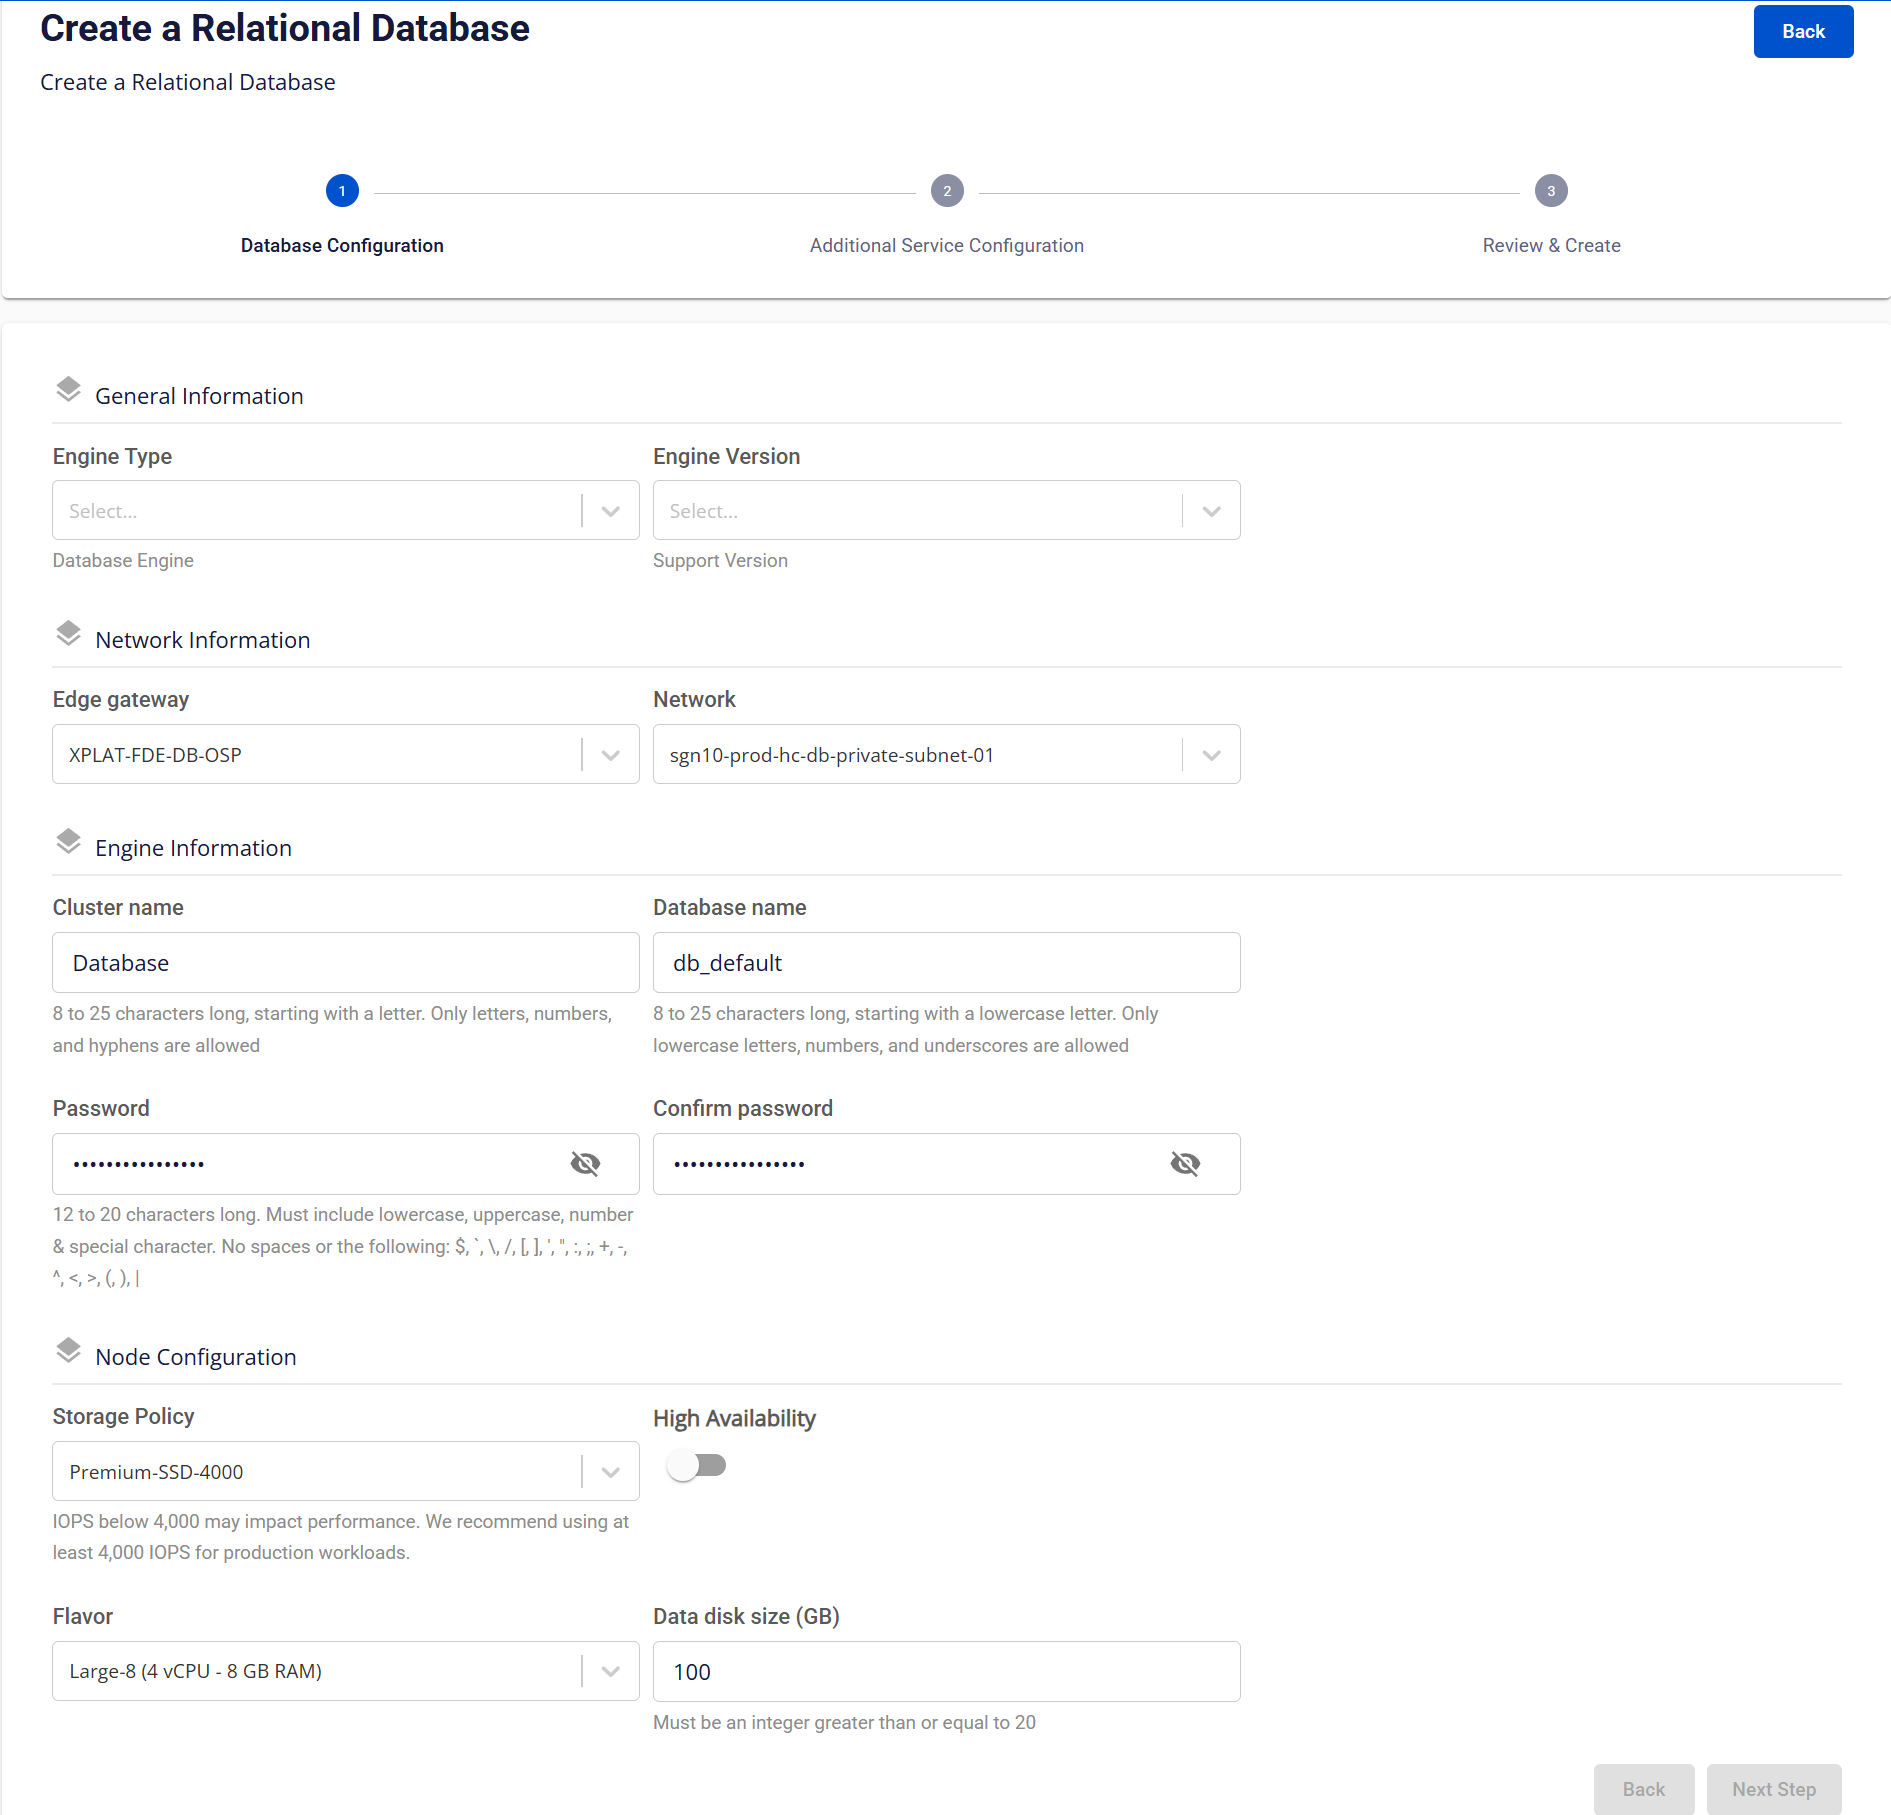
This screen is the first step of the database cluster provisioning workflow. It is used to define core database cluster parameters, including engine selection, networking, credentials, and compute/storage configuration. Depending on the engine selected, some information fields may vary.
Describe the fields on the screen:
| 1. General Information section | ||
|---|---|---|
| Field | Description | |
| Engine Type | Select the database engine. Depending on the selected menu, the system will display the corresponding options:
|
|
| Edition | Select the engine edition, including: “Enterprise”, “Standard”, “Web”. This field is only displayed for "SQL Server" as the engine type. |
|
| Engine Version | Select a supported engine version based on the Database engine version policy. | |
| 2. Network Information section | ||
| Field | Description | |
| Edge Gateway | Select an Edge Gateway to route network traffic between the database cluster and other systems. | |
| Network | Select the Network/Subnet where the database cluster will be deployed. This defines access scope and network isolation. | |
| 3. Section Engine Information | ||
| Field | Description | |
| Cluster Name | Logical name of the database cluster. The name must be 8 to 25 characters long, start with a letter, and contain only letters, numbers, and hyphens (-). | |
| Database Name | Default database name created within the cluster. The name be 8 to 25 characters long, start with a lowercase letter, and contain only lowercase letters, numbers, and underscores (_). This field is not displayed for Redis or Kafka engine type. |
|
| VHost Name | Default VHost name created within the cluster. The name must be 8 to 25 characters long, start with a lowercase letter, and contain only lowercase letters, numbers, and underscores (_). This field is only displayed for RabbitMQ as the engine type. |
|
| Password/ Confirm Password | Password for the database administrative account. The password must be 12 to 20 characters long, and include uppercase, lowercase, number, and special character. Spaces and the following special characters are not allowed: / \ " ' < > ? % ; : $ ! [ ] { } ( ) , & + |
|
| 4. Node Configuration section | ||
| Field | Description | |
| Storage Policy | Select a Storage Policy that defines storage performance (IOPS). It is recommended to select IOPS ≥ 4,000 for production environments to ensure performance and stability. | |
| High Availability | Enable High Availability (HA) to deploy a multi-node cluster with automatic failover.
This field is not displayed for Cassandra engine type. ⚠️
Important notes on using HA for ClickHouse Engine:
|
|
| Number Of Nodes | Select the number of nodes for the database cluster.
This field is displayed only when the engine type is Cassandra. |
|
| Flavor | Select a flavor to define compute resources per node (vCPU, RAM). | |
| Data Disk Size (GB) | Allocated data disk size for the database cluster. The size is measured in GB, with a minimum value of 20 GB. |
After entering all required information, click Next Step to proceed to configuring the associated services.
Step 3: Configure additional services
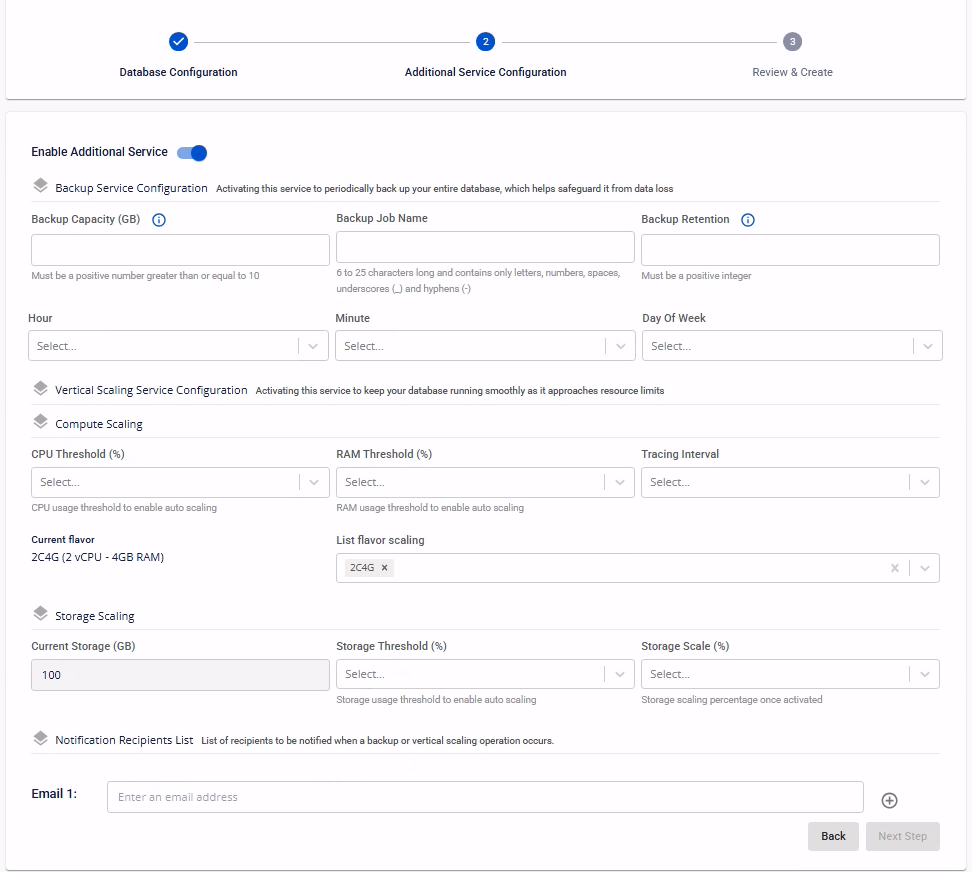
This screen allows you to configure optional managed services for the database cluster, including backup, auto scaling, and notifications, to enhance availability, scalability, and operational visibility.
It is recommended to enable Backup and Auto Scaling services during database creation to ensure data protection, stability, and continuous system operation.
Describe the fields on the screen:
-
Enable Additional Service: Enable or disable add-on services for the database cluster, including backup and auto scaling. If the field is disabled, the database cluster will be created without these services. You can enable the add-on services after the cluster is created successfully.
-
Backup Service Configuration: Activating this service enables periodic full database backups to protect against data loss. The required fields include:
| Field | Description |
|---|---|
| Backup Capacity (GB) | Allocated storage capacity for backups. The size is measured in GB, with a minimum value of 10 GB. |
| Storage Policy | Backup storage policy defining performance and durability characteristics. |
| Enable point-in-time recovery (PITR) | Enable PITR for the database cluster. This will only be displayed if the selected engine type is PostgreSQL, MySQL, or MariaDB. |
| Backup Job Name | Logical name for the backup job. The name must be 6 to 25 characters long, and contain only letters, numbers, spaces, hyphens (-) and underscores (_). |
| Backup Retention | The number of full database backups to retain. When the number of backups exceeds this limit, the oldest backups are automatically deleted. |
| Hour / Minute / Day of Week | Configure the recurring backup schedule:
|
- Vertical Scaling Service Configuration: Activating this service allows the system to automatically scale compute or storage resources when usage thresholds are exceeded. The required fields include:
| 1. Compute Scaling section | ||
|---|---|---|
| Field | Description | |
| CPU Threshold (%) | CPU usage threshold that triggers auto scaling. | |
| RAM Threshold (%) | Memory usage threshold that triggers auto scaling. | |
| Tracing Interval | Monitoring interval used to evaluate resource usage before scaling. | |
| Current Flavor | Current compute flavor assigned to the database node. | |
| List Flavor Scaling | List of target flavors that the system can scale up to when auto scaling is triggered. The list will be sorted in ascending order, from the smallest to the largest value. | |
| 2. Storage Scaling section | ||
| Field | Description | |
| Current Storage (GB) | Current allocated database cluster storage size. | |
| Storage Threshold (%) | Storage usage threshold to trigger automatic scaling. | |
| Storage Scale (%) | Percentage of storage increase applied per scaling operation. |
-
Maintenance Window: defines the time period during which the system is allowed to perform maintenance activities:
- Day of Week: The day of the week on which maintenance is performed. Available options range from “Monday” to “Sunday”.
- Start Time: the time at which maintenance is allowed to start on the selected day. Maintenance duration: 1 hour, starting from the configured Start Time.
-
Notification Recipients List: Enter a list of email addresses to receive notifications when backup or scaling events occur. You can add multiple emails by clicking the “+” button to include a new email in the list.
After entering all required information, click Next Step to proceed to the review step and confirm database creation.
Step 4: Review & Create
Users should review all configuration settings for the database cluster before confirming creation:
- To make changes, click Back to return to the previous step and update the information.
- If the information is correct, click Create to confirm the creation of the database cluster.
After confirmation:
- The system checks resources, displays a creation notification, and starts deploying the new database cluster based on the provided configuration.
- Users are redirected to the Database cluster list page, where the newly created database cluster appears at the top in Processing status.
The creation process typically takes 5–7 minutes. Once completed successfully, the database cluster transitions to Running status. Note: If the database cluster creation fails, please delete the failed database cluster and create it again.
To connect to the newly created database cluster, refer to section Connect to the database cluster.
To operate the database cluster, refer to section Database cluster operations.