- About Us
-
 Secure, unlimited storage to ensures efficiency as well as high and continuous data access demand.
 Virtual server integration for 3D Rendering, AI or ML
 Enhance application capacity and availability.
 Access to an all-inclusive stack for AI development, driven by NVIDIA’s powerful technology!
 FPT Web Application Firewall provides powerful protection for web applications
 Advanced virtual server with rapid scalability
 Backup and restore data instantly, securely and maintain data integrity.
Advanced virtual server with rapid scalability
Access to an all-inclusive stack for AI development, driven by NVIDIA’s powerful technology!
Enhance application capacity and availability.
Backup and restore data instantly, securely and maintain data integrity.
Recovery, ensuring quick operation for the business after all incidents and disasters.
Backup and restore data instantly, securely and maintain data integrity.
Advanced virtual server with rapid scalability
Access to an all-inclusive stack for AI development, driven by NVIDIA’s powerful technology!
Enhance application capacity and availability.
Backup and restore data instantly, securely and maintain data integrity.
Recovery, ensuring quick operation for the business after all incidents and disasters.
 Diverse throughput and capacity to meet various business workloads.
Secure, unlimited storage to ensures efficiency as well as high and continuous data access demand.
FPT Web Application Firewall provides powerful protection for web applications
Intelligent and Comprehensive Virtual Web Application Firewall - Security Collaboration between FPT Cloud and Penta Security.
The Next generation firewall security service
Easily store, manage, deploy, and secure Container images
Safe, secure, stable, high-performance Kubernetes platform
Provided as a service to deploy, monitor, backup, restore, and scale MongoDB databases on cloud.
Provided as a service to deploy, monitor, backup, restore, and scale Redis databases on cloud.
Provided as a service to deploy, monitor, backup, restore, and scale PostgreSQL databases on cloud. System Monitoring Solution anywhere, anytime, anyplatform
 Helps reduce operational costs by up to 40% compared to traditional BI solutions, while improving efficiency through optimized resource usage and infrastructure scaling.
 - Pricing
- Partner
- Event
Managed – FPT Database Engine
-
 Concepts
-
 Initial Setup
-
 Tutorials
-
 Peformance & Benchmark
-
 Troubleshooting
-
 FAQs
FAQs
-
 Glossary
-
The User group management function helps organize multiple users under a shared access control configuration by assigning roles to the group as a whole. The feature is part of IAM on the FPT Cloud Portal. It helps organize users by roles, reduces administrative overhead, and ensures consistent application of access rights across the DBaaS environment.
To create a new user group, follow these steps:
Step 1: Access the User Group Management page
Log in to the FPT Cloud Portal. After logging successfully, from the main menu, select IAM > User groups. The User Group Management interface will display the list of existing user groups, along with options to create, edit, or delete a user group.
Step 2: Create a new user group
On the User Group Management page, click Create user group. The Create New User Group screen will appear as follows:
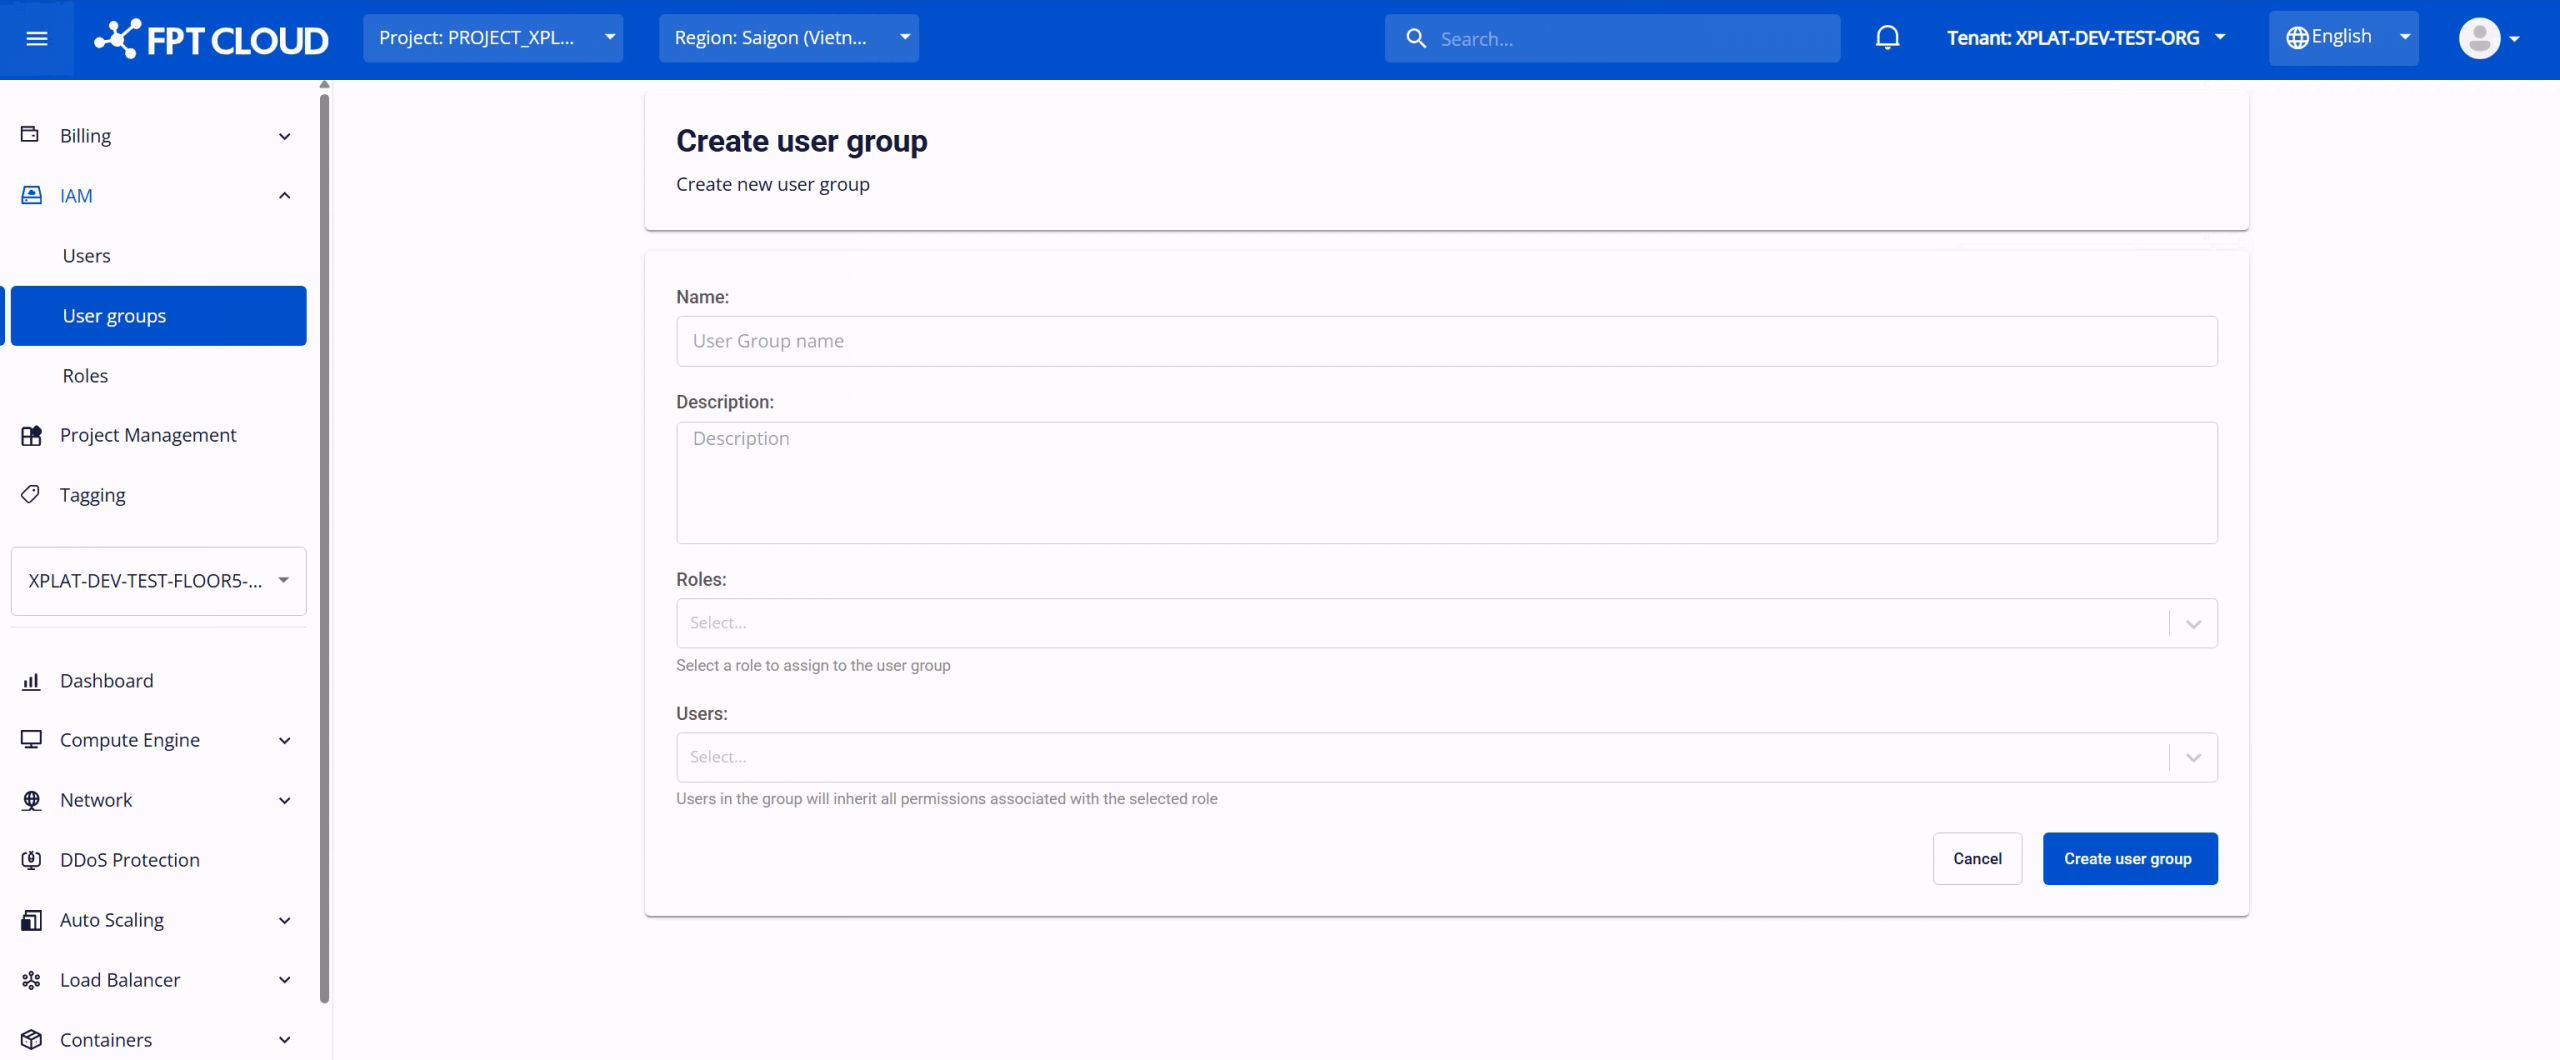
Configure the following information:
- Name: A name to identify the user group within the IAM system. The name can be up to 100 characters. The name should clearly reflect the group’s purpose or responsibility.
- Description: Provides additional details about the user group, such as usage scope or managed services. This field helps improve administration and auditing.
- Roles: Select one or more roles to assign to the user group. These roles define the permissions applied to all users in the group.
- Users: Select users to add to the group. Users will inherit all permissions associated with the assigned roles. Any change to the group’s roles will be applied to all group members.
After entering all required information, select Create user group to complete the user group creation process.
After the user group is created successfully, the new group will appear in the management list with the Active status. Users assigned to this group will be able to access the features and functions according to the permissions defined by the associated roles.
If needed, you can perform the following actions on the created user group:
-
Edit a user group: : Enable updates to the group’s information or modification of roles assigned to the group. To use it, on the User Group Management, page, select Edit user group next to the group you want to modify. Make the changes and click Edit user group to save.
-
Delete a user group: When a group is no longer needed (e.g., due to organizational changes), you can delete it to maintain clean access policies and security. On the User Group Management page, select Delete next to the group you want to remove. Confirm the action in the warning dialog to complete the deletion. Warning: Deleting a user group will immediately remove all role-based access permissions assigned through that group. Users who were members of the group will lose the inherited permissions and may no longer be able to access or manage DBaaS resources and other cloud services. Before deleting a user group, ensure that:
- The group is not required for ongoing database operations or administration.
- Users in the group have been reassigned to other user groups or granted alternative roles if continued access is needed.
- No critical DBaaS workflows or automation depend on permissions provided by this group.