- About Us
-
 Secure, unlimited storage to ensures efficiency as well as high and continuous data access demand.
 Virtual server integration for 3D Rendering, AI or ML
 Enhance application capacity and availability.
 Access to an all-inclusive stack for AI development, driven by NVIDIA’s powerful technology!
 FPT Web Application Firewall provides powerful protection for web applications
 Advanced virtual server with rapid scalability
 Backup and restore data instantly, securely and maintain data integrity.
Advanced virtual server with rapid scalability
Access to an all-inclusive stack for AI development, driven by NVIDIA’s powerful technology!
Enhance application capacity and availability.
Backup and restore data instantly, securely and maintain data integrity.
Recovery, ensuring quick operation for the business after all incidents and disasters.
Backup and restore data instantly, securely and maintain data integrity.
Advanced virtual server with rapid scalability
Access to an all-inclusive stack for AI development, driven by NVIDIA’s powerful technology!
Enhance application capacity and availability.
Backup and restore data instantly, securely and maintain data integrity.
Recovery, ensuring quick operation for the business after all incidents and disasters.
 Diverse throughput and capacity to meet various business workloads.
Secure, unlimited storage to ensures efficiency as well as high and continuous data access demand.
FPT Web Application Firewall provides powerful protection for web applications
Intelligent and Comprehensive Virtual Web Application Firewall - Security Collaboration between FPT Cloud and Penta Security.
The Next generation firewall security service
Easily store, manage, deploy, and secure Container images
Safe, secure, stable, high-performance Kubernetes platform
Provided as a service to deploy, monitor, backup, restore, and scale MongoDB databases on cloud.
Provided as a service to deploy, monitor, backup, restore, and scale Redis databases on cloud.
Provided as a service to deploy, monitor, backup, restore, and scale PostgreSQL databases on cloud. System Monitoring Solution anywhere, anytime, anyplatform
 Helps reduce operational costs by up to 40% compared to traditional BI solutions, while improving efficiency through optimized resource usage and infrastructure scaling.
 - Pricing
- Partner
- Event
Managed – FPT Database Engine
-
 Concepts
-
 Initial Setup
-
 Tutorials
-
 Peformance & Benchmark
-
 Troubleshooting
-
 FAQs
FAQs
-
 Glossary
-
This guide explains how to connect to a database cluster deployed on FPT Database Engine using supported connection methods and best practices.
After provisioning a database cluster on FPT Database Engine, users can connect to it using standard database clients, application drivers, or management tools. Connectivity depends on network configuration, access control, and database cluster credentials.
Before connecting to a database cluster, you must configure appropriate network access and security policies to allow connections from your client. This usually involves creating security group rules and assigning a floating IP (public IP) if you need external access. Once network access is permitted, you can connect to your database cluster using a database client tool.
1. Create a security group
A security group is a collection of firewall rules that control inbound and outbound network traffic to and from a database cluster. Each rule defines the allowed ports, protocols, and IP addresses or CIDR ranges.
Properly configuring security groups helps secure database cluster connectivity, enforce the least privilege access model and reduce the risk of unauthorized access.
- Use a dedicated Security Group for each database cluster.
- Open only the required ports to connect.
- Avoid sharing a Security Group across multiple clusters or allowing all ports.Overly permissive rules may expand the attack surface, increase the risk of unauthorized access and impact other clusters when rules are modified. In some cases, lead to service disruption or data exposure.
To ensure security and ease of management, create and configure a Security Group for the database cluster by following these steps:
Step 1: Access the Security Groups Management page
Log in to the FPT Cloud Portal. After logging successfully, from the main menu, select Network > Security Groups. The Security Group Management interface will display the list of existing security groups, along with options to create, edit, or delete a security group.
Step 2: Create a new security group
On the Security Group Management page, click Create security group. The Create New Security Group screen will appear as follows:
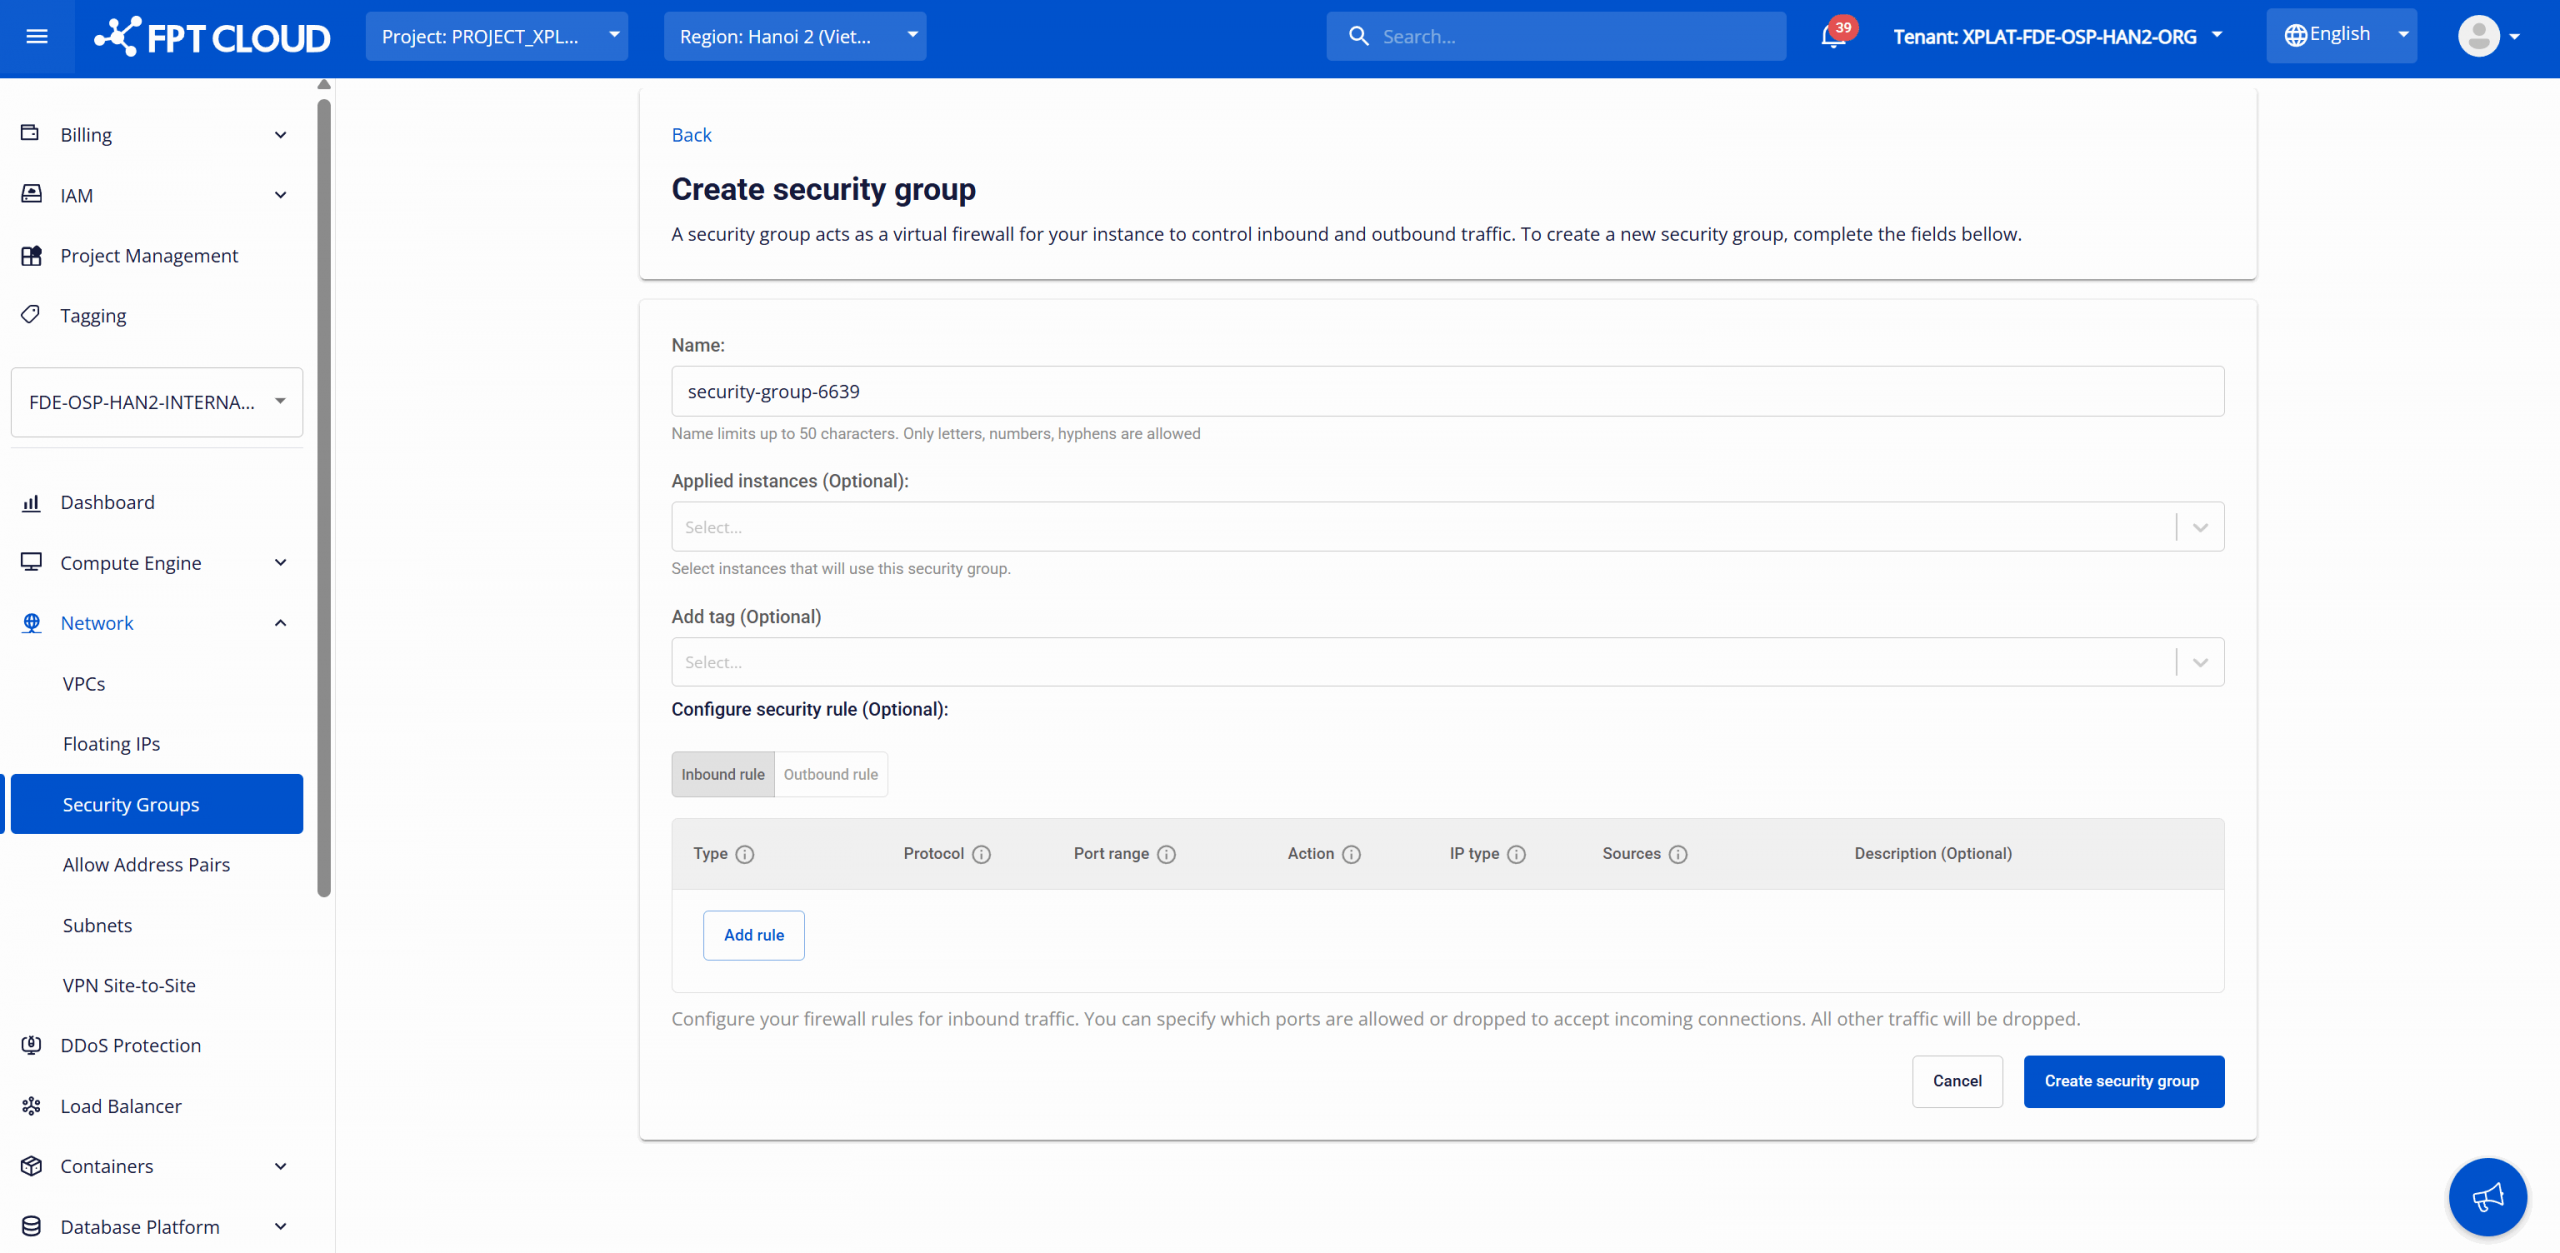
Enter configuration details:
-
Name: Enter a Security Group name for easier management. The name can be up to 50 characters and may contain letters, numbers, and hyphens (-). A default name can be automatically generated by the system.
-
Applied Instances (optional): Select the database instance to which the Security Group will be applied.
-
Add tag (Optional): Assign tags (key-value pairs) to the Security Group for resource classification, cost management, operations, and auditing.
-
Configure security rule (optional): Configure security rules to control inbound and outbound network traffic for the database cluster.
- Inbound rules: Control incoming connections to the database cluster, typically used to allow applications or users to access the database. Allowed IP addresses or CIDR ranges are specified in the Source field.
- Outbound rules: Control outbound connections from the database cluster. In most cases, this configuration is not required for internal-only communication. Destination IP addresses or CIDR ranges are specified in the Destination field.
After entering all required information, select Create security group to complete the creation process.
After successful creation, the new security group will appear in the management list, displaying information such as name, applied nodes, and creation time.
If needed, you can perform the following actions on the created security group:
-
Rename security group: This function allows you to modify the name of the security group. To use it, on the Security Group Management page, select Rename next to the security group you want to modify. Make the changes and click Rename to save.
-
Delete security group: This function allows you to remove unused security groups, keeping the management system clean and accurate. On the Security Group Management page, select Delete next to the group you want to remove. Confirm the action in the warning dialog to complete the deletion. Warning: Deleting a Security Group may disrupt network connectivity for database instances or database clusters associated with it. Once deleted, all related security rules are removed immediately, which may prevent applications from accessing the database or cause loss of connectivity between internal services. Ensure that the Security Group is not associated with any resources before proceeding with deletion.
2. Assign a Floating IP
To enable external (public) access to your database cluster or instance, you must create and assign a Floating IP to the database cluster. A Floating IP is a static public IPv4 address that can be associated with your DBaaS resource without changing other network settings. Assigning it requires that your security group / firewall rules permit the appropriate traffic (ports, protocols) to your database cluster.
Best Practice: Assign a Floating IP only when public access is required. If the database serves internal traffic within a VPC, consider using private static IPs to avoid exposing the service externally.
The steps to assign a Floating IP address are as follows:
Step 1: Access the Floating IP Management page
Log in to the FPT Cloud Portal. After logging successfully, from the main menu, select Network > Floating IPs. The Floating IP Management interface will display the list of existing Floating IPs, along with options to create, or delete a floating IP.
Step 2: Allocate IP address
On the Floating IP Management page, click Allocate IP address. The Allocate IP address popup will appear as follows:
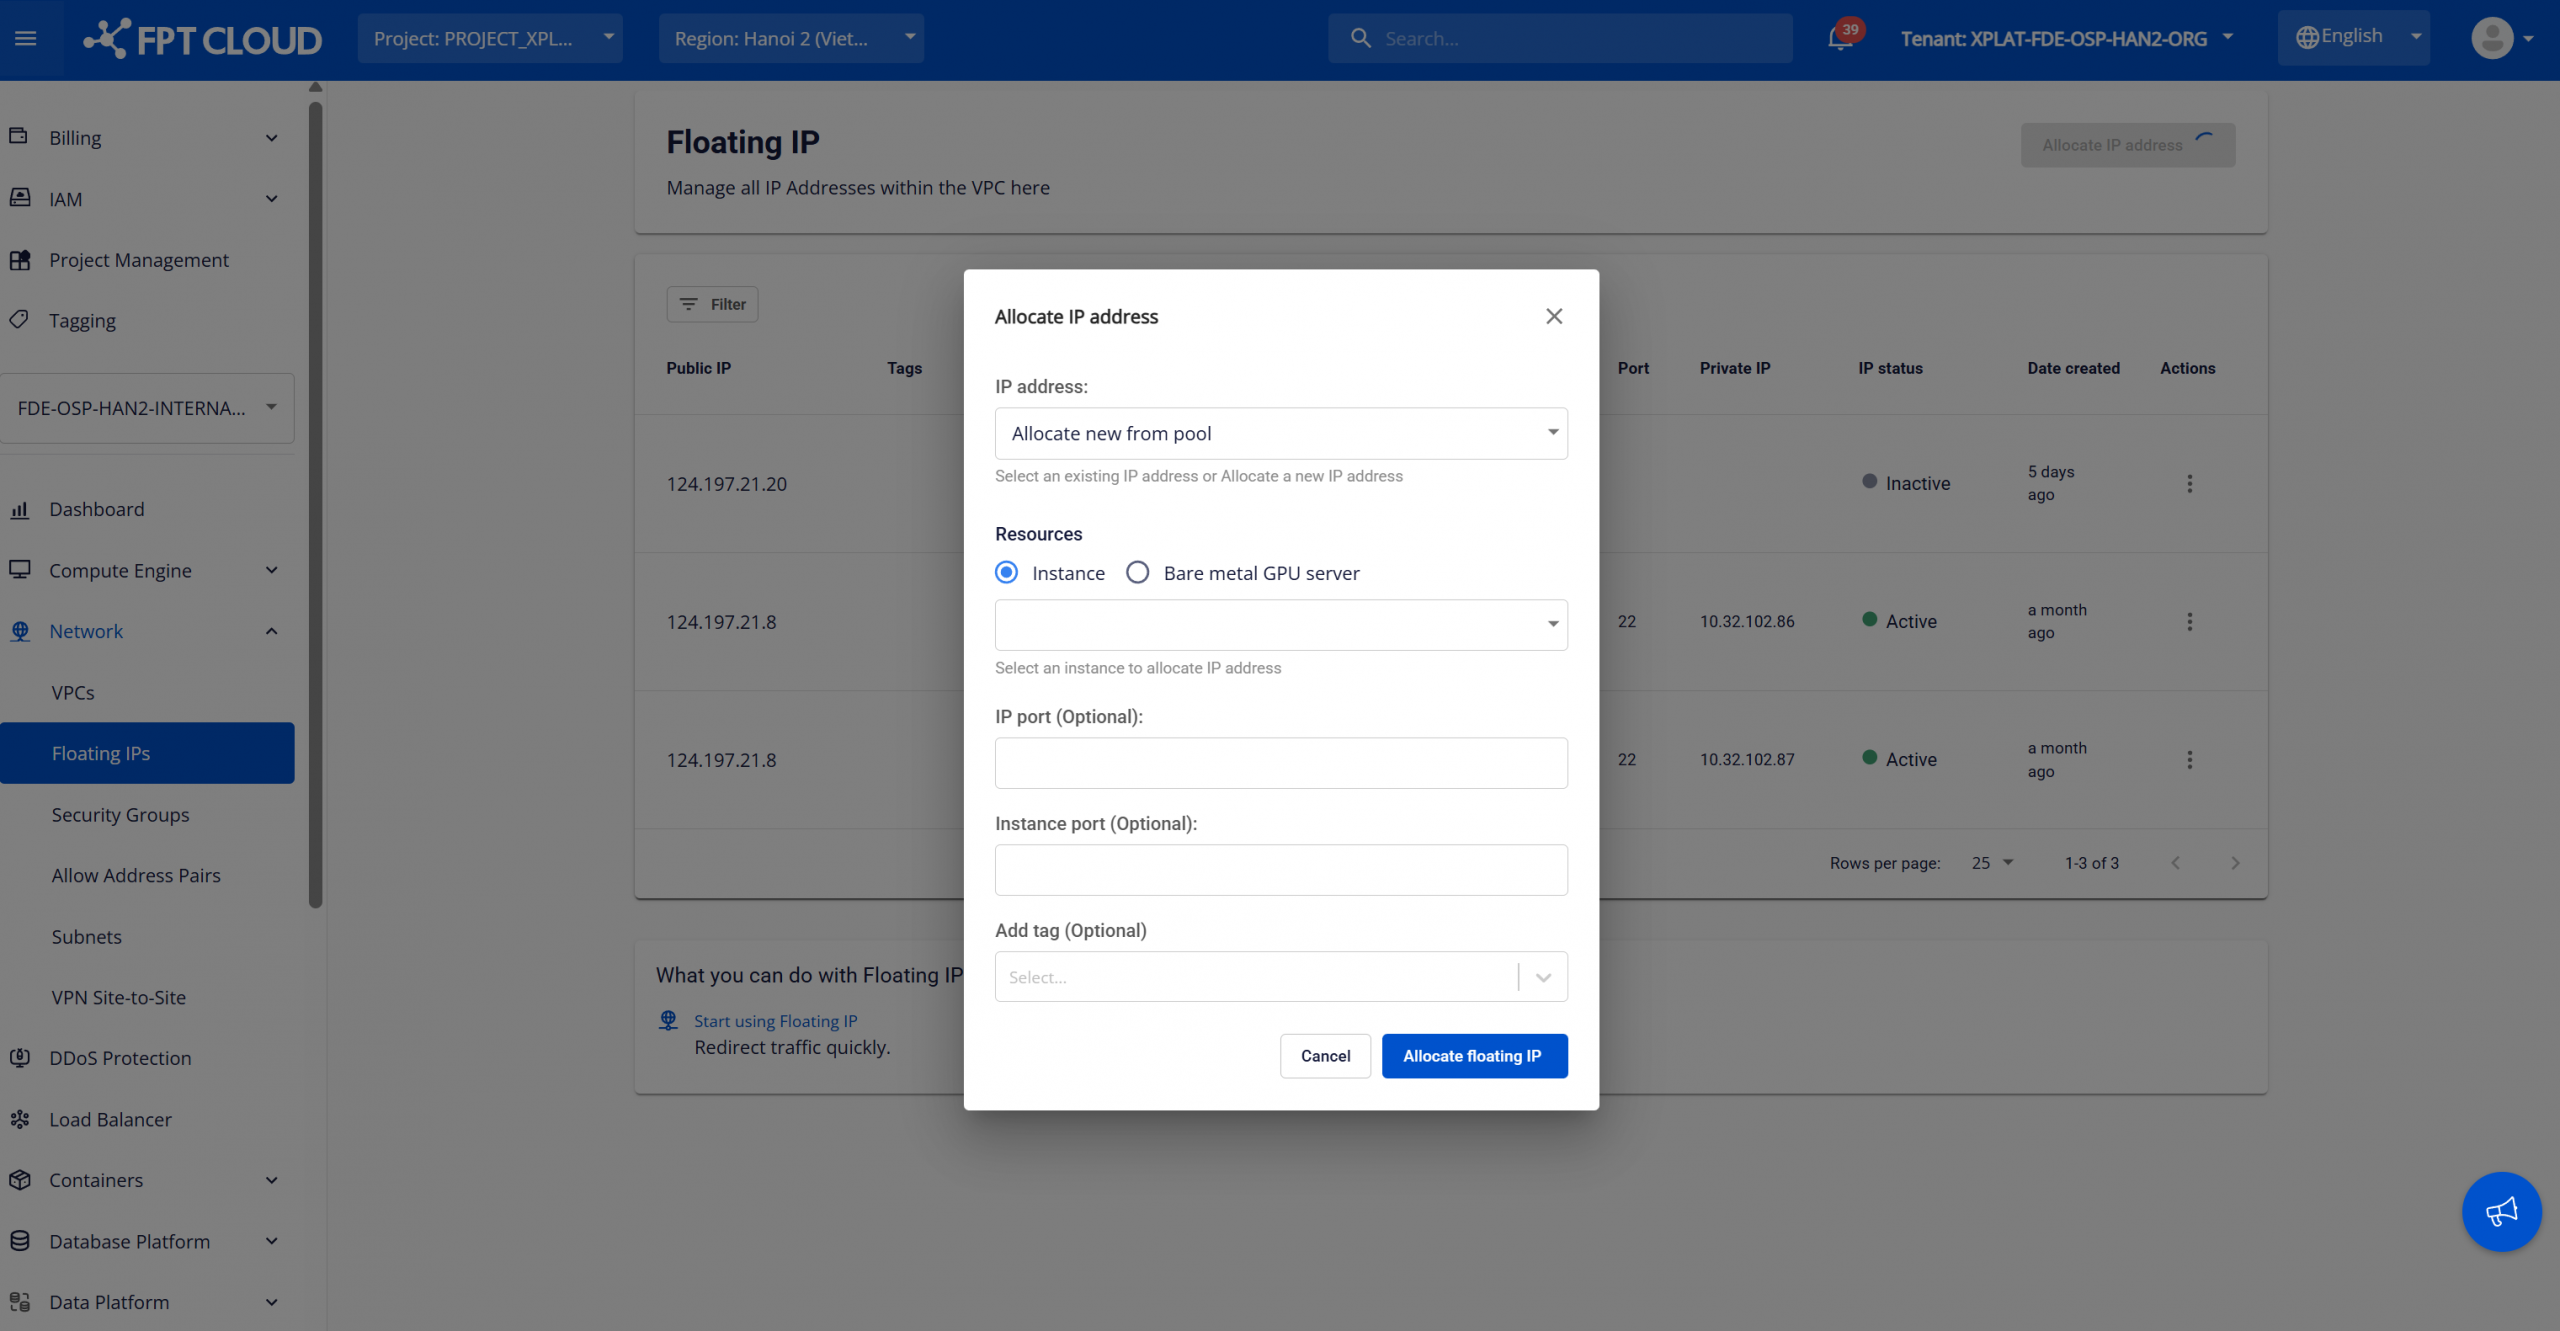
Allocation configurations:
- IP address: Select how you want to obtain the IP address. Two options are available:
- Allocate new from pool: The system automatically allocates a new public Floating IP from the available IP pool.
- Existing IP (if any): Select an existing Floating IP from the predefined list.
- Resources: Select the resource type to associate with the Floating IP. For FPT Database Engine, choose Resource type = Instance and then select the target database instance.
- IP Port (Optional): Specify the public port when configuring port forwarding or custom NAT rules. Leave blank to use the default configuration.
- Instance port (Optional): Specify the private port on the instance to map incoming traffic. Leave blank to use the default configuration.
- Add tag (Optional): Assign tags (key-value pairs) to classify and manage the Floating IP for operations and auditing.
After completing the configuration, click Allocate floating IP to start the allocation process. The new Floating IP appears in the list with “Active” status and is associated with the selected database instance or cluster. You can use this Floating IP to connect to the database externally, provided that the configured security rules and firewall policies allow the traffic.
Release Floating IP:
When the Floating IP is no longer required, select Release IP for the corresponding address and confirm the action in the warning dialog.
Notes & Troubleshooting:
- Ensure that the instance Security Group allows inbound traffic on the required ports (for example, SSH port 22, HTTP port 80, or the relevant database ports).
- If the Floating IP does not function as expected, review the security group inbound rules to ensure the required database ports are open.
3. Connect to the database using a client
After network access is granted (via security group and floating IP), you can connect using your preferred database client (e.g., pgAdmin for PostgreSQL, MySQL Workbench for MySQL).
Step 1: View connection information
Database connection details are displayed on the Database Overview page in the FPT Cloud Portal. To access this page, open the Database list page, then select the database cluster ID to view the details page:
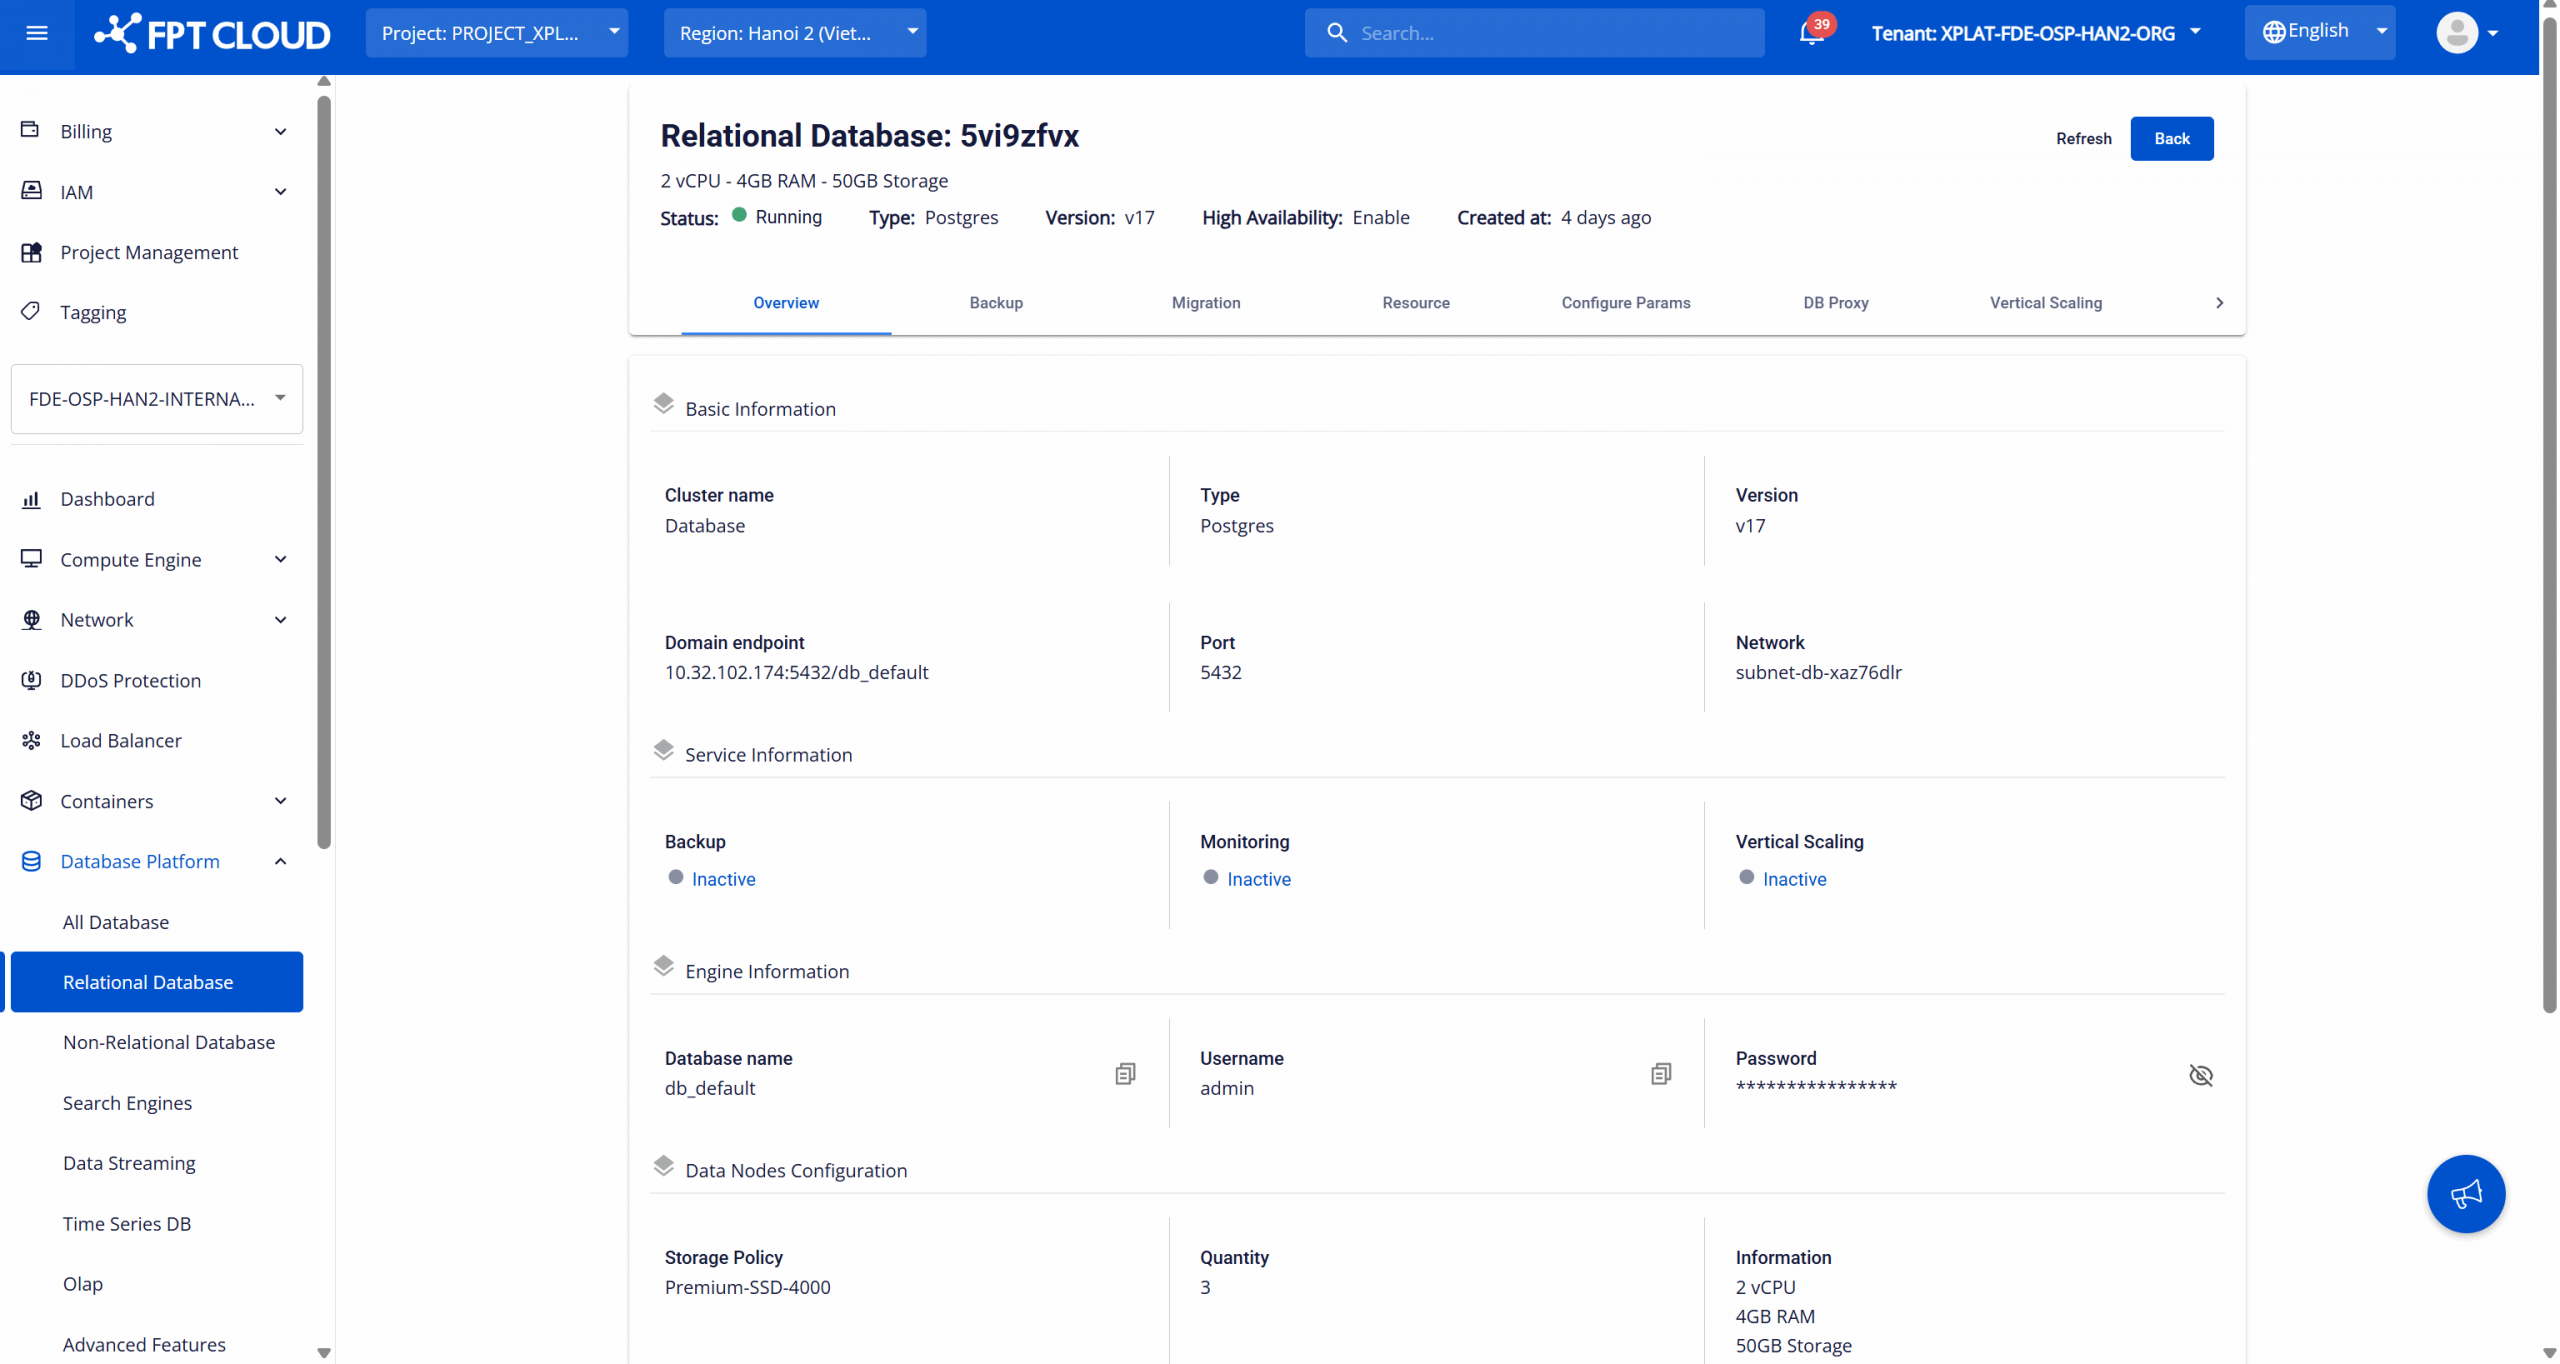
Use the following information to connect to the database:
- Domain endpoint: The endpoint address used to connect to the database cluster.
- Port: The service port on which the database engine is listening.
- Database name: The default database name that was created when provisioning the database cluster.
- Username: The administrative username used to access the default database.
- Password: The password associated with the administrative account.
Step 2: Establish a connection
You can connect to the database cluster using one of the following methods:
- Using a database management tool: Use a database management tool (for example, pgAdmin, MySQL Workbench, SSMS) and provide the endpoint, port, username, password, and database name.
- Using the command-line interface (CLI): Connect directly from a terminal or application server using engine-specific CLI commands.
- Connecting from an application: Use official database drivers for the selected engine and configure the appropriate connection string to connect from your application.
Once the connection is successful, you will see the database structure and can execute queries directly from the client.
Note: Ensure that security groups, firewall rules, and network policies allow access to the database endpoint and port.