- Giới thiệu
-
 Lưu trữ dữ liệu đối tượng không giới hạn và truy xuất dữ liệu liên tục
 Certified DBaaS (cơ sở dữ liệu theo dạng dịch vụ) đầu tiên của MongoDB tại Việt Nam
 Tích hợp với máy chủ ảo dành cho 3D Rendering, AI hay ML
 Nền tảng phân tích dữ liệu đáng tin cậy cho doanh nghiệp và chuyên gia, giúp tối ưu chi phí vận hành lên đến 40% so với giải pháp BI khác.
 Sản phẩm hợp tác giữa FPT Cloud và CyRadar, cung cấp dịch vụ tường lửa với khả năng bảo vệ mạnh mẽ cho các ứng dụng web
 Sản phẩm hợp tác giữa FPT Cloud và CyRadar, dịch vụ cung cấp khả năng rà quét toàn diện, phân tích chi tiết và đánh giá lỗ hổng bảo mật để tăng cường an ninh thông tin cho hệ thống ứng dụng doanh nghiệp
 Sao lưu và khôi phục dữ liệu tức thời, an toàn và toàn vẹn dữ liệu
 Trở thành doanh nghiệp đầu tiên trải nghiệm bộ giải pháp phát triển AI toàn diện, được phát triển trên công nghệ mạnh mẽ bậc nhất từ NVIDIA!
 Giải pháp làm việc từ xa hiệu quả và an toàn cho doanh nghiệp
 Dịch vụ máy chủ ảo tiên tiến với khả năng mở rộng nhanh chóng
 Hiệu năng mạnh mẽ với hạ tầng riêng biệt
Tích hợp với máy chủ ảo dành cho 3D Rendering, AI hay ML
Dịch vụ máy chủ ảo tiết kiệm đến 90% chi phí cho doanh nghiệp
Sao lưu và khôi phục dữ liệu tức thời, an toàn và toàn vẹn dữ liệu
Dịch vụ dự phòng & khôi phục hệ thống nhanh chóng
Lưu trữ khối đa dạng thông lượng và dung lượng cho mọi nhu cầu
Lưu trữ dữ liệu đối tượng không giới hạn và truy xuất dữ liệu liên tục Nâng cao năng lực, tính sẵn sàng của ứng dụng
Sản phẩm hợp tác giữa FPT Cloud và CyRadar, dịch vụ cung cấp khả năng rà quét toàn diện, phân tích chi tiết và đánh giá lỗ hổng bảo mật để tăng cường an ninh thông tin cho hệ thống ứng dụng doanh nghiệp
Sản phẩm hợp tác giữa FPT Cloud và CyRadar, cung cấp dịch vụ tường lửa với khả năng bảo vệ mạnh mẽ cho các ứng dụng web
Dịch vụ tường lửa thông minh cho các ứng dụng web - Giải pháp bảo mật đột phá với sự hợp tác giữa FPT Cloud và Penta Security.
Dịch vụ bảo mật tường lửa thế hệ mới
Lưu trữ, quản lý, và bảo mật các Docker Images
Nền tảng Kubernetes an toàn, bảo mật, ổn định, hiệu năng cao
Nâng cao năng lực, tính sẵn sàng của ứng dụng
Sản phẩm hợp tác giữa FPT Cloud và CyRadar, dịch vụ cung cấp khả năng rà quét toàn diện, phân tích chi tiết và đánh giá lỗ hổng bảo mật để tăng cường an ninh thông tin cho hệ thống ứng dụng doanh nghiệp
Sản phẩm hợp tác giữa FPT Cloud và CyRadar, cung cấp dịch vụ tường lửa với khả năng bảo vệ mạnh mẽ cho các ứng dụng web
Dịch vụ tường lửa thông minh cho các ứng dụng web - Giải pháp bảo mật đột phá với sự hợp tác giữa FPT Cloud và Penta Security.
Dịch vụ bảo mật tường lửa thế hệ mới
Lưu trữ, quản lý, và bảo mật các Docker Images
Nền tảng Kubernetes an toàn, bảo mật, ổn định, hiệu năng cao Tăng tốc phát triển ứng dụng yêu cầu hiệu năng cao bằng dịch vụ Kubernetes tích hợp với vi xử lý cao cấp GPU
Giám sát và triển khai cơ sở dữ liệu như Kafka,..
Tăng tốc phát triển ứng dụng yêu cầu hiệu năng cao bằng dịch vụ Kubernetes tích hợp với vi xử lý cao cấp GPU
Giám sát và triển khai cơ sở dữ liệu như Kafka,..
Certified DBaaS (cơ sở dữ liệu theo dạng dịch vụ) đầu tiên của MongoDB tại Việt Nam
Giám sát và triển khai cơ sở dữ liệu Redis, Cassandra, ...
Giám sát và triển khai cơ sở dữ liệu xử lý phân tích trực tuyến
Giám sát và triển khai cơ sở dữ liệu MySQL, Postgres, SQLserver, MariaDB,...
Giám sát và triển khai cơ sở dữ liệu truy vấn thông tin
Giám sát và triển khai cơ sở dữ liệu chuỗi thời gian
Giám sát hệ thống và tài nguyên toàn diện trên mọi nền tảng Giải pháp quản lý sự cố thông minh
 Dịch vụ cung cấp giải pháp khởi tạo và quản lý FPT ArgoCD được tạo ra từ dự án mã nguồn mở Argo
Nền tảng tự động hoá bảo mật trong quy trình phát triển phần mềm
Dịch vụ cung cấp giải pháp khởi tạo và quản lý FPT ArgoCD được tạo ra từ dự án mã nguồn mở Argo
Nền tảng tự động hoá bảo mật trong quy trình phát triển phần mềm Tăng cường khả năng quản lý tài sản dữ liệu doanh nghiệp
 Quản lý dữ liệu liền mạch & toàn diện
Truy vấn, quản lý, trực quan hóa dữ liệu hiệu quả
Tăng tốc độ xử lý, đảm bảo tính nhất quán cho ứng dụng
Nền tảng phân tích dữ liệu đáng tin cậy cho doanh nghiệp và chuyên gia, giúp tối ưu chi phí vận hành lên đến 40% so với giải pháp BI khác.
Trở thành doanh nghiệp đầu tiên trải nghiệm bộ giải pháp phát triển AI toàn diện, được phát triển trên công nghệ mạnh mẽ bậc nhất từ NVIDIA!
Nền tảng hội thoại thông minh gắn kết khách hàng trên mọi nền tảng
Xác thực nhanh chóng, dễ dàng, tối ưu chi phí
Nâng tầm trải nghiệm khách hàng
Quản lý dữ liệu liền mạch & toàn diện
Truy vấn, quản lý, trực quan hóa dữ liệu hiệu quả
Tăng tốc độ xử lý, đảm bảo tính nhất quán cho ứng dụng
Nền tảng phân tích dữ liệu đáng tin cậy cho doanh nghiệp và chuyên gia, giúp tối ưu chi phí vận hành lên đến 40% so với giải pháp BI khác.
Trở thành doanh nghiệp đầu tiên trải nghiệm bộ giải pháp phát triển AI toàn diện, được phát triển trên công nghệ mạnh mẽ bậc nhất từ NVIDIA!
Nền tảng hội thoại thông minh gắn kết khách hàng trên mọi nền tảng
Xác thực nhanh chóng, dễ dàng, tối ưu chi phí
Nâng tầm trải nghiệm khách hàng
Trích xuất dữ liệu vượt mọi giới hạn
Chuyển văn bản thành giọng nói tiếng Việt với ngữ điệu tự nhiên.
- Bảng giá
- Sự kiện
VPN Site-to-Site
-
 Overviews
-
 Initial Setup
-
 Hướng dẫn nhanh (Quick Starts)
-
Hướng dẫn chi tiết (Tutorials)
-
 FAQs
FAQs
-
 VPN Site to Site (new version)
-
Cấu hình thiết bị VPN phổ biến
- Cấu hình VPN Site-to-Site với Palo Alto
- Cấu hình VPN Site-to-Site với PfSense
- Cấu hình VPN Site-to-Site với strongSwan
- Cấu hình VPN Site-to-Site với Vyos 1.5
- Cấu hình VPN Site-to-Site với CheckPoint R81.20
- Cấu hình kết nối VPN Site-to-Site giữa FCI Cloud và AWS (Transit-Gateway)
- Cấu hình kết nối VPN Site-to-Site giữa FCI Cloud và AWS (Virtual private gateways)
- Cấu hình kết nối VPN Site-to-Site giữa Portal OpenStack và VMware
- Cấu hình VPN Site-to-Site với Fortigate
- Cấu hình VPN Site-to-Site với các thiết bị NAT IP
-
Quản lý & thao tác VPN Connection
- Hướng dẫn khởi tạo VPN Connection
- Hướng dẫn chỉnh sửa VPN Connection
- Hướng dẫn enable/disable VPN Connection
- Hướng dẫn xóa VPN Connection
- Hướng dẫn download file config VPN
- Hướng dẫn kết nối thiết bị Behind NAT IP
- Hướng dẫn tạo Customer gateway
- Hướng dẫn chỉnh sửa Customer gateway
- Hướng dẫn xoá Customer gateway
- Hướng dẫn phân quyền sử dụng dịch vụ
- Hướng dẫn cài đặt cảnh báo thông qua dịch vụ Cloud Guard
- Theo dõi dịch vụ thông qua tính năng logging
- Theo dõi dịch vụ thông qua tính năng monitoring
- Câu hỏi thường gặp (FAQs)
-
Cấu hình thiết bị VPN phổ biến
Bài viết này hướng dẫn build thiết bị Router để đấu nối VPN_S2S với dịch vụ VPN Site-to-site của FPT Smart Cloud.
Cần đảm bảo các điều kiện sau:
- VPNAAS trên trang Portal
- Ubuntu 20.04 đã được download và cài đặt : strongSwan 5.9.14
- Public IP, giảm độ phức tạp thì gắn trực tiếp vào VM, không dùng Floating IP
- 1 VM Pfsense để phục vụ debug (Optional )
Bước 1: Build strongSwan
* Lưu ý: Để build strongSwan, chỉ tiến hành chọn cách 1.1 hoặc cách 1.2
1.1: Build strongSwan 5.9.14 from source (tiến tới làm chủ công nghệ)
- Trên Horizon ta tiến hành tạo VM từ image với các thông số keypair của user và network provider bất kì.
- Cài đặt các gói sau:
apt-get update
apt-get install vim git wget traceroute ngrep net-tool gcc g++ libgmp-dev build-essential devscripts debhelper dh-make autoconf automake libtool checkinstall nmap curl
- Download source strongSwan từ link sau:
wget https://github.com/strongswan/strongswan/releases/download/5.9.14/strongswan-5.9.14.tar.gz
tar -xzvf strongswan-5.9.14.tar.gz
cd strongswan-5.9.14/
- Tiến hành configure và make file cho source code:
./configure --prefix=/usr --sysconfdir=/etc
make
checkinstall
1.2: Cài đặt strongSwan từ Repo
apt-get update
apt install strongswan strongswan-pki
1.2: Cài đặt strongSwan từ Repo
apt-get update
apt install strongswan strongswan-pki
Bước 2: Cấu hình cho VPN Site-to-Site
Truy cập và tạo VPN Site To Site trên trang https://console.fptcloud.com/
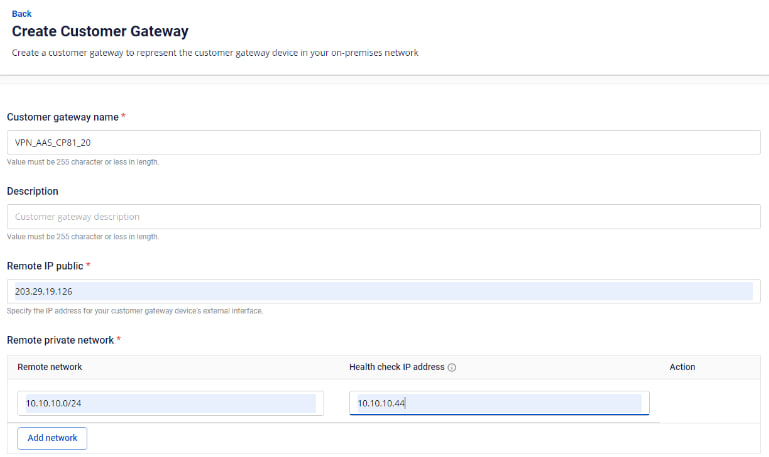
- Tạo Customer Gateway:
+Remote private network: dãy Lan Subnet cần peering của Vyos
+Remote IP public: IP public của Vyos
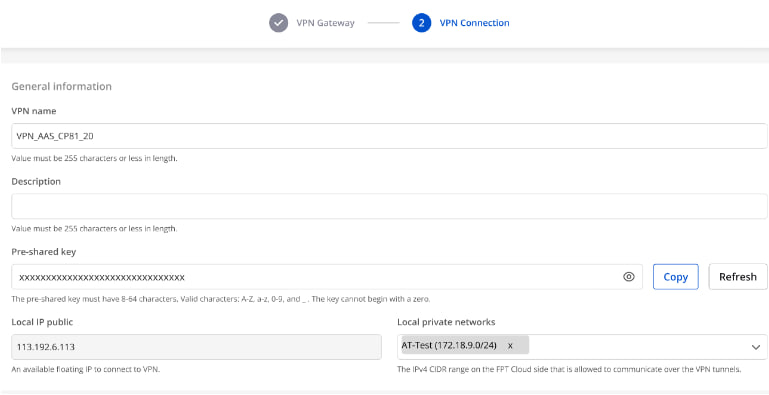
- Tạo VPN Connection:
Thông số của VPN Connection sẽ bao gồm 3 mục chính:
- General information (chứa các thông tin chung của kết nối VPN)
- Remote VPN Information (chứa các thông tin mã hóa và thông tin của quý khách hàng)
- Dead Peer Detection (số lần hệ thống tự động retry kết nối khi bị vấn đề)
Phần 1: General information
Phần 2: Remote VPN information
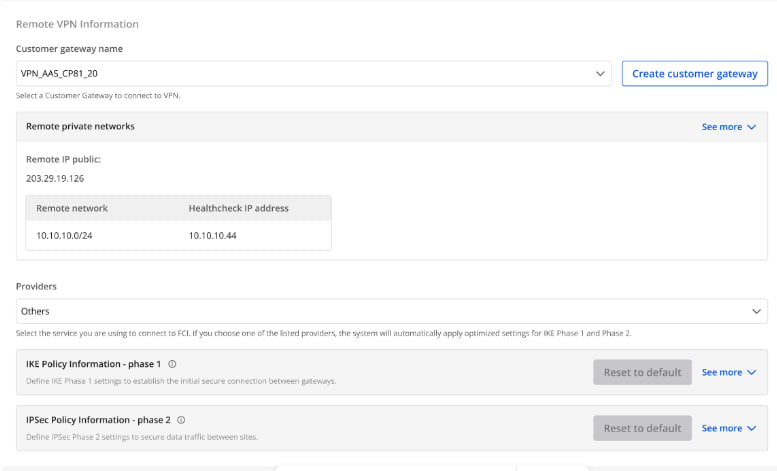
Quý khách hàng lựa chọn Providers = “others" sau đó làm theo các bước sau:
- Bước 1: Điền providers name = "StrongSwan"
- Bước 2: Điền thông tin cho IKE và IPSec cụ thể như sau:
Đối với IKE:
- Authorization algorithm: sha256
- Encryption algorithm: aes 256
- IKE version: ikev2
- DH group: group14
- Lifetime: 3600 seconds
- Phase1 negotiation mode: main
Đối với IPsec:
- Authorization algorithm: sha256
- Encryption algorithm: aes 256
- Encapsulation mode: tunnel
- Transform protocol: esp
- Perfect Forward Secrecy (PFS): group14
- Lifetime: 3600 seconds
Phần 3: Dead peer detection
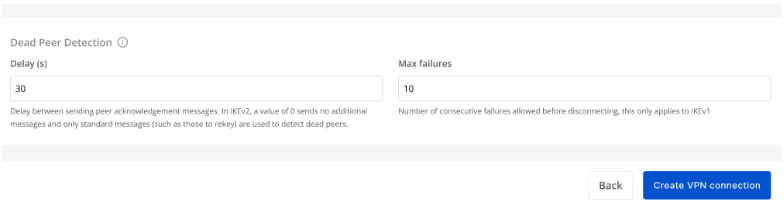
Sau khi điền đầy đủ thông tin, quý khách hàng vui lòng chọn “Create VPN Connection”
Bước 3: Cấu hình cho StrongSwan
- Đăng nhập ssh vào Ubuntu theo key đã tạo ở trên
- Đăng nhập ssh theo địa chỉ IP VM đã tạo với user là: "ubuntu"
Cấu hình StrongSwan VPN
Chạy các lệnh sau( thay các tham số vào):
Kiểm tra phiên bản strongSwan
swanctl -v
edit file sau /etc/ipsec.conf với mẫu:
config setup
        charondebug="all"
        uniqueids=yes

conn myvpn
    type=tunnel
    auto=start
    keyexchange=ikev2
    ike=aes256-sha256-modp2048
    keyingtries=%forever
    lifetime=3600s
    dpddelay=30s
    dpdtimeout=120s
    dpdaction=restart
    esp=aes256-sha256-modp2048
    left=x.x.x.x    //IP của StrongSwan
    leftsubnet=x.x.x.x/24 //Subnet của StrongSwan
    leftauth=psk
    right=x.x.x.x    // IP của đối tác
    rightsubnet=x.x.x.x/24 //Subnet của đối tác
    rightauth=psk
    authby=secret
    auto=start
Edit file sau /etc/ipsec.secret với mẫu:
# This file holds shared secrets or RSA private keys for authentication.
x.x.x.x x.x.x.x : PSK "xxxxxxxxxxxxxxxxxxxxxxxxxxxxxxxxxxx"   // Pre-shared key
# RSA private key for this host, authenticating it to any other host
# which knows the public part.- Lưu ý:
- StrongSwan là một chương trình chạy nền trên Ubuntu, cần thêm enable multi-network trên CPU để đạt hiệu năng tốt nhất.
- StrongSwan là một chương trình chạy nền trên Ubuntu, cần thêm enable firewall và routing để có thể kết nối.
- Nếu lab trên Openstack của FCI thì phải add Static route trên router với Destination là IP của đối tác và nexthop là IP LAN của StrongSwan.